
Knowledge SuperBox S8, Knowledge SuperBox
SuperBox S8 Plus Unboxing and Setup Guide: What’s in the Box and How to Get Started





The SuperBox S8 Plus is a mid-range model in the S8 Series, built for people who want the newer S8 interface, 64GB of internal storage, and features such as built-in recording and supported Multi-Viewing. Getting started does not require special tools: unpack the device, connect it to a compatible TV, connect it to the internet, and follow the on-screen setup.
This guide walks through those steps in the order that makes setup easiest. It covers what to check in the package, how to connect the S8 Plus correctly, how to choose Wi-Fi or Ethernet, how to pair the remote, and what to do if setup does not go as expected. It also explains what is specific to the S8 Plus so you can avoid mixing its accessories or ports with those of another S8 model.
Quick answer: The SuperBox S8 Plus package shown in the unboxing includes the S8 Plus box, voice-command remote, power adapter, HDMI cable, and user guide. Connect the box to your TV with HDMI, power it with the supplied adapter, select that HDMI input on the TV, connect to Wi-Fi or Ethernet, and pair the remote by following the on-screen prompt.
Model-specific connection note: The S8 Plus uses a round DC power connector and has one USB 2.0 port plus one USB 3.0 port. The S8 Pro, S8 Max, and S8 Ultra use Type-C power and have a different USB port combination. Check the label and the port layout on your own unit before plugging in accessories.
What’s in the SuperBox S8 Plus Box?
Before connecting anything, take out the contents and lay them on a clear surface. The clip shows the blue S8 Plus streaming box, a voice-command remote, a power adapter, an HDMI cable, and a printed user guide. The device has two external antennas attached at the back. Check that the accessories are present and that the box and cables have no visible shipping damage.
| Item | What it’s for |
|---|---|
| SuperBox S8 Plus | The media box that connects to your TV and home network |
| Voice-command remote | Navigates the home screen and supports voice input |
| Power adapter | Supplies power through the S8 Plus’s round DC power socket |
| HDMI cable | Carries picture and sound from the box to a compatible TV |
| User guide | Provides quick reference information for setup and operation |
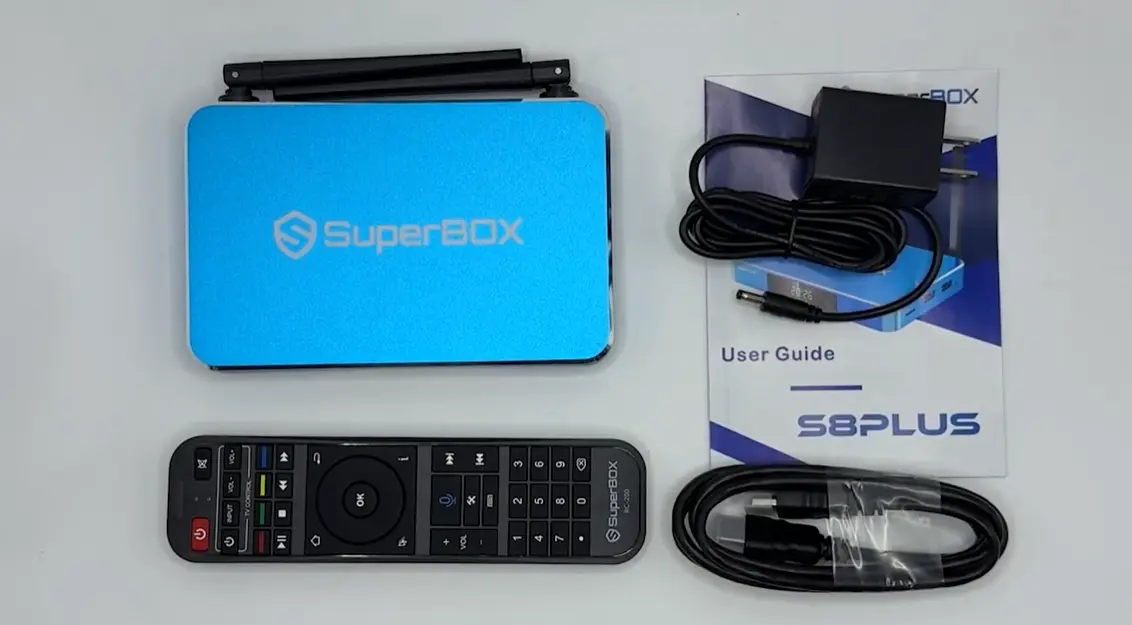
If an item is missing or damaged, photograph the box label and the contents and contact the retailer before setup. Keep the packaging and accessories until you have confirmed that the device powers on and connects successfully.
Identify the S8 Plus before plugging it in
S8 models share the same generation name and some features, but their connection layouts are not identical. The current S8 comparison identifies the Plus by 4GB RAM, 64GB internal storage, USB 2.0 + USB 3.0, and a round power connector.
Do not rely on a generic port illustration or assume that a cable fits because it looks similar. In particular, do not try to power the S8 Plus from a USB-C socket: it uses the round DC adapter supplied for this model. Using the correct adapter avoids a connection mismatch and helps protect the device.
The product package and footage also show feature callouts such as Wi-Fi 6, Gigabit Ethernet, H.265, and 6K decoding capability. These are device specifications, not a guarantee that every program will display in 6K. The final picture depends on the source, app, HDMI connection, TV, and selected output settings.
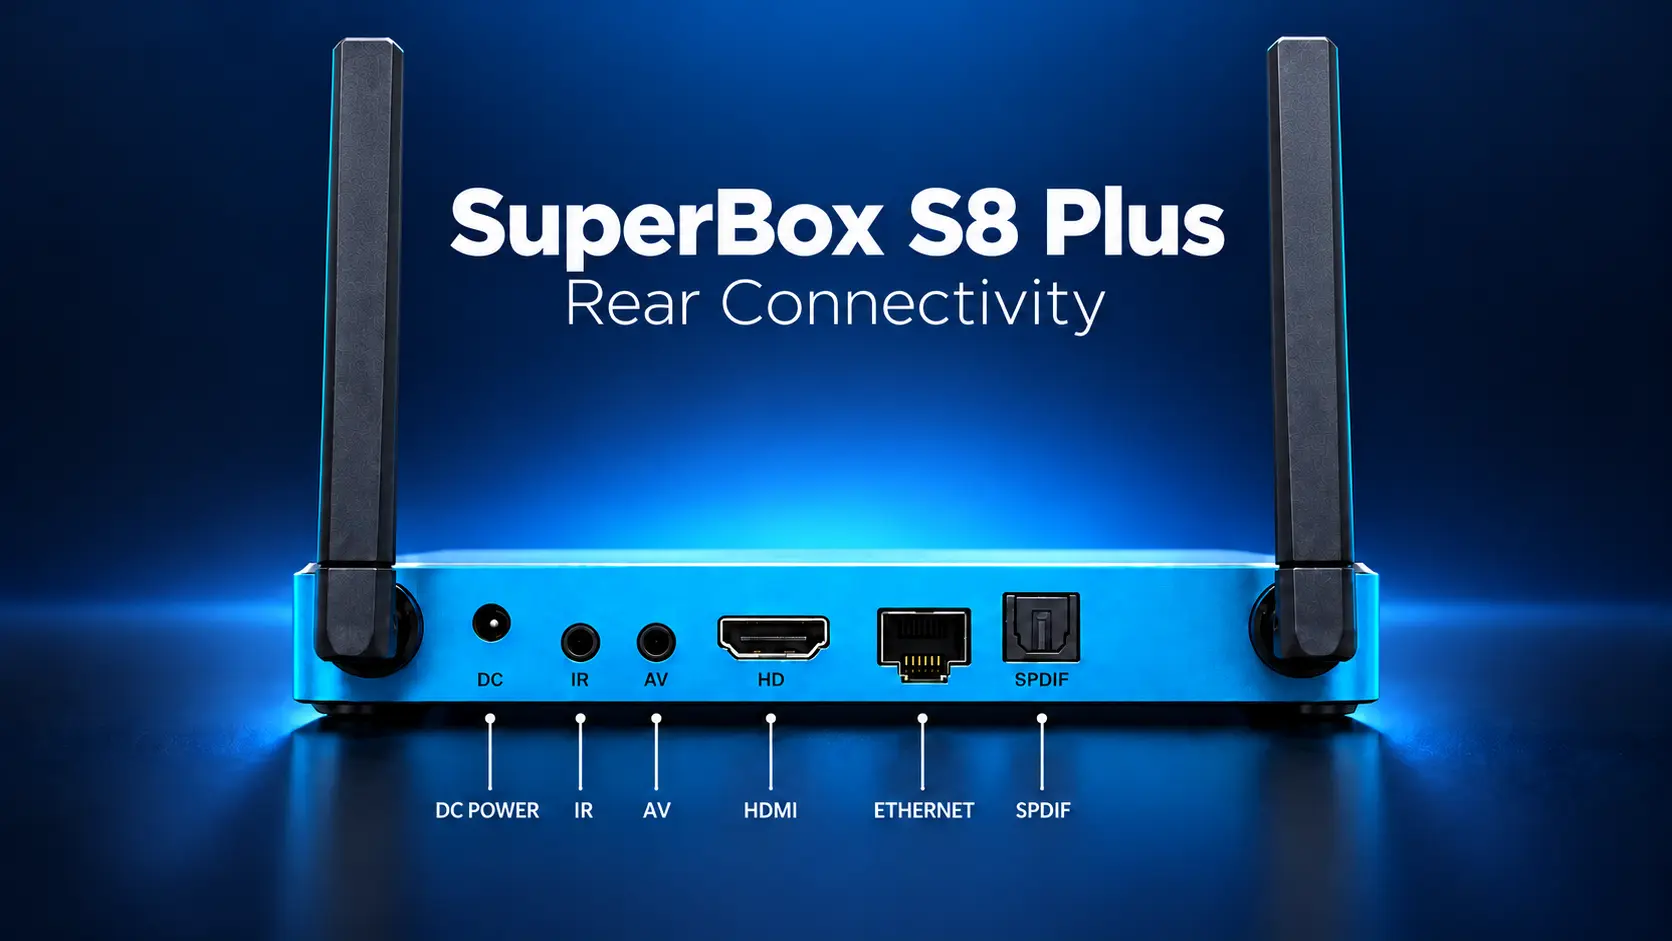
Before You Connect the S8 Plus
Choose a stable, open spot near the TV and within reach of your home router or Wi-Fi signal. Leave room around the box and avoid placing objects directly over the antennas or covering the device. The two external antennas are part of the wireless design; position them so they are not pressed against the television or trapped behind dense objects.
You will need:
- A television or display with an available HDMI input.
- The HDMI cable supplied with the box, or a compatible HDMI cable.
- The power adapter supplied for the S8 Plus.
- A working internet connection for online apps and services.
- Your Wi-Fi network name and password if you plan to connect wirelessly.
If your router is close to the TV stand, you can use Ethernet instead of Wi-Fi. The S8 Plus supports Wi-Fi 6 and wired Gigabit Ethernet. Your real-world speed depends on your network, content source, and service. For the full walkthrough, see How to Connect SuperBox S8 to Wi-Fi or Ethernet.
How to Set Up the SuperBox S8 Plus
Follow these steps in sequence. Connecting the HDMI cable before selecting the TV input makes it easier to confirm that the picture appears on the correct source.
Step 1: Connect the HDMI cable to the TV
With the TV and box off, connect the HDMI cable from an available TV input to the S8 Plus HDMI port. Note the input number (such as HDMI 1) for the next step. Seat both ends gently; do not force the connector.
Step 2: Connect the supplied power adapter
Connect the supplied adapter’s round DC plug to the S8 Plus, then plug the adapter into a wall outlet. Use the power supply provided for this model; a plug that fits does not by itself prove another adapter is compatible. Avoid pinching or pulling the cable tight.
Step 3: Turn on the TV and select the correct HDMI source
Power on the TV and choose the HDMI input used in Step 1. If “No Signal” appears, confirm the selected input and reseat the HDMI cable. If necessary, try another TV HDMI port.
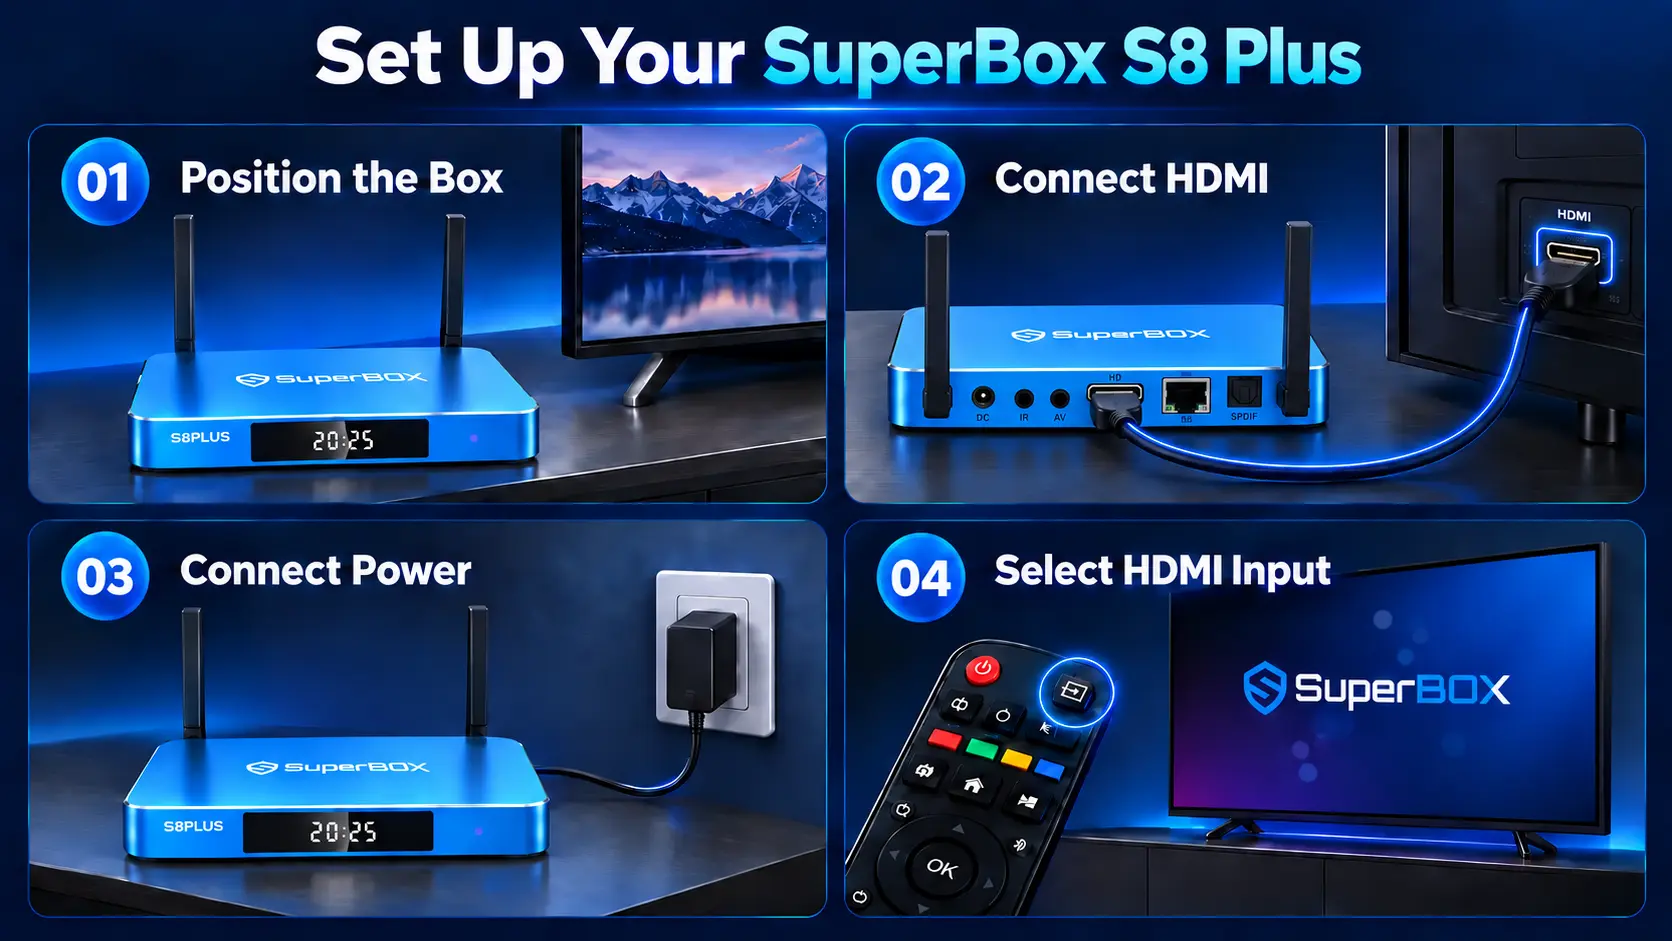
Step 4: Connect the S8 Plus to the internet
At the network step, choose one of the available connection methods:
Wi-Fi: Select your wireless network from the list, enter its password, and choose Connect. Double-check the spelling and capitalization if the password is rejected. Wait for the setup screen to confirm the connection before moving on.
Ethernet: Connect an Ethernet cable from the S8 Plus’s LAN port to an available port on your router. Select the wired option if the setup screen asks for the network type. Ethernet can be convenient when the router is nearby and you prefer a wired link.
Wait for the setup screen to confirm the connection before continuing. If your network is missing, rescan and check the router. If Wi-Fi still will not connect, move the box closer to the router or try Ethernet.
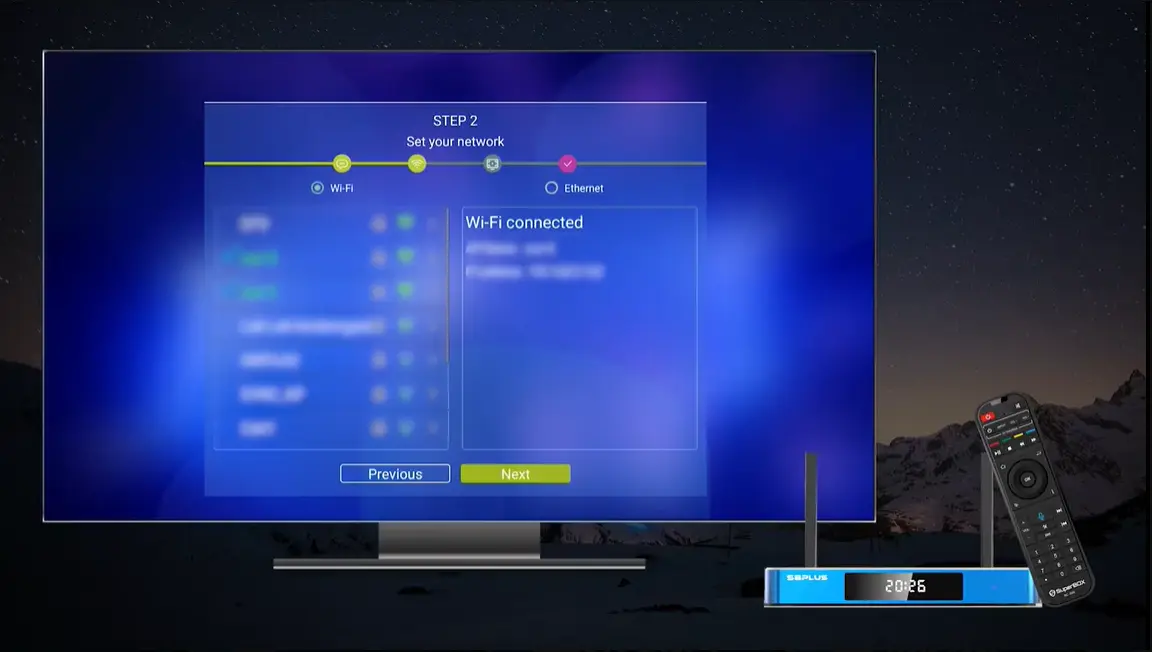
Step 5: Pair the voice-command remote
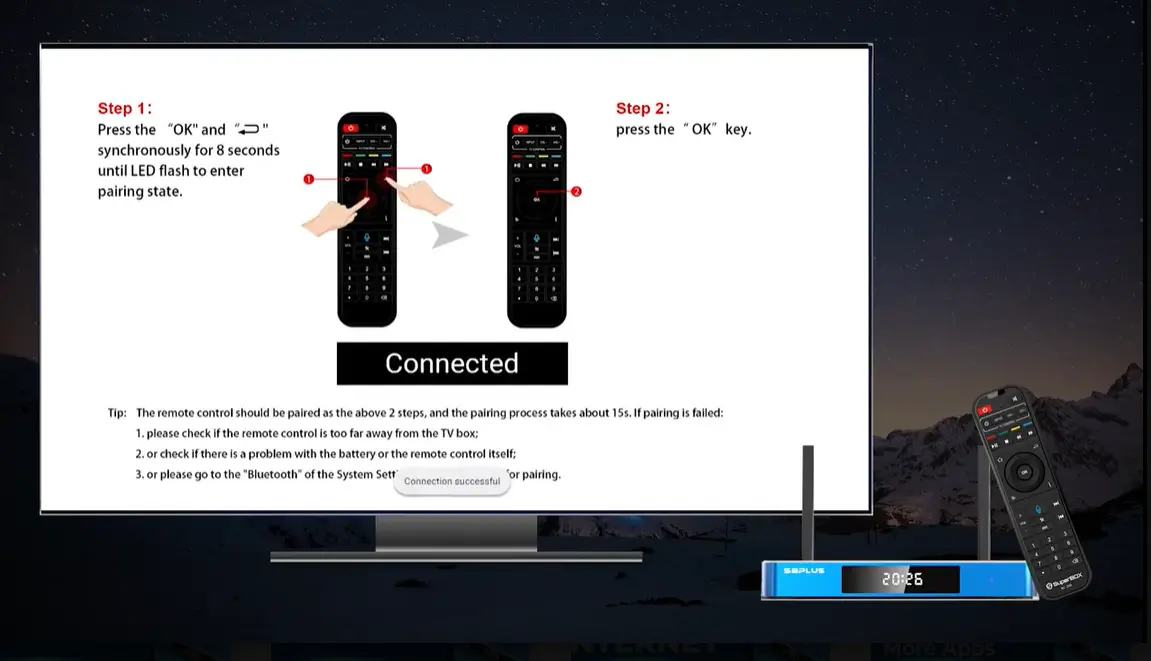
The S8 Plus remote is used to move through setup and the home screen. If the pairing prompt appears, keep the remote near the box and follow the on-screen instructions. In the supplied setup demonstration, the remote pairing process uses the OK and Return/Back buttons together: hold them for about eight seconds until the remote’s LED flashes, then press OK to start the search. Wait for the on-screen pairing confirmation.
Button labels and screen prompts can vary by remote version or software build. If the prompt on your screen differs, follow the instructions displayed by your device. Do not keep repeating the pairing combination if the remote is already responding normally.
If the remote does not pair on the first attempt, check the battery direction, move it closer, and retry the on-screen pairing steps. Make sure OK and Return/Back are held together until the indicator flashes. For a complete troubleshooting walkthrough, see How to Pair a SuperBox S8 Remote.
Step 6: Finish setup and reach the S8 home screen
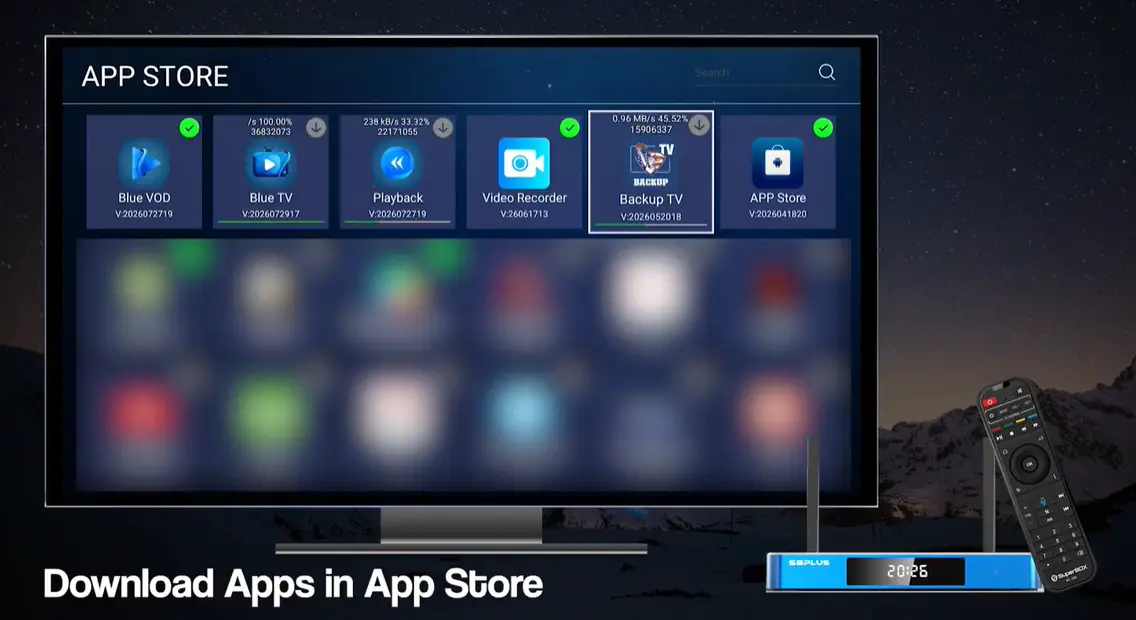
After internet and remote setup are complete, go to the App Store tile on the S8 home interface. When opening the store, read the displayed disclaimer and choose the on-screen confirmation button to continue. The store view in the setup shows dedicated tiles for apps such as Blue TV, Blue VOD, Playback, Video Recorder, and Backup TV.
Select an app tile to view its available action. If it is not already installed, choose the install or download option and wait for the progress indicator to finish. Avoid interrupting the installation by unplugging the box or switching off the TV before the download completes. When installation is done, open the app from its tile or return to the home screen and select it there.
Install only the apps you plan to use first. This makes it easier to confirm each one opens properly and avoids downloading several apps at once while you are still checking the internet connection. The S8 Plus shown has 64GB of internal storage, but installed apps, system data, and recordings all use available space. Keep storage in mind if you plan to save content locally.
The app list and available functions may depend on software version and region. If an app is not visible, confirm the internet connection and check the SuperBox App Store. See the step-by-step guide to install Blue TV, Blue VOD, Playback, and other apps on SuperBox S8. Install apps only from the device’s supported app store or sources you recognize.
What to Try First on the S8 Plus
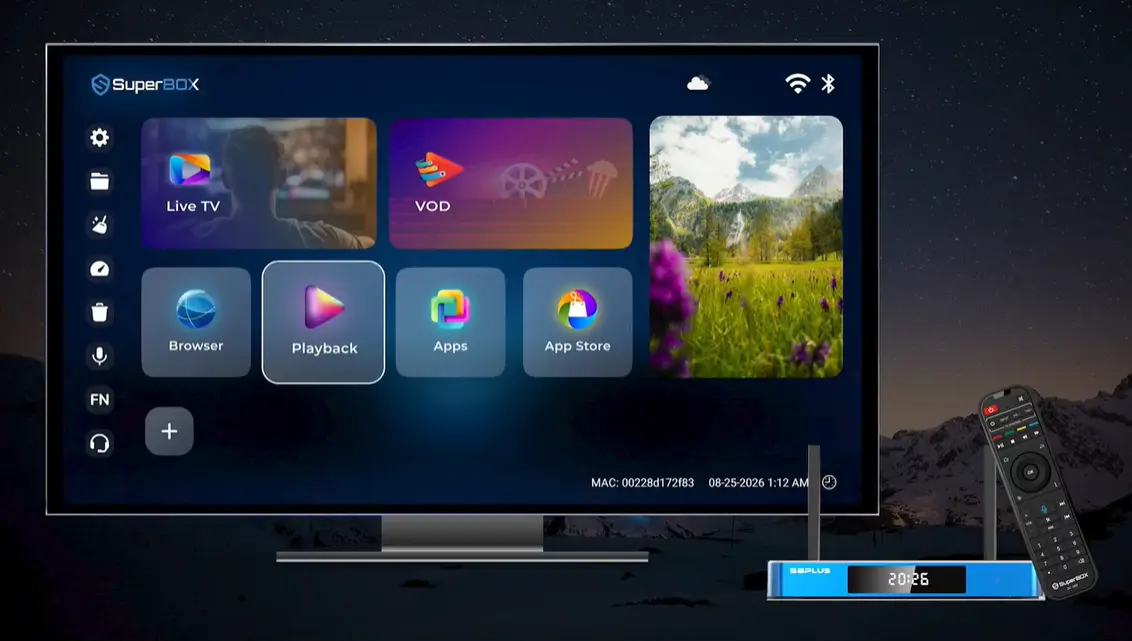
After the first boot, check that the essentials work before customizing the device. Open the main app area, confirm that the box is online, and verify that the remote can navigate between tiles. If your intended feature depends on a specific app or channel, open that feature and confirm that it is available to you; availability can depend on service, region, software version, and content source.
Make the home screen useful
The redesigned S8 interface is intended to make everyday navigation more direct. Add compatible favorite apps to Quick Access if that option appears in your software version.
Know the S8 Plus’s place in the S8 lineup
The S8 Plus is the 64GB mid-tier choice. Like Pro, Multi-Viewing is listed for supported PPV and ESPN channels; unlike Max and Ultra, Plus is not listed with the NFL app or full-channel Multi-Viewing. Only Ultra is listed with a backlit remote. The S8 comparison lists built-in recording, Blue TV, Blue VOD, Playback, Backup TV, and voice command across all four models.
| S8 model | Internal storage | USB ports | Power input | Multi-Viewing | NFL app | Backlit remote |
|---|---|---|---|---|---|---|
| S8 Pro | 32GB | USB-C + USB 3.0 | Type-C | PPV + ESPN | No | No |
| S8 Plus | 64GB | USB 2.0 + USB 3.0 | Round plug | PPV + ESPN | No | No |
| S8 Max | 64GB | USB-C + USB 3.0 | Type-C | Full supported channels | Yes | No |
| S8 Ultra | 128GB | USB-C + USB 3.0 | Type-C | Full supported channels | Yes | Yes |
All four S8 models list 4GB RAM and support the core S8 apps and built-in recording. Choose by storage, model-specific apps and Multi-Viewing support, remote backlighting, and port layout. For a fuller feature breakdown, use our SuperBox S8 Pro vs Plus vs Max vs Ultra comparison guide.
Explore recording and playback carefully
Built-in recording is listed for the S8 Plus. Availability depends on the app and program, and recordings use local storage shared with apps and other files. Our SuperBox S8 Recorder App guide explains the recording workflow and storage checks. Playback is separate: eligible programs may be replayable for a limited period, while recording saves supported programs locally. Learn how it works in the SuperBox S8 Playback guide. Check on-screen availability for each program.
Troubleshooting: SuperBox S8 Plus Setup Problems
The TV says “No Signal”
Confirm the TV is on the connected HDMI input, reseat the cable, and try another HDMI port. Check the supplied round-plug power adapter and outlet.
The Wi-Fi network is missing
Rescan and confirm the router is on. Move the box closer to the router or use Ethernet to isolate a Wi-Fi issue.
The Wi-Fi password is rejected
Re-enter the password carefully, including uppercase letters and special characters. Avoid sharing screenshots that reveal it.
The remote does not respond
Check battery orientation, keep the remote close, and repeat the on-screen pairing procedure. Test voice input in a compatible search field.
The picture appears soft or does not look like 4K
Resolution depends on the source, app, HDMI connection, TV, and display settings. H.265 decoding capability does not guarantee every program is delivered at that resolution.
The box connects, but an app or program does not load
Confirm the network, then retry. If other apps work, note the affected app, on-screen message, and steps tried before contacting support; availability may depend on region and software version. For cache cleanup or support options in the new S8 interface, see Clear Cache on SuperBox S8 and Contact Customer Service.
Frequently Asked Questions
What comes with the SuperBox S8 Plus?
The unboxing shows the S8 Plus box, voice-command remote, round-plug power adapter, HDMI cable, and user guide. Contents can vary by region or production batch, so check the items in your own package.
How do I set up the SuperBox S8 Plus?
Connect it to your TV with HDMI, connect the supplied power adapter, select the matching TV input, join Wi-Fi or connect Ethernet, and complete the on-screen prompts. Pair the remote when requested.
Does the SuperBox S8 Plus use USB-C power?
No. The S8 Plus uses a round DC power connector. The current S8 comparison lists Type-C power for S8 Pro, S8 Max, and S8 Ultra. Use the power adapter supplied for your exact model.
What USB ports does the S8 Plus have?
The current model specification lists one USB 2.0 port and one USB 3.0 port. Check your device’s actual port labels before connecting accessories.
How do I pair the S8 Plus remote?
Follow the prompt shown on the box. In the pairing demonstration, holding OK and Return/Back for about eight seconds until the LED flashes enters pairing mode; press OK when prompted to search. Follow the screen if your software or remote displays different instructions.
Does the S8 Plus have a backlit remote?
The current S8 comparison lists voice command on all four models and backlighting only on S8 Ultra. S8 Plus has voice control but is not listed with backlit buttons.
Can I connect the S8 Plus with Ethernet?
Yes. It supports wired Gigabit Ethernet as well as Wi-Fi 6. Use Ethernet when you prefer a direct cable connection and have a network cable available near the TV.
Does the S8 Plus support recording?
Built-in recording is listed for the S8 Series, including the Plus. Recording depends on app and program support, and local files use the device’s available storage.
Is the S8 Plus a better choice than the S8 Max?
It depends on what you need. Both list 4GB RAM and 64GB storage, but Max adds the NFL app and broader Multi-Viewing support; Plus has USB 2.0 + USB 3.0 and round-plug power, whereas Max uses USB-C + USB 3.0 and Type-C power. Compare the current model page and supported features before deciding.
Final Setup Checklist
- Confirm the package contains the S8 Plus, remote, round-plug adapter, HDMI cable, and guide.
- Connect HDMI to the TV and note the input number.
- Use the S8 Plus’s supplied round DC power adapter.
- Select the matching HDMI source on the TV.
- Connect to Wi-Fi or Ethernet and wait for confirmation.
- Pair the voice remote when prompted.
- Open the home interface and confirm the apps and remote respond.
- Save the packaging and order details until the setup is confirmed.
A careful first setup takes only a few connections and a short on-screen network step. The main detail to remember is model-specific: the SuperBox S8 Plus uses round-plug power and USB 2.0 + USB 3.0. Once HDMI, power, internet, and remote pairing are in place, you can explore the redesigned S8 interface and decide which supported features fit your household.
Why Buy the SuperBox S8 Plus from SuperBox TV Box Store?
If you are choosing a device, SuperBox TV Box Store lists the S8 Series, including the S8 Plus. Check the live product listing for current configuration, price, stock, package details, and terms; availability can change.
SuperBox TV Box Store identifies itself as an authorized online SuperBox retailer and publishes contacts for order questions and technical support. Review its current warranty, return, and shipping terms, and keep your order confirmation. That gives you a clear store contact for model-selection questions before purchase and setup help after delivery.
Choose the model that fits your setup. Compare storage, remote, ports, and live price; ask the shop if you are unsure whether a feature or accessory applies to your model.
For a more confident order, verify three details on the live listing: the exact model name, the included power connection and remote, and the current fulfillment/return terms. SuperBox TV Box Store presents itself as an authorized SuperBox retailer and provides order and technical-support contact information. That gives buyers a direct place to ask about a model or setup question before checkout and a support route to use after delivery.
The article was updated on:
