
Knowledge SuperBox, Knowledge SuperBox S8
SuperBox S8 Pro Setup Guide: Unboxing, Wi-Fi, Remote Pairing and Apps





A new streaming box is only useful once it is connected, online, and ready to open the apps you want. This SuperBox S8 Pro setup guide takes you from the first unboxing check through the initial network wizard, remote pairing, screen-size adjustment, and app installation. It is written for someone setting up the device in front of a TV, so you can follow the steps in order instead of searching through separate instructions.
The S8 Pro is the entry model in the SuperBox S8 Series. It combines 4GB RAM and 32GB of internal storage with the S8 home interface, voice control, built-in recording, Picture-in-Picture, and Multi-Viewing for supported PPV and ESPN channels. It supports Wi-Fi 6 and Gigabit Ethernet, so you can choose wireless or wired networking based on your room.
Quick setup: Connect the S8 Pro to your TV with HDMI, connect its supplied Type-C power cable, select the matching HDMI input, complete the setup wizard, connect to Wi-Fi or Ethernet, adjust the display until it fits your TV, pair the voice remote, and install the apps you need from the SuperBox App Store.
Model note: The S8 Pro uses Type-C power and has USB-C + USB 3.0. The S8 Plus uses a different power and USB configuration. Check the model label before using a cable or accessory from another box.
What Comes in the SuperBox S8 Pro Box?
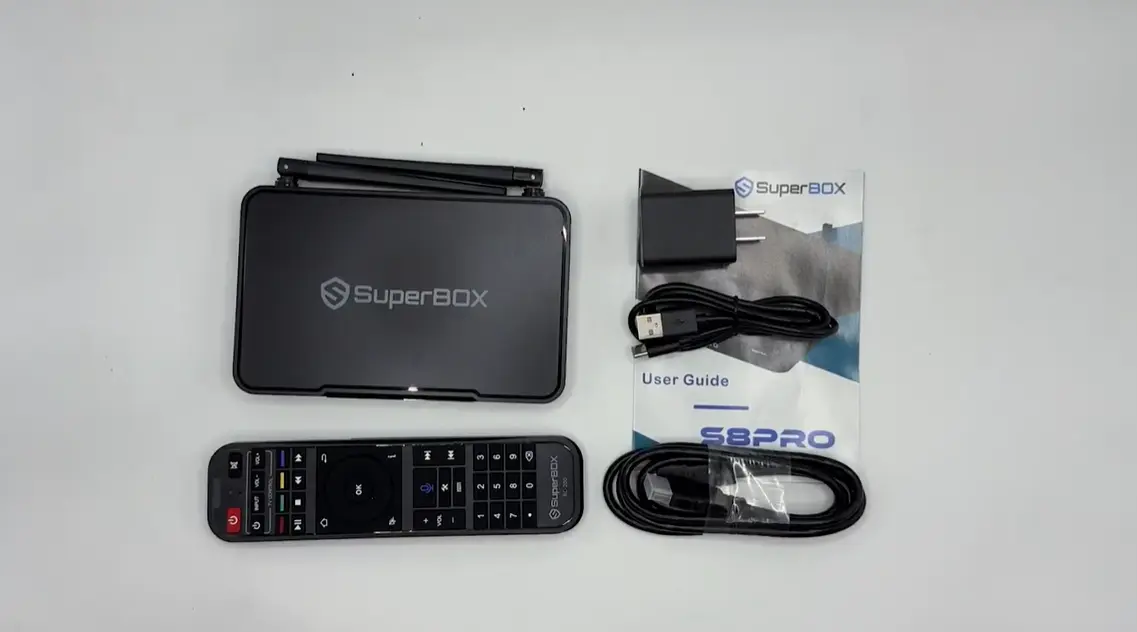
The S8 Pro package includes the media box, voice-command remote, Type-C power cable, HDMI cable, and user guide. Two external antennas are attached to the box. The remote supports voice commands but is not backlit.
| Included item | Purpose |
|---|---|
| SuperBox S8 Pro | Connects to your TV and home network |
| Voice-command remote | Navigates the S8 interface and supports compatible voice commands |
| Type-C power cable | Powers the S8 Pro through its Type-C power input |
| HDMI cable | Carries picture and audio to your television |
| User guide | Quick reference for the device and setup |
If something is missing or damaged, photograph the package label and contents, then contact the seller. Keep the packaging until setup is confirmed.
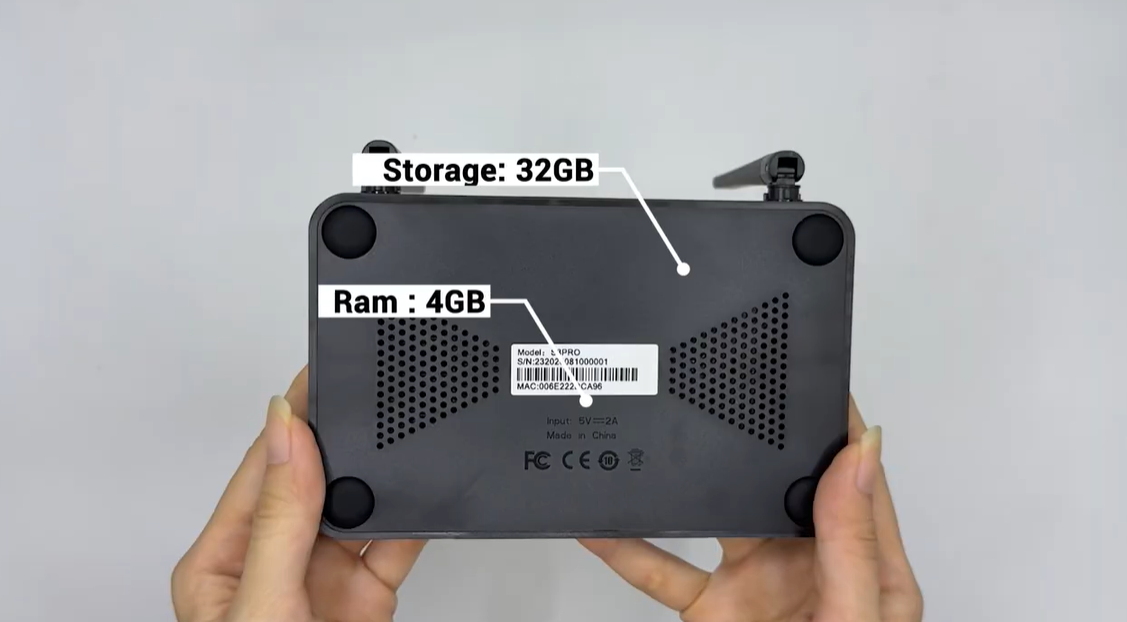
Confirm the model and storage
The underside label identifies the S8 Pro’s 4GB RAM and 32GB storage. RAM supports active system processes; storage holds the system, apps, and local files. Usable space is lower after setup, and supported recordings share that space. Pro is the 32GB option compared with 64GB on Plus/Max and 128GB on Ultra.
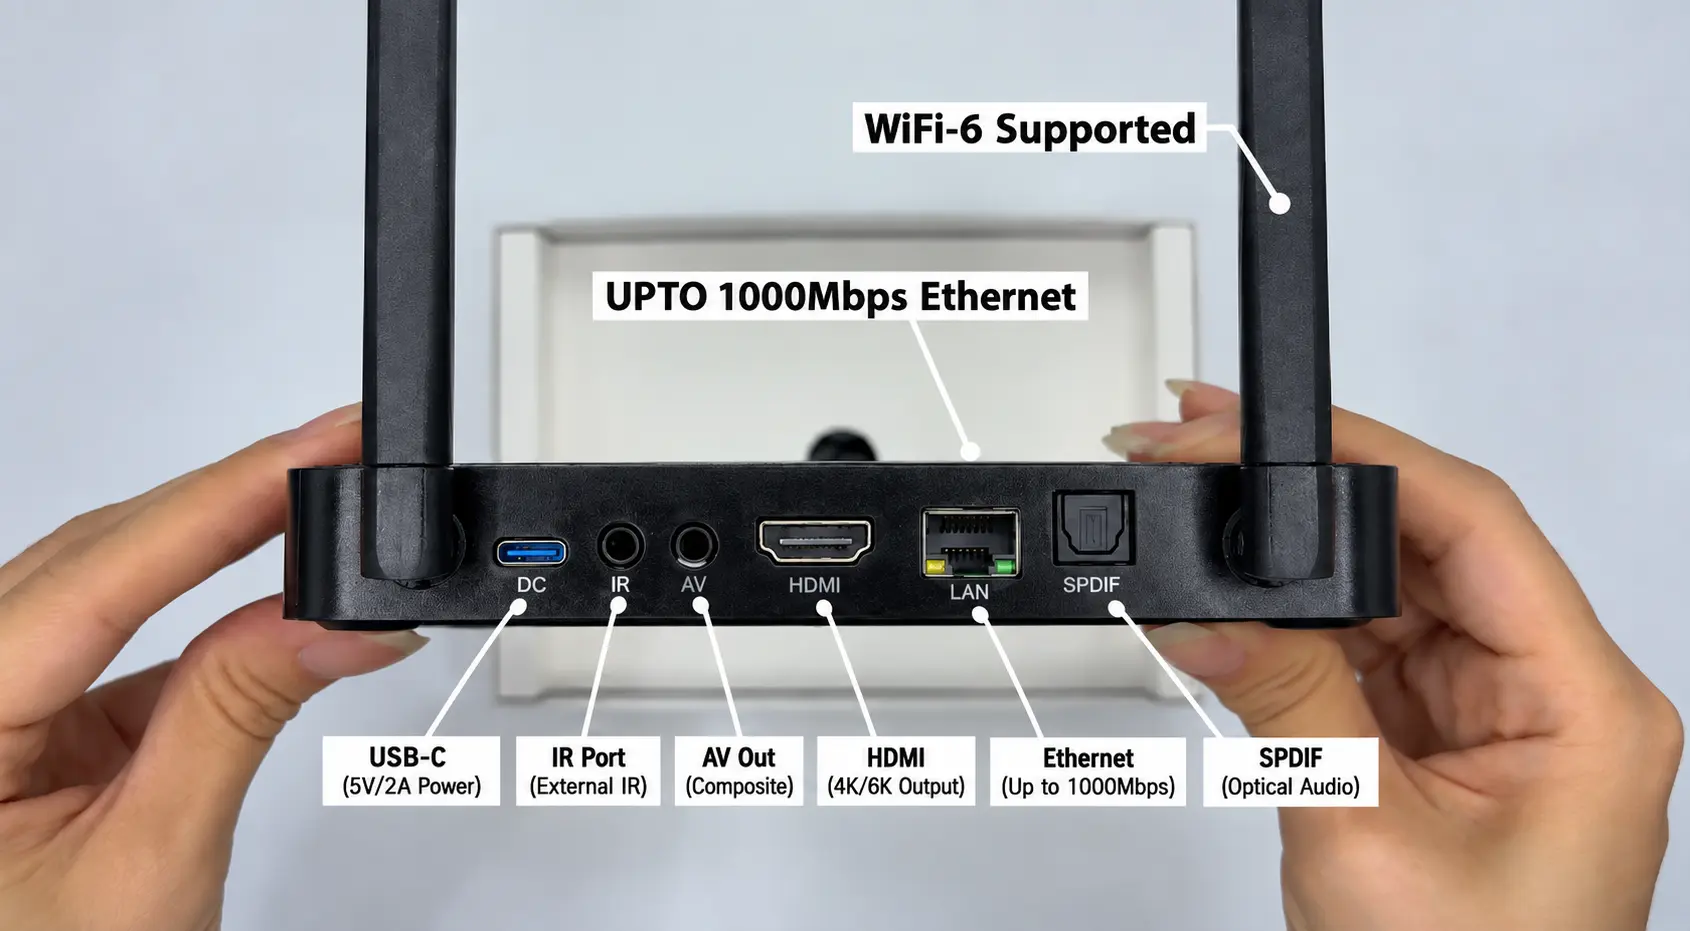
Know the S8 Pro’s connections before plugging in
The S8 Pro specification lists USB-C + USB 3.0 and a separate Type-C power connection, along with HDMI and Ethernet. Use the supplied Type-C power cable for power, HDMI to connect the TV, and Ethernet for a wired network. Use USB ports for compatible accessories, not as substitutes for the power input. If a generic video overlay conflicts with the current product page or the physical unit, verify the model-specific port before labeling it.
Before You Set Up the S8 Pro
Place the box on a stable, open shelf close enough to reach the TV’s HDMI input and a power outlet. Leave the antennas unobstructed and avoid covering the unit. For Wi-Fi setup, have your network name and password ready. If you prefer Ethernet, make sure a network cable can reach from the router to the S8 Pro.
You will need a TV or display with an HDMI input, the included HDMI cable, the supplied Type-C power cable, and an internet connection for online apps, downloads, and streaming. The S8 Pro supports dual-band Wi-Fi 6 and 1000Mbps Gigabit Ethernet. Actual internet performance depends on the internet plan, router, wireless environment, content source, and service. For the complete network walkthrough, see How to Connect SuperBox S8 to Wi-Fi or Ethernet.
How to Set Up the SuperBox S8 Pro
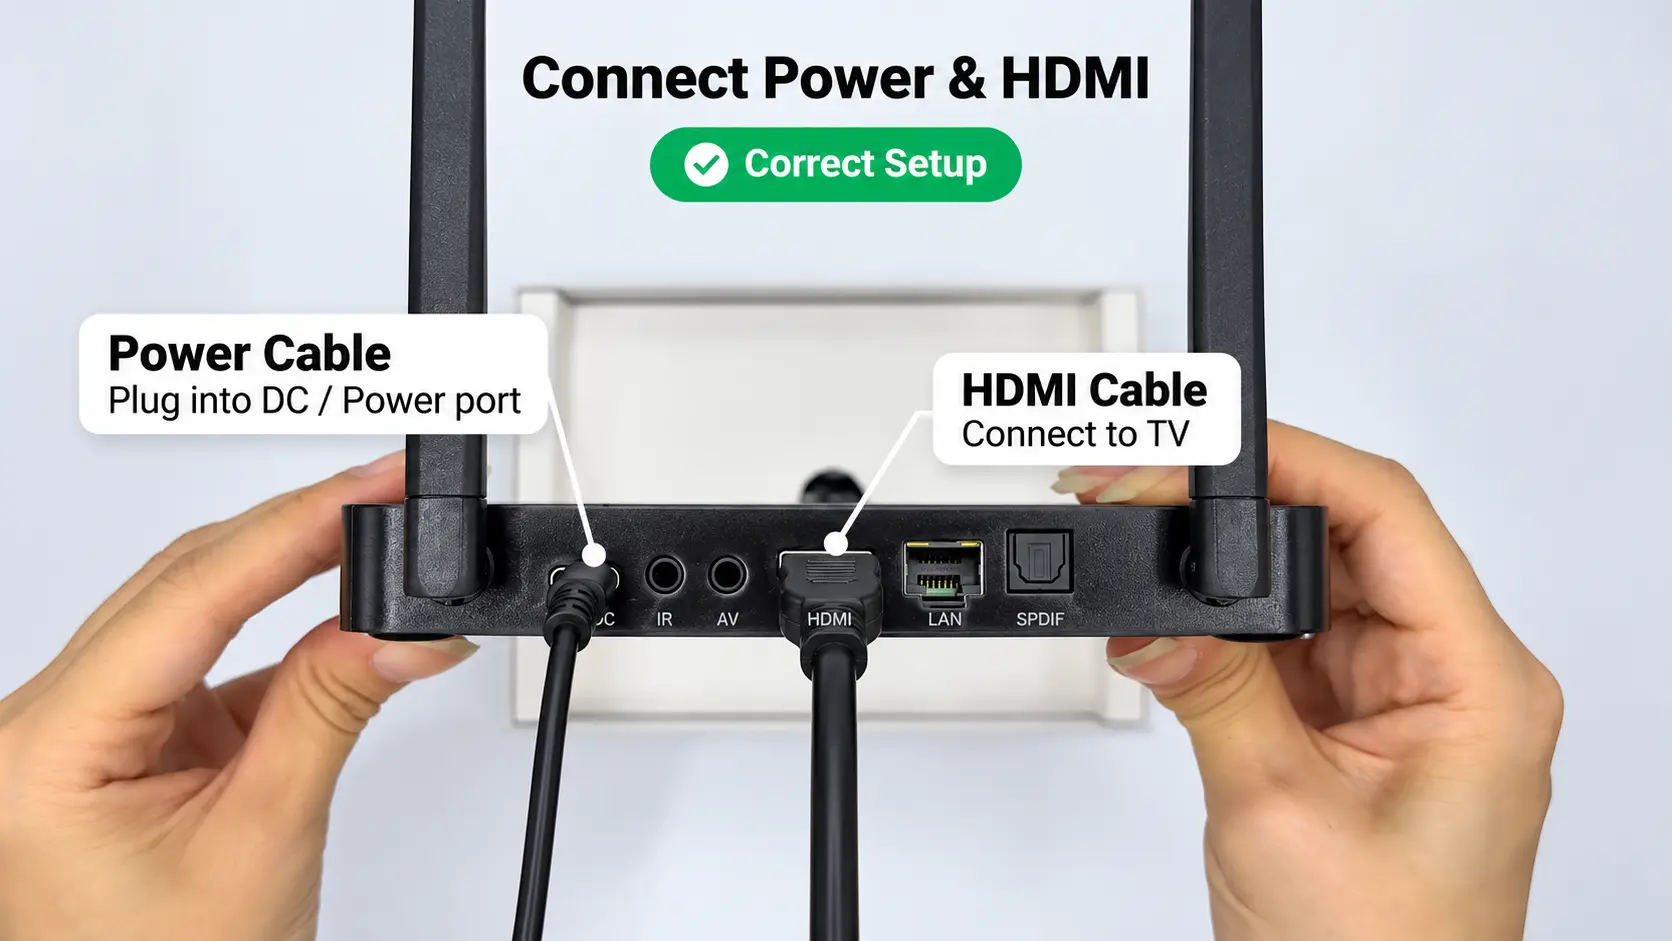
Follow this order: HDMI first, power next, then the TV input and on-screen setup. This keeps the cables easy to reach while you check that the picture appears on the correct source.
Step 1: Connect the HDMI cable
With the TV and box off, connect one end of the HDMI cable to the S8 Pro and the other end to an available HDMI input on the television. Seat the connectors gently and do not force them.
Step 2: Connect Type-C power
Connect the supplied Type-C power cable to the S8 Pro’s Type-C power input, then connect the adapter to a suitable outlet. Use the power supply included for the S8 Pro; connector shape alone does not confirm that another adapter has the correct electrical rating. Keep the cable from being pinched or pulled tight.
Step 3: Select the matching HDMI input
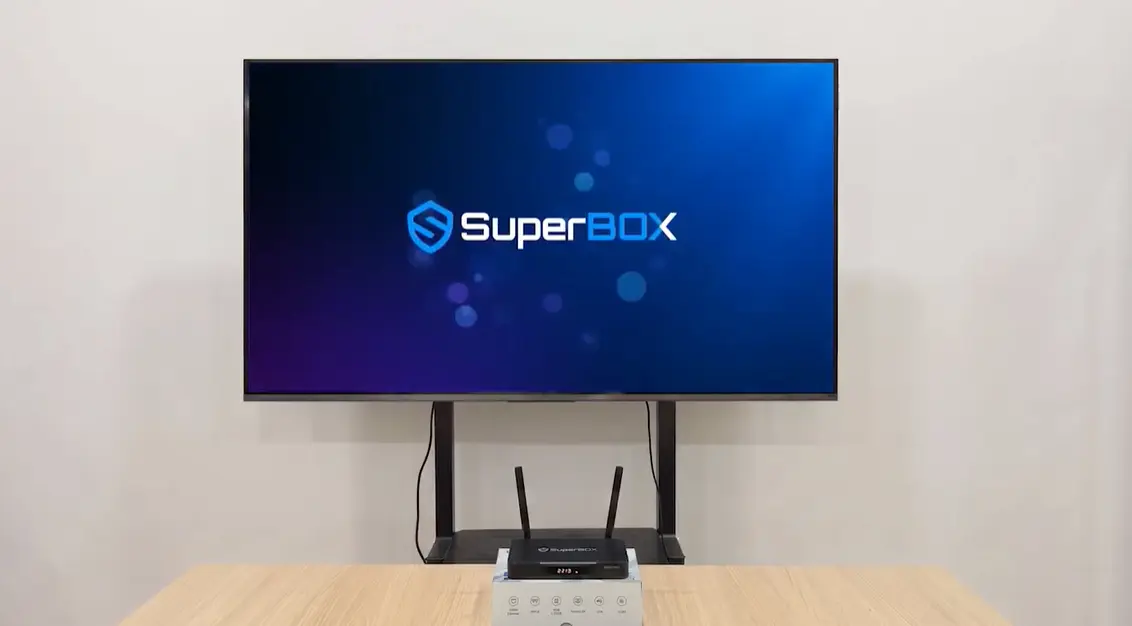
Turn on the TV and choose the HDMI input connected to the S8 Pro. The SuperBox startup screen should appear after the box boots. If the TV displays “No Signal,” check that the input number matches the port you used, reseat the HDMI cable, and confirm that power is connected.
Step 4: Review and accept the setup notice
The first-time setup includes an on-screen notice before the network step. Read the notice and make the selection required to continue. Use the remote’s directional controls to move between buttons and press OK to confirm. If a screen differs from the walkthrough, follow the current on-screen wording on your device.
Step 5: Connect the S8 Pro to Wi-Fi or Ethernet
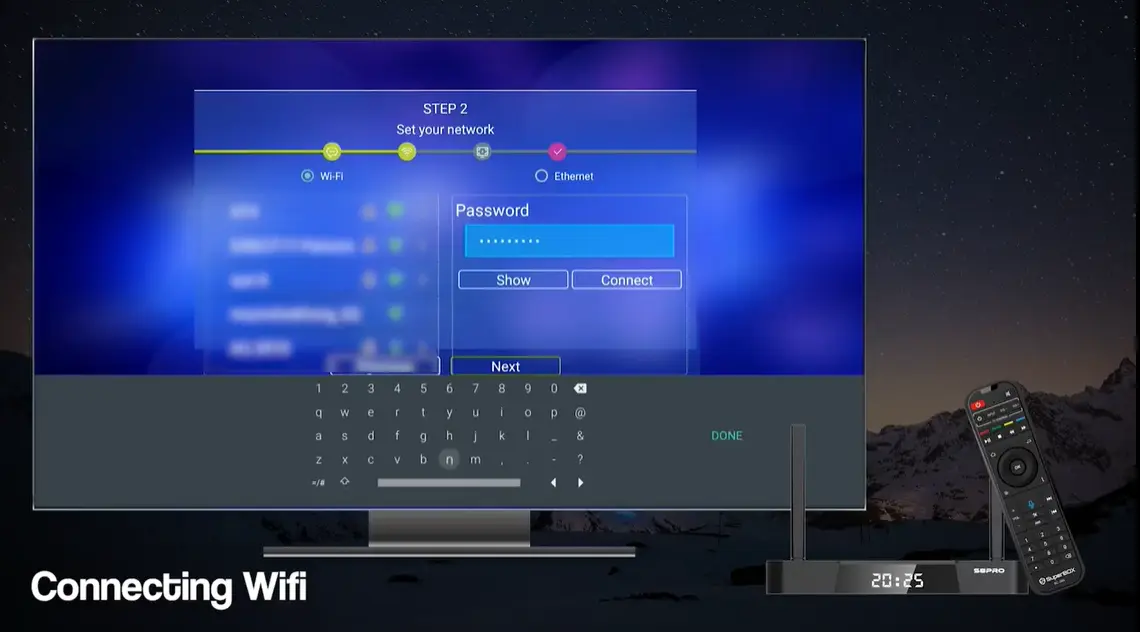
The setup wizard’s network page is labeled Set your network. It offers Wi-Fi and Ethernet. Choose the connection that suits your room.
To connect with Wi-Fi:
- Select Wi-Fi and refresh the access-point list if needed.
- Highlight your network name and press OK.
- Enter the Wi-Fi password using the on-screen keyboard. Check capitalization and symbols carefully.
- Select Connect and wait for the connection status to complete.
- When the wizard confirms the connection, choose Next.
Do not include your real Wi-Fi name or password in screenshots or public support posts. If the network list is empty, refresh it and check that the router is online. If the password is rejected, re-enter it slowly.
To connect with Ethernet: connect a network cable from the router to the S8 Pro Ethernet port. Select Ethernet in the setup wizard if prompted, wait for the connection, and continue. Ethernet is useful when the box is near the router and you want a direct wired connection. For more network troubleshooting, use the S8 Wi-Fi and Ethernet guide.
Step 6: Pair the voice remote
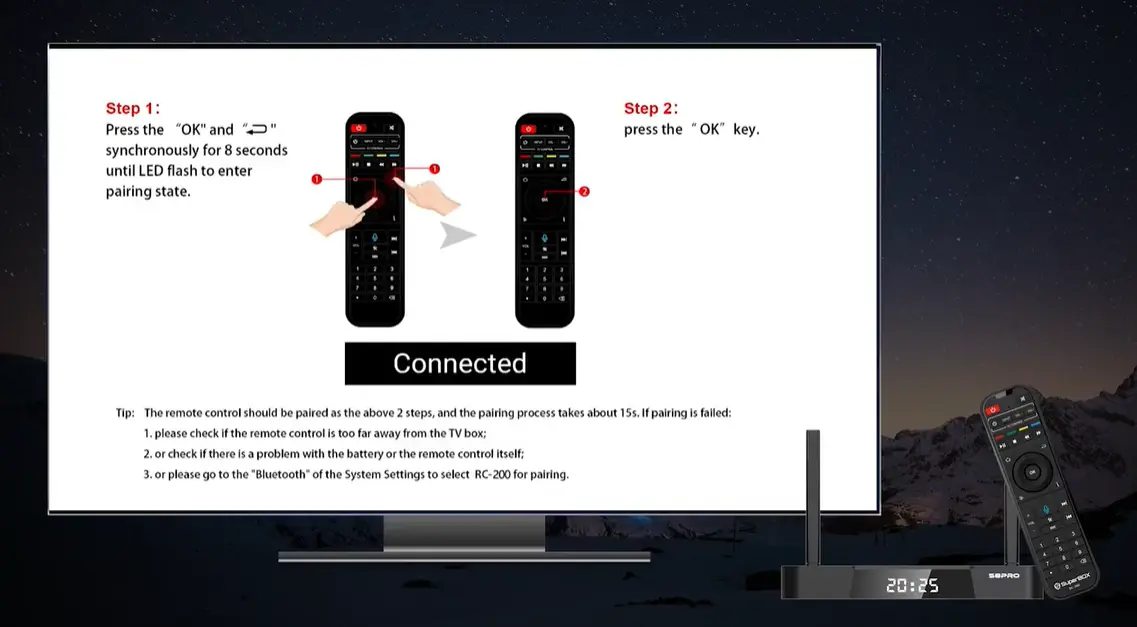
The S8 Pro remote may pair during first-time setup. Keep the remote close to the box and follow the pairing instructions displayed on screen. The pairing graphic in the setup flow gives these steps:
- Press and hold OK + Back/Return together for about eight seconds.
- Release the buttons when the remote’s LED flashes and the box enters pairing mode.
- Press OK once to begin the search.
- Wait for the Connected confirmation; the pairing process may take about 15 seconds.
If pairing fails, move the remote closer to the box, check the batteries and retry the two-step pairing process. The on-screen pairing instructions also indicate that you can open the system Bluetooth settings and select RC-200 if needed. Follow the labels on your own remote and screen if a software update changes the prompt. For a more detailed walk-through, use How to Pair a SuperBox S8 Remote.
Install Blue TV, Blue VOD, Playback and Other S8 Apps
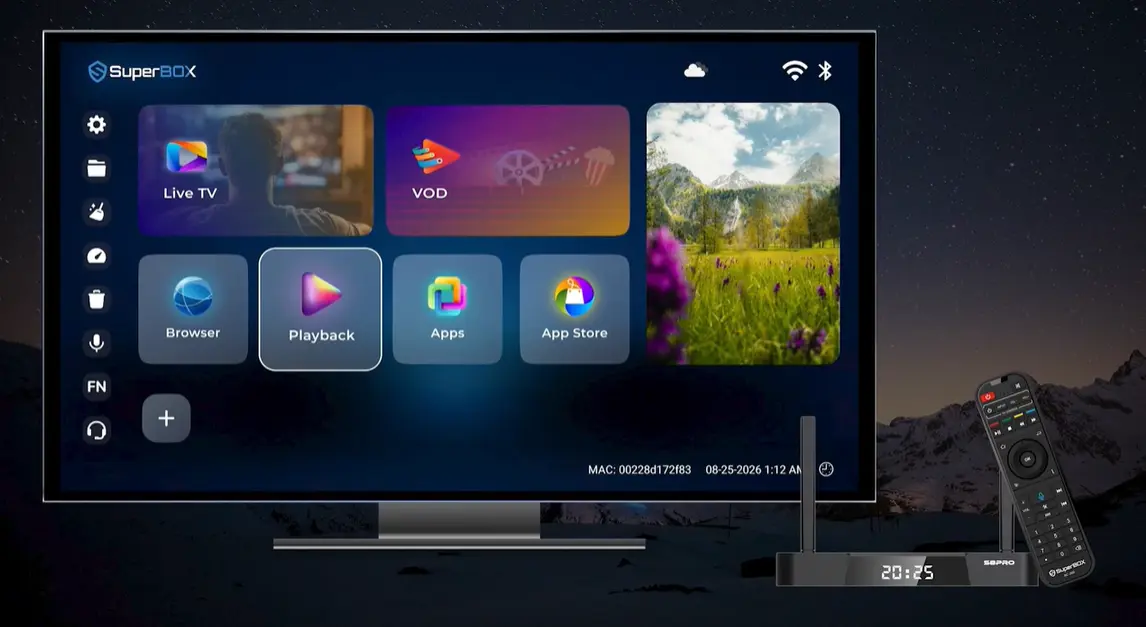
The S8 home screen has an App Store tile. Depending on the unit’s software and region, the apps you want may need to be installed after setup rather than appearing as ready-to-open shortcuts. Installing an app and adding it to the home shortcut row are separate actions: first install it from the App Store, then add a shortcut if you want it displayed on Home.
Step 1: Open App Store from the S8 home screen
After the network and remote steps finish, go to the S8 home screen and select App Store. If a service or disclaimer notice appears, read and accept it as required to continue into the catalog.
Step 2: Find the apps you plan to use
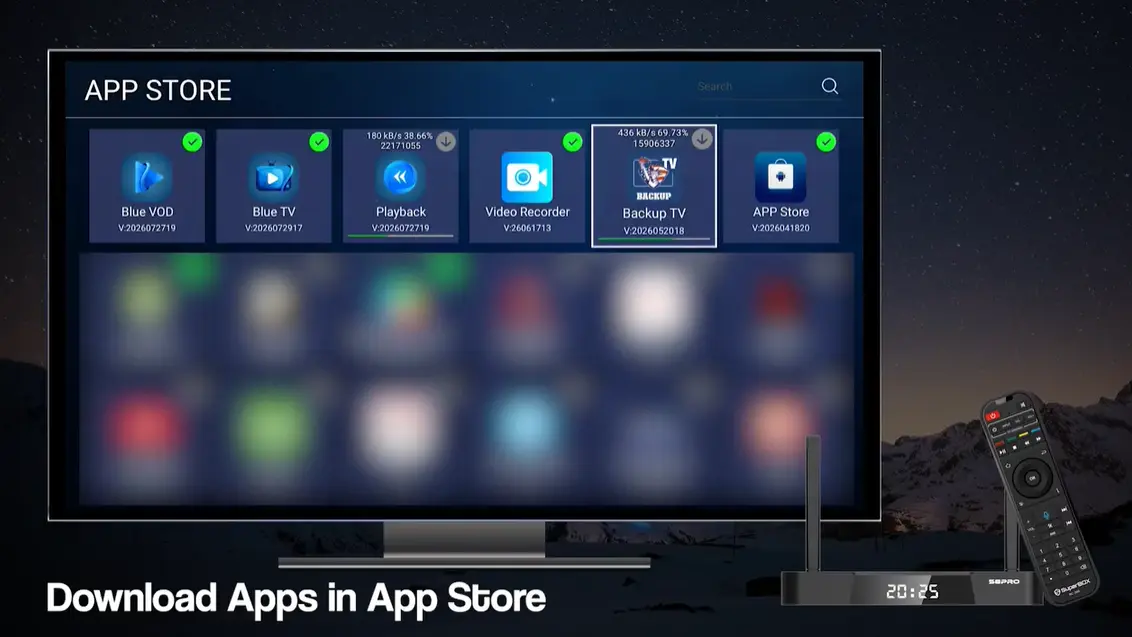
The catalog shown in the S8 interface includes Blue TV, Blue VOD, Playback, Video Recorder, Backup TV, and other apps. Their purposes differ:
- Blue TV: live programming in supported categories.
- Blue VOD: on-demand movies and TV content where available.
- Playback: eligible programs that can be replayed within the supported window.
- Video Recorder: built-in recording for supported programming.
- Backup TV: an additional option for supported live programming.
Availability can vary by app, region, software build, service status, and content rights. Check the app description and current on-screen options before installing.
Step 3: Install apps and confirm completion
Highlight an app and use the on-screen install/download control. Wait for the download or installation to finish before leaving the store. The interface may show a progress indicator during installation and a check mark when an app is installed. Repeat for each app you want.
If an app is installed but you do not see it on the home screen, return to Home and look in the Apps area or use the + / Add shortcut selector. Our SuperBox S8 app installation guide explains how to install apps and add them to Quick Access.
Set up recording and playback expectations
Built-in recording is a key S8 Series feature and is listed for the S8 Pro. Record only programs supported by the app and source. Recordings use flash drive to storage, so the Pro’s 32GB capacity is shared by the system, apps, and others saved files.
Recording and Playback are not the same thing. Recording saves a supported program locally; Playback lets you revisit eligible programs when the channel or program supports the feature. Review the SuperBox S8 Recorder guide and S8 Playback guide for dedicated instructions.
What Makes the S8 Pro Different from Other S8 Models?
The S8 Pro shares the S8 generation’s redesigned interface and core features, but its 32GB capacity and supported Multi-Viewing scope distinguish it from the higher models. All S8 models list 4GB RAM, built-in recording, voice command, Blue TV, Blue VOD, Playback, and Backup TV.
| Feature | S8 Pro | S8 Plus | S8 Max | S8 Ultra |
|---|---|---|---|---|
| RAM / internal storage | 4GB / 32GB | 4GB / 64GB | 4GB / 64GB | 4GB / 128GB |
| USB ports | USB-C + USB 3.0 | USB 2.0 + USB 3.0 | USB-C + USB 3.0 | USB-C + USB 3.0 |
| Power connection | Type-C | Round plug | Type-C | Type-C |
| Multi-Viewing | Supported PPV + ESPN | Supported PPV + ESPN | Full supported channels | Full supported channels |
| NFL app | No | No | Yes | Yes |
| Backlit remote | No | No | No | Yes |
| Voice command | Yes | Yes | Yes | Yes |
Choose the Pro if you want a lower-cost way into the S8 generation and 32GB is sufficient for your use. Consider Plus if you want 64GB but do not need the Max/Ultra viewing tier. Choose Max or Ultra if you want the NFL app or full supported Multi-Viewing. Ultra adds 128GB and the only backlit remote. See the complete SuperBox S8 Pro vs. Plus vs. Max vs. Ultra comparison before deciding.
Troubleshooting SuperBox S8 Pro Setup
The TV shows “No Signal”
Check the selected HDMI input, reseat the HDMI cable, and confirm Type-C power. Try another TV HDMI port if needed.
The Wi-Fi list is blank
Refresh the list, check that the router is online, or move closer to it. Try Ethernet to continue setup and isolate a Wi-Fi issue.
The password will not connect
Re-enter it carefully, including capitalization and symbols. Never expose your Wi-Fi password in a public screenshot.
The remote does not pair
Check battery orientation and keep the remote close. Retry OK + Back/Return, then OK. If it still fails, select RC-200 in Bluetooth settings as prompted.
Apps are not on the home screen
Check App Store to confirm installation, then look in Apps or add the app to the Home shortcut row.
A program buffers or an app will not load
Confirm internet access and test another app. If only one app fails, note its name and message; use our SuperBox buffering guide for next steps.
The picture is cropped or looks soft
Adjust screen size using the setup preview. Resolution depends on the source, app, HDMI path, TV, and display settings; H.265 6K decoding does not mean every program is delivered in 6K.
Why Buy the SuperBox S8 Pro from SuperBox TV Box Store?
Choosing the right seller is just as important as choosing the right SuperBox model, especially when you want reliable service and product-specific support after your purchase. SuperBox TV Box Store is an authorized online retailer of SuperBox products, serving customers across the United States and Canada with a dedicated source for genuine SuperBox devices, order assistance, shipping support, and after-sales service.
Buying from an authorized retailer also gives customers greater confidence in where their device comes from and who to contact if assistance is needed after delivery. Instead of relying on an unknown third-party marketplace seller, customers have a dedicated retailer that can assist with order questions, shipping concerns, warranty-related issues, and product support throughout the purchasing experience.
For customers considering the SuperBox S8 Pro, our dedicated product page provides detailed model specifications, key features, included accessories, and current purchasing information in one place. This makes it easier to verify exactly what you are ordering and distinguish the S8 Pro from other models in the S8 Series before completing your purchase.
With clear product information, dedicated customer support, and authorized retailer status, SuperBox TV Box Store provides a more dependable way for US and Canadian customers to purchase the SuperBox S8 Pro with confidence and receive continued assistance after delivery.
Before checkout, confirm the current price, stock status, shipping destination, warranty, and return terms on the live page. The store lists a one-year warranty and support options; read the current conditions so you know what applies to your order. Keep the order confirmation and use the store’s contact and technical support information if a setup problem remains after following this guide.
Shop the model: View SuperBox S8 Pro at SuperBox TV Box Store. Compare all four models first if you need more storage, the NFL app, broader Multi-Viewing, or a backlit remote.
Frequently Asked Questions
How do I set up a SuperBox S8 Pro for the first time?
Connect HDMI and Type-C power, select the TV input, complete the wizard, connect to Wi-Fi or Ethernet, fit the display, pair the remote, and install apps from App Store.
Does the S8 Pro use Type-C power?
Yes. The current S8 Pro specification lists a Type-C power connector. Use the supplied power cable for this model.
What is included with the S8 Pro?
It includes the S8 Pro, voice remote, Type-C power cable, HDMI cable, and user guide; contents can vary by batch or region.
How do I pair the SuperBox S8 Pro remote?
Hold OK + Back/Return for about eight seconds, then press OK and wait for Connected. If needed, check batteries or select RC-200 in Bluetooth settings.
Does the S8 Pro connect to Wi-Fi and Ethernet?
Yes. Select Wi-Fi and enter your password, or connect Ethernet to the router and choose Ethernet if prompted.
Do I need to install Blue TV and Blue VOD?
Yes, They need to be installed from App Store. If an installed app is not on Home, check Apps or Quick Access. SuperBox doesn’t come with preloaded apps.
Does the S8 Pro include built-in recording?
Yes, for supported programming. Recordings use local storage, so capacity and app support limit what you can save.
Can the S8 Pro display 6K?
It lists H.265 decoding up to 6K at 60fps and supports compatible 4K playback. Actual output depends on the source and display chain.
What is the main difference between S8 Pro and S8 Plus?
Pro has 32GB, USB-C + USB 3.0, and Type-C power; Plus has 64GB, USB 2.0 + USB 3.0, and round-plug power. Both list 4GB RAM and PPV/ESPN Multi-Viewing.
First-Setup Checklist
- Verify the box, remote, Type-C power cable, HDMI cable, and user guide.
- Connect HDMI to the TV and remember the input number.
- Use the supplied Type-C power cable.
- Select the same HDMI input on the television.
- Complete the setup notice and join Wi-Fi or Ethernet.
- Pair the remote and wait for Connected.
- Install the supported apps you want from App Store.
- Confirm that the apps open before arranging the box permanently.
A successful SuperBox S8 Pro setup comes down to using the correct connections and completing each on-screen step: HDMI, Type-C power, network, display, remote, and apps. Once those pieces are in place, the redesigned S8 interface gives you one home screen for compatible live viewing, on-demand apps, playback, and recording. If you want help selecting a model before ordering, compare the S8 Series lineup or review the current SuperBox S8 Pro product details.
The article was updated on:
