
Knowledge SuperBox
How to Set Up SuperBox Supreme: TV, Internet, Remote and Apps





To set up SuperBox Supreme, connect it to your TV with HDMI, attach its supplied power adapter, select the matching TV input and connect the box to your home internet. Then pair the RC-200 remote over Bluetooth, check your apps and add the shortcuts you want to use every day.
Work through those tasks in that order. Getting a picture on the television is the first checkpoint; reaching the internet and opening an app come afterward. This makes it easier to spot which part needs attention if something does not work.
This guide covers the SuperBox Supreme launcher and RC-200 remote. Menus and available apps can vary with software versions, so follow the labels on your Supreme if a screen looks slightly different.
Have these items ready before connecting anything
Place the Supreme near the television where you can reach its rear connections and leave its ventilation openings clear. Keep the remote and your TV’s original remote nearby; they have different jobs during setup.
You will need:
- The SuperBox Supreme console and its correct supplied power adapter.
- An HDMI cable and an available HDMI input on the television.
- The RC-200 remote with two AAA batteries installed in the marked direction.
- Your home WiFi name and password, or an Ethernet cable connected to your router.
- A working home internet connection.
The TV remote selects the television’s HDMI input. The SuperBox remote operates the box once its picture appears. Confusing those two controls is an easy way to get stuck before the setup has really begun.
You can leave USB drives and other optional accessories disconnected for now. First establish a basic working setup, then add anything else you actually need.
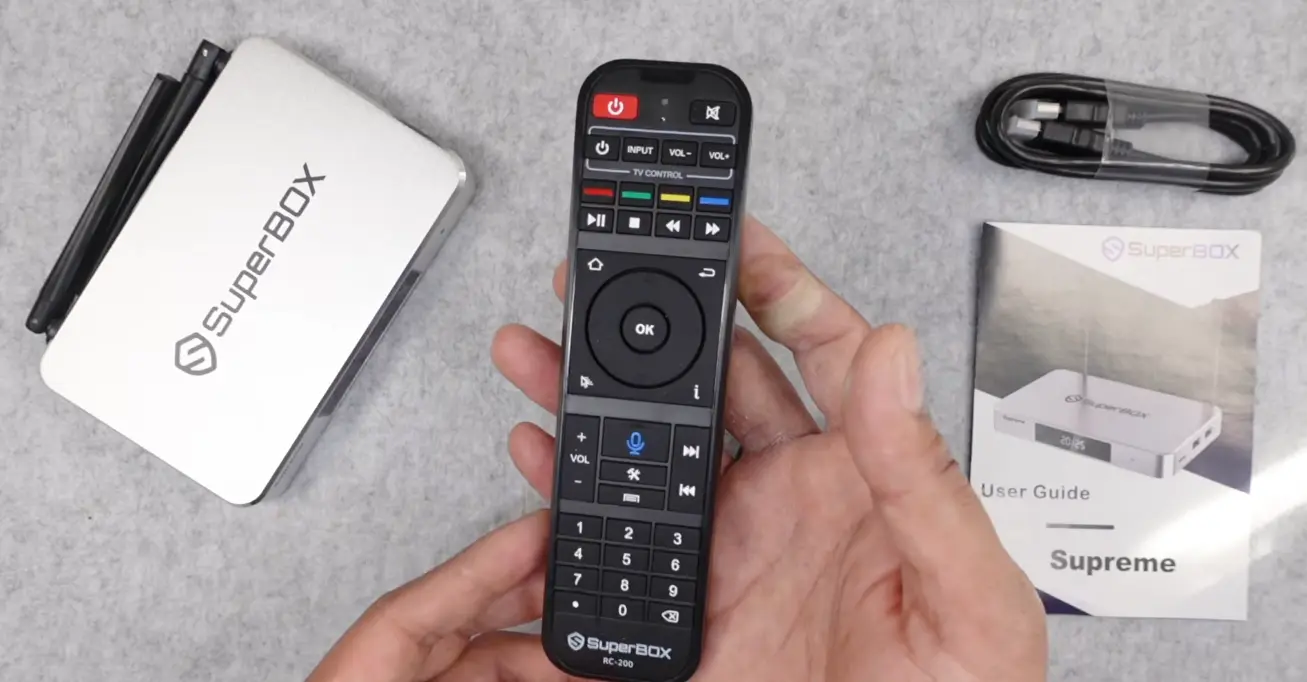
1. Connect Supreme to the TV and select its HDMI input
Identify the HDMI, DC power and Ethernet/LAN connections on the box. HDMI carries the picture and sound to the television. DC is the power connection. Ethernet is an optional wired route to your router.
Connect one end of the HDMI cable to Supreme and the other to an HDMI input on the TV. Note the television’s input number, such as HDMI 1 or HDMI 2.
Attach the supplied power adapter to the box’s DC input and plug it into a suitable outlet. Use the adapter intended for your Supreme; a similar-looking cable or a television’s USB socket is not a reason to substitute another power source.
Turn on the television and use its Source or Input control to select the HDMI connection you noted. Allow the box to start. The result you are looking for is the Supreme startup screen followed by its Home screen or initial setup prompts.
Make the TV connection easy to find tomorrow
If Supreme is plugged into HDMI 2, select HDMI 2 even if the TV opens its own smart-TV dashboard first. Seeing the television’s built-in apps means you are still using the TV interface. Choose the connected input to reach Supreme.
Write down that HDMI number if someone else will use the television. A short note beside the remotes can prevent the same input confusion the next morning, especially when the TV is also connected to a game console or another player.
Once the Home screen appears, leave the HDMI cable in place while you finish internet and remote setup. If you have a picture but no sound during the later playback test, check the TV’s mute and volume controls first. Keep track of which remote changes the television volume.
If the TV says No Signal
Check the selected input against the socket holding the cable. Then check that both HDMI ends are seated and the box has power. If needed, try another available HDMI input and select that new input on the TV.
A No Signal message comes before app setup. Changing WiFi or installing an app will not resolve a television that is looking at the wrong input.
Samsung owners can use the TV input and connection checks in our Samsung guide. The television-side controls are the relevant part of that guide.
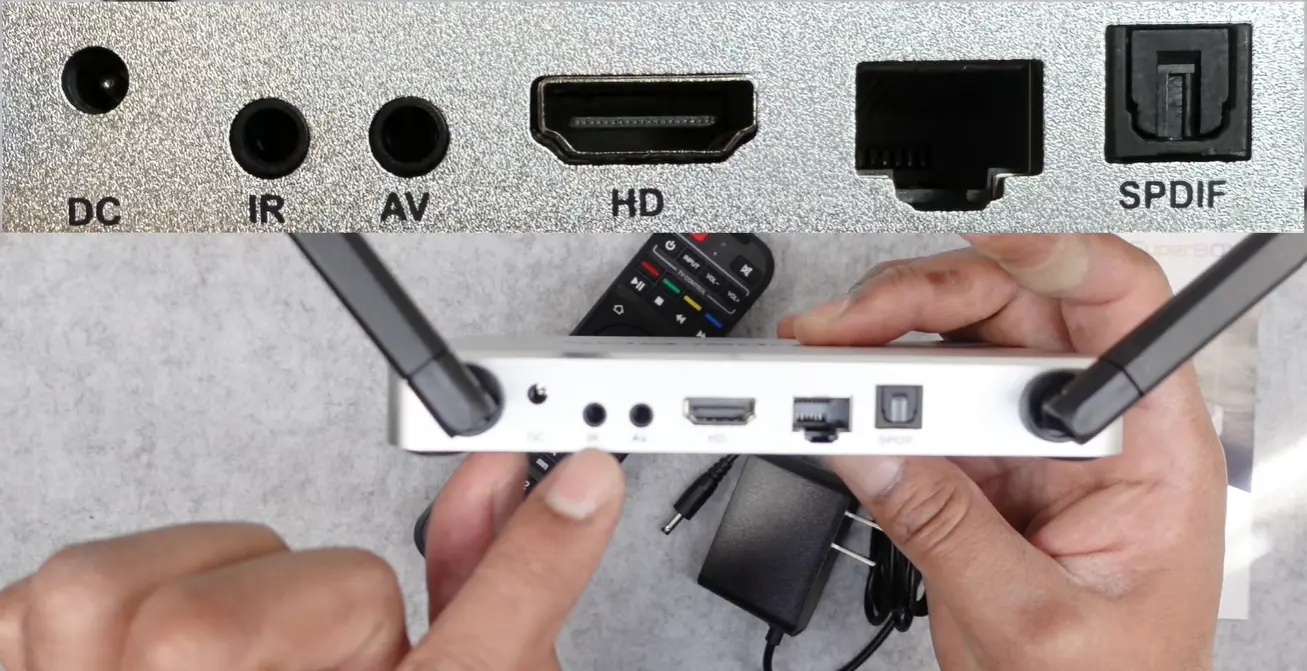
2. Connect SuperBox Supreme to WiFi or Ethernet
Supreme needs an internet connection for online streaming. Choose the connection you intend to use and confirm it works before moving on to entertainment apps.
Use Ethernet when a router connection is convenient
Connect an Ethernet cable from an available LAN port on your router to the Supreme Ethernet port. Allow the box to recognize the connection, then check its network status through Settings.
A cable connection avoids needing to enter a WiFi password. However, the router and its internet service must still be working. A cable being plugged in is only the physical part of the connection.
Connect to your home WiFi
If a network prompt appears during first startup, select your home network there. To connect from the Home screen, open the bottom-row Settings control and follow Network & Internet → Wi-Fi, using the equivalent labels on your version.
Select your own network, enter its password carefully and confirm the connection. Check letters, numbers and capitalization if the password is rejected. Make sure you have selected the intended household network rather than a similarly named neighboring one.
Once the connection is established, return to Home. The launcher includes connection indicators and an internet speed-test tool. Use a connection check to confirm the box can reach the internet; its result describes your own network, not a guaranteed Supreme speed.
If the network connects but an app later fails, note whether another online app works. That comparison is more useful than repeatedly re-entering a password that was already accepted.
Check the connection in two stages
First, confirm that Settings shows your chosen connection. Second, open an online app and check whether it loads content. These are separate results: a network name on screen tells you which network the box joined, while the app test helps establish whether you can actually use the internet.
For example, if your password is accepted and YouTube opens, return to the entertainment app that was failing. Report that app’s name and message rather than describing the whole box as disconnected.
If no online app works, check whether another device can use the same home internet. A phone using mobile data is not testing that household connection; use its home WiFi for a meaningful comparison. If the home connection also fails there, investigate the router or internet service before changing more settings on Supreme.
3. Pair the RC-200 remote for Bluetooth and voice control
Basic navigation and voice control are separate checks. A remote may move the selection while pointed toward the box, yet still need Bluetooth pairing for voice functions.
For the RC-200 remote:
- Make sure the box is powered on and the remote has its batteries installed correctly.
- Point it toward Supreme and hold OK + Back/Return until the red indicator begins blinking.
- Open Settings → Bluetooth on the box and look for RC-200 in the available-device list.
- Select the remote and complete any confirmation shown on screen.
- Check that the remote appears connected, then test navigation and the microphone function.
Use the device’s visible confirmation rather than timing the button hold to an exact number of seconds. If a pairing prompt requests another press of OK, follow that prompt.
For a simple voice test, use the microphone button and speak a short command such as “open Settings.” If arrow buttons work but voice does not, recheck the Bluetooth connection before assuming the remote needs replacement.
If RC-200 does not appear in the Bluetooth list
Check the remote’s indicator again. If it is no longer blinking, repeat OK plus Back/Return to re-enter pairing mode, then check the available devices. Keep the remote near the box during this step so you can see both the indicator and the television’s response.
If RC-200 is already listed as connected, test it before trying to pair it again. A successful connection does not need to be recreated simply because you have returned to Settings.
When asking for help, describe the exact stopping point: no indicator light, blinking light but no RC-200 listing, or a listed remote that will not connect. Those observations help separate a button or battery problem from a Bluetooth connection problem. Avoid trying unrelated remote-programming combinations while working through this check.
Pairing to the box does not program TV power and volume
Bluetooth pairing lets the remote communicate with Supreme. Teaching it commands from your original television remote is a different task.
Complete the box setup first. If you later want to copy supported TV controls, follow the separate SuperBox remote-programming instructions.
If the remote remains unresponsive, our remote troubleshooting guide can help distinguish battery, infrared and Bluetooth problems.
4. Learn the Supreme Home screen before adding apps
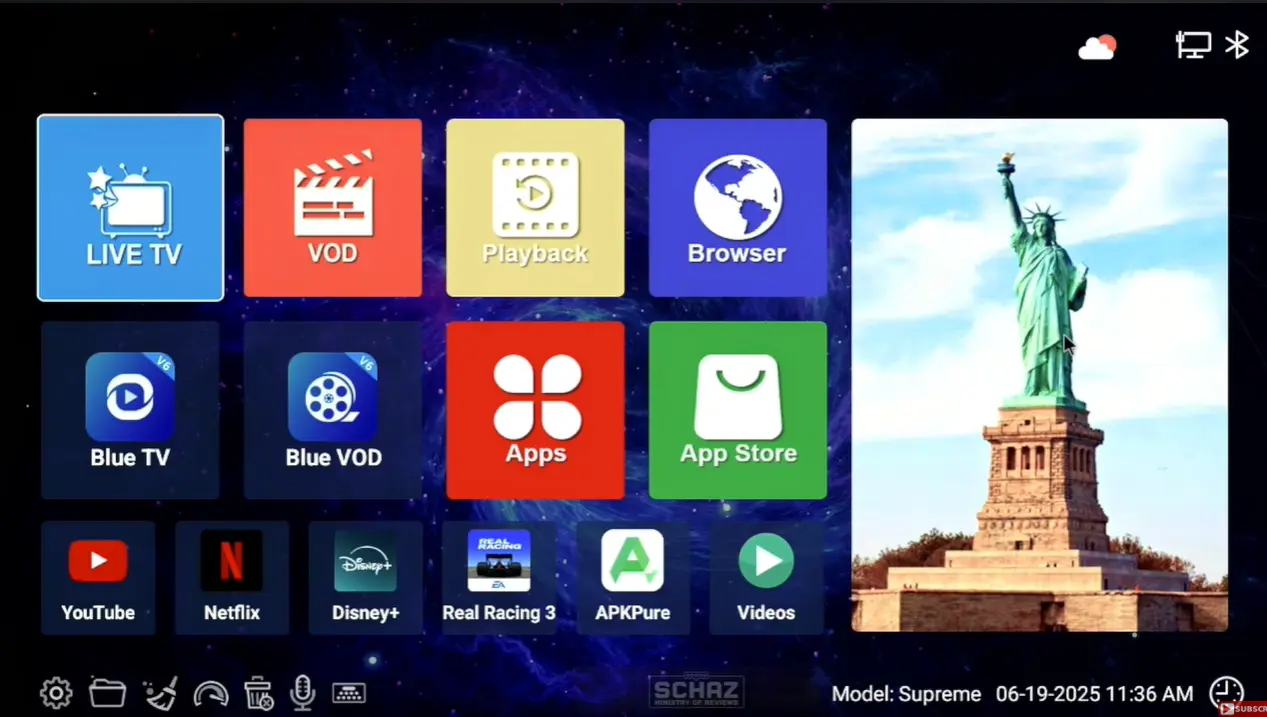
The Home screen groups common tasks into large tiles, with smaller shortcuts and system tools below. Recognizing these areas makes the next steps easier.
| Home-screen area | What to use it for |
|---|---|
| Live TV | Reach the live-TV app area |
| VOD | Reach on-demand movie and series apps |
| Playback | Open the supported playback area |
| Browser | Open the internet browser |
| Apps | See the installed-app list |
| App Store | Review apps available through the supplied store |
| Bottom Settings control | Open network, Bluetooth and device settings |
| File-folder control | Browse accessible local or connected-storage files |
Open Apps when you want to check what is actually installed. A Home-screen tile may be a route into an app category or a shortcut, so the installed-app list is a useful place to look when an expected shortcut is absent.
Keep your first tour short: find Settings, open Apps and return to Home. You do not need to configure every system tool to begin using the device.
Know which screen you are trying to reach
Use Home when you want the Supreme launcher again. Use Back/Return to move out of the current screen. If you are unsure where an app has taken you, returning to Home gives you a familiar starting point.
Practice a short route before rearranging anything: Home → Apps → choose an installed app → Home. Then open Settings and return once more. This helps a new user recognize the difference between viewing an app, browsing the installed-app list and changing the box’s settings.
You can leave account, storage and other device preferences alone unless a specific task requires them. Getting comfortable with the launcher is more useful during first setup than changing every available option.
5. Check your apps and install or update what you need
Open the supplied App Store and review the apps it offers. Choose the app you intend to use, then follow the installation or update control actually displayed. Wait for the process to finish and open the app to check the result.
App installation and Home-screen placement are different tasks. An app can be installed without appearing in your preferred shortcut position. Confirm it in Apps before trying to install it again.
Treat your own installed-app list as the starting point. Apps and their availability can differ between units and software versions, so check what your Supreme actually offers before creating shortcuts.
If your expected app is unavailable in the supplied store, check with your seller or support team about the appropriate route for your unit. You only need to install the apps you plan to use.
Check the result of each installation
Work on one app at a time. Once an installation or update finishes, open that app from Apps and check whether its first screen loads. Return to the store for the next app afterward. This gives you a clear record of what succeeded if another installation needs help.
Read the displayed action before selecting it. An installation adds an app; an update changes an existing installation; opening an app launches it. The wording may differ between software versions, so follow the actual prompt instead of searching for an icon that appears in someone else’s screenshot.
If an app asks for an account, check which service is requesting it. Your home WiFi password belongs in network setup, while a streaming-service sign-in uses that service’s account. These are different credentials. Do not share either password when sending support a photograph of the screen.
Choose an app for the task you want
For supported installations, Blue TV is for live-channel browsing and Blue VOD is for on-demand movies and series. Playback and Backup TV serve different viewing tasks. Our Backup TV explanation covers when that separate app may be useful.
Official paid services retain their own account and subscription requirements. An installed icon is not proof of a free account, a particular resolution or access to every program. The SuperBox monthly-fee guide explains the difference between buying the device and keeping optional paid services.
6. Add your everyday apps to the Home screen
Once an app opens successfully, place a shortcut where it is easy to find. The Supreme launcher has editable app positions among its large tiles and in the smaller shortcut row.
To replace an existing editable shortcut:
- Highlight that shortcut on the Home screen.
- Press the remote’s Menu button to clear the shortcut position.
- Select the resulting + position.
- Choose the installed app you want to place there.
- Open the new shortcut to confirm it launches the intended app.
Use the editable positions rather than trying to replace fixed launcher categories. Clearing a launcher shortcut is different from selecting an app-uninstall tool.
Start with one or two apps you use frequently. That is enough to make the device easier to navigate without rearranging everything during the first session.
For a simple arrangement, put your most-used live-TV app in one editable position and your preferred on-demand app in another. Open both shortcuts once after assigning them. If the wrong app opens, return to that editable position and choose the intended app again.
A missing shortcut is not the same as a missing installation. If the app still opens through Apps, focus on repairing the Home position. Reinstalling it adds another task without addressing the shortcut you meant to change.
Set a number-key shortcut if you want one-button access
The keyboard/number-key tool on the Home screen opens the remote shortcut assignments. Choose a number, assign an installed app and return to Home to test that number key.
For example, you can assign 1 to YouTube if it is installed. Pressing 1 from Home should open the assigned app. Test from Home because number keys inside a viewing app may have a different job, such as entering a channel number.
Keep a simple note of the assignments if more than one person uses the television. You can add more later after the household is comfortable with the basic routine.
7. Finish with a short everyday-use test
Before calling setup complete, try the same actions you expect to use tomorrow:
- Start at the correct TV HDMI input and reach Supreme Home.
- Open an online app and play a short item to check internet, picture and sound.
- Return to Home and reopen the app from your new shortcut.
- Test a voice command after confirming Bluetooth pairing.
- Check that anyone else using the television can repeat the route.
Keep picture settings appropriate for your television. Playing a high-resolution source file is different from proving the television receives that output resolution. If you need to choose an output mode, use the resolution and display-setting guide and check what your TV supports.
You can also connect a USB drive and use the file-folder control to browse your own media. That is optional; a drive is not required just to get online or open streaming apps.
Optional: find your own media on a USB drive
If you want to browse personal media, connect the drive to a USB port and open the file-folder control. Look for the connected drive, open the relevant folder and select the file you want to play. Start with a file you recognize so you can tell whether you have reached the right folder.
Check the file’s picture and sound separately. Being able to browse a drive does not mean every file on it will play; the individual file and the player also matter. If one file fails, note its name and try another known file before concluding that the USB connection has failed.
Leave this optional task until online viewing works. That keeps questions about personal files separate from the core HDMI, internet and app setup.
If you get stuck, identify the stage that failed
| What you see | What to check first |
|---|---|
| TV says No Signal | TV input selection, HDMI seating and Supreme power |
| Home opens, but WiFi will not connect | Selected network and password; compare with another household device |
| Arrow keys work, but voice does not | RC-200 Bluetooth connection |
| An app is installed but absent from Home | Apps list and editable shortcut positions |
| One app fails while another works | The exact app, message and whether more than one item fails |
| A number key behaves differently inside an app | Return to Home and test the launcher shortcut there |
Avoid a factory reset as your first response to an incomplete setup. It erases settings and can create more work before you have identified the original problem. Factory reset and an ordinary restart are different operations.
Keep a useful record before changing anything else
Write down the last step that worked and the first step that failed. “Home opens, WiFi says connected, and one app displays an error” is much more useful than “setup does not work.” Include whether the problem happens every time or only after a particular action.
Change one thing, then test the same action again. For a No Signal problem, try the selected input first, then recheck the cable. For a missing shortcut, check Apps first, then its Home assignment. Changing several unrelated settings together makes it harder to tell what helped.
If an installation or update is visibly running, let that operation finish before starting another task. If the screen remains stuck or repeats an error, photograph the message and ask for help with that specific stage. Keep order details and any device identifiers in private support messages.
SuperBox TV Box Store is an authorized retailer serving the US and Canada.
If you purchased directly from SuperBox TV Box Store, email customer@superboxtvboxstore.com for technical or order help. Include “SuperBox Supreme,” the setup stage, the exact on-screen message and a photo where useful. We value a setup you can use comfortably, and those details help us coordinate the next step.
If you are choosing a box for another television or helping a family member get started, browse the current SuperBox collection and ask our team which model fits their setup.
SuperBox Supreme setup FAQs
Does Supreme need a smart TV?
The basic connection uses the television’s HDMI input. The box supplies its own interface, so you select the connected HDMI source rather than looking for the Supreme apps in the TV’s own Home menu.
Can I set up Supreme without WiFi?
Yes, you can use an Ethernet cable from the router to the box instead. Online streaming still requires working internet; Ethernet replaces the wireless connection, not the internet service.
Why does the remote work only when pointed at the box?
Check Bluetooth pairing. Basic infrared navigation can work before the RC-200 is connected over Bluetooth. Follow the pairing steps and confirm the connected status before testing voice control.
Which apps should I install first?
Start with the apps you intend to use for everyday viewing. Check the installed-app list first, then use the supplied App Store for an available installation or update. Open each app successfully before assigning its Home shortcut.
Do I need a USB drive or memory card for first setup?
Neither is required for HDMI connection, internet access or ordinary streaming-app setup. Add external storage only for a specific supported task.
Should I factory-reset Supreme if an app is missing?
First check Apps and the supplied App Store, then ask support about the expected app for your unit. A reset removes settings and does not establish that a missing app will become available.
How do I set up Supreme on a different television?
Reconnect its HDMI cable and correct power adapter at the other TV, then select that television’s matching HDMI input. The input number may be different from the one used in the original room.
Check internet access again, especially if you use WiFi in the new location. If you normally use Ethernet, you will need a router connection there or must select an available WiFi network instead. Test an online app, picture and sound before arranging the cables permanently. Moving the box does not require deleting its Home shortcuts or treating it as a brand-new installation.
Keep the first viewing routine simple
A working Supreme setup should let you select the TV input, reach Home, open your chosen app and return without confusion. Once that route works, add shortcuts or optional accessories one at a time.
Reference video
The article was updated on:
