
Knowledge SuperBox S8, Knowledge SuperBox
SuperBox S8 Ultra Setup Guide: Unboxing, Wi-Fi, Remote Pairing & Apps





A new streaming box should not require a scavenger hunt through menus before you can use it. This SuperBox S8 Ultra setup guide walks through the process in a useful order: identify what came in the box, connect the right ports, complete the first-run screens, connect to the internet, pair the remote, and install apps from the on-device App Store.
The S8 Ultra is the flagship configuration in the SuperBox S8 Series. It combines 4GB of RAM with 128GB of internal storage, a redesigned S8 home interface, voice control, a backlit remote, and the S8 feature set that includes built-in recording, Picture-in-Picture, and full-channel Multi-Viewing support where available. Its larger storage capacity is useful for people who plan to install more apps or save media files locally. The Ultra also includes an NFL app and is the only S8 model with a backlit remote.
If you need the differences between every model before you start, see our SuperBox S8 Pro vs. Plus vs. Max vs. Ultra comparison.
Quick setup: Connect the S8 Ultra to your TV with HDMI, power it using the supplied Type-C power supply, select the matching HDMI input, complete the setup screens, connect by Wi-Fi or Ethernet, pair the voice remote, and install the apps you plan to use.
Model-specific note: The S8 Ultra has 4GB RAM and 128GB internal storage, USB-C + USB 3.0, and a Type-C power connection. The included power adapter is rated 5V/2A on the current product specification. Use the power supply supplied for your unit rather than choosing an adapter based only on connector shape.
What Comes in the SuperBox S8 Ultra Box?
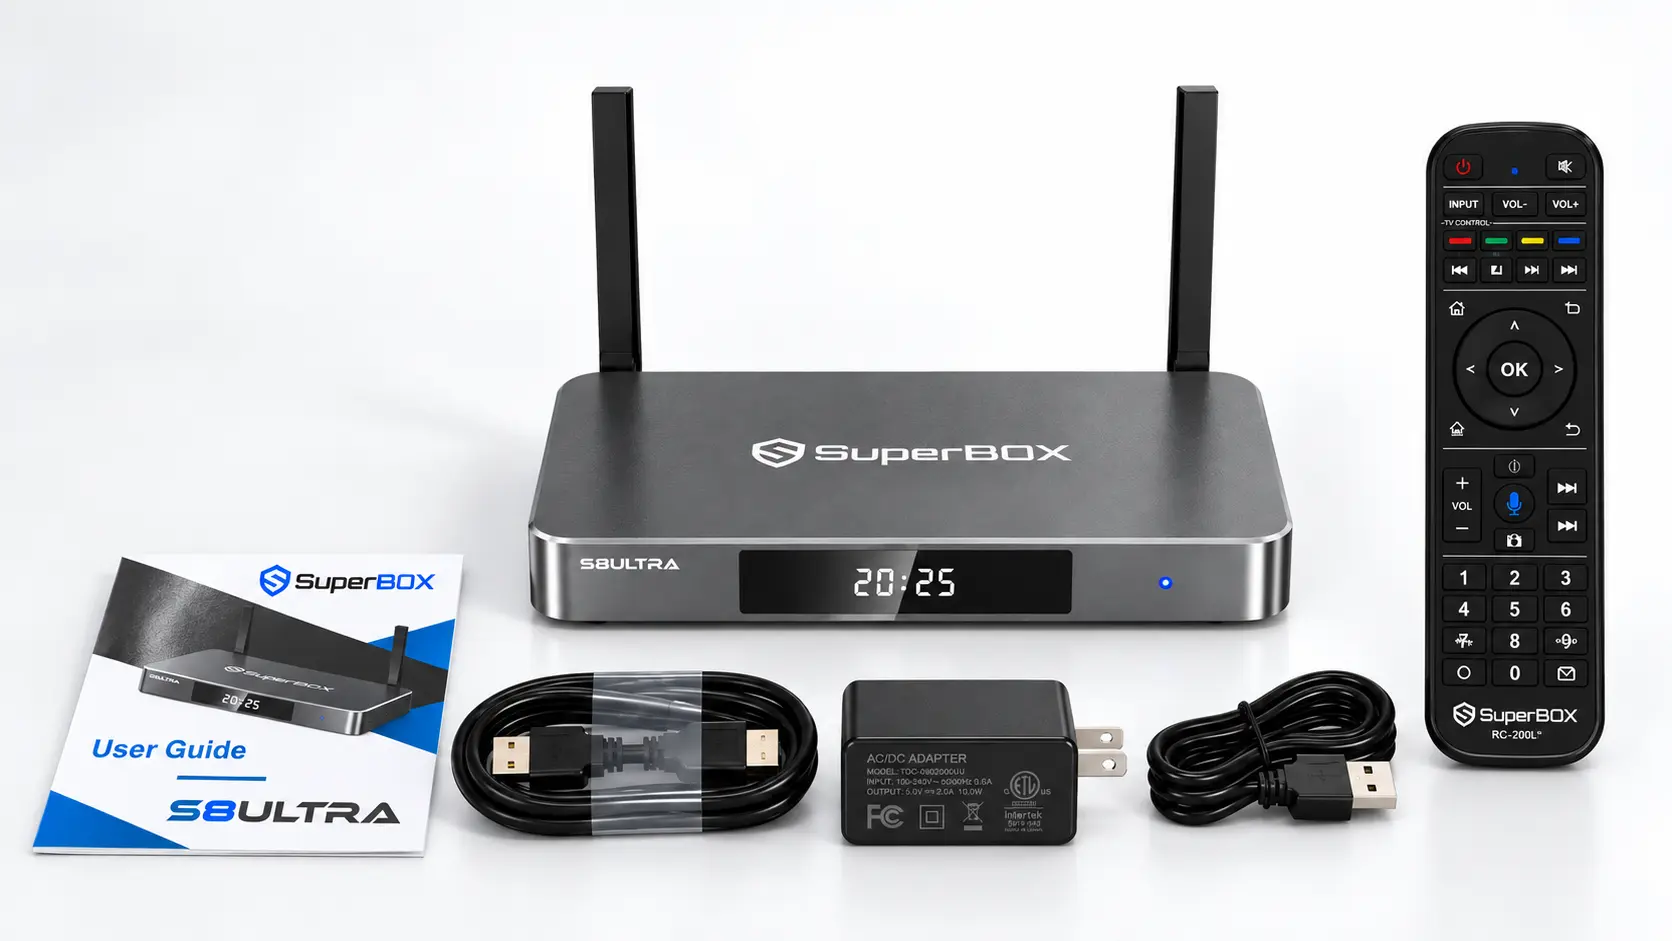
Open the packaging on a clear surface and check the accessories before connecting anything. The package shown for the S8 Ultra includes the streaming box, voice-command remote, power supply and cable, HDMI cable, and user guide. The box has two external antennas attached. Check your delivered package and the included guide, since contents or packaging can vary by region or production batch.
| Item | What it is for |
|---|---|
| SuperBox S8 Ultra | Connects your TV to the S8 interface and supported apps |
| Voice-command remote | Navigates menus and supports voice commands; the Ultra remote is backlit |
| Type-C power supply | Powers the S8 Ultra through its Type-C power connection |
| HDMI cable | Carries the picture and audio signal to the TV |
| User guide | Basic device and setup reference |
Before setup, compare the accessories with the package contents and inspect the power cable and HDMI cable for damage. Keep the box and order details until you have confirmed that the device starts and connects successfully. If an item is missing, take photos of the package and contents and contact the seller you purchased from.
Check the model and storage
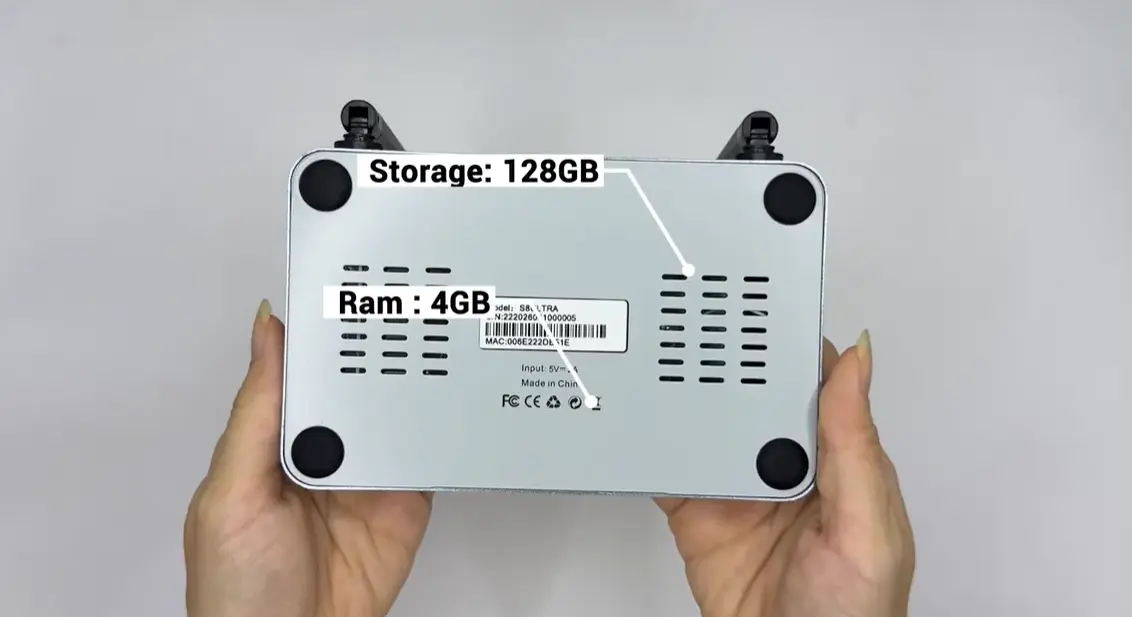
The S8 Ultra is the 128GB storage model in the S8 family. Its underside label in the clip identifies 4GB RAM and 128GB storage. RAM is working memory used while the system and apps are running; internal storage holds the system, installed apps, and supported local recordings. The full advertised capacity is not all available for personal use because the operating system and preinstalled components use space.
That storage headroom is one practical reason to choose Ultra if you expect to install more apps or use to save media files locally. It does not make every app faster by itself, and recording availability still depends on the app, program, and support.
Identify the ports before connecting cables
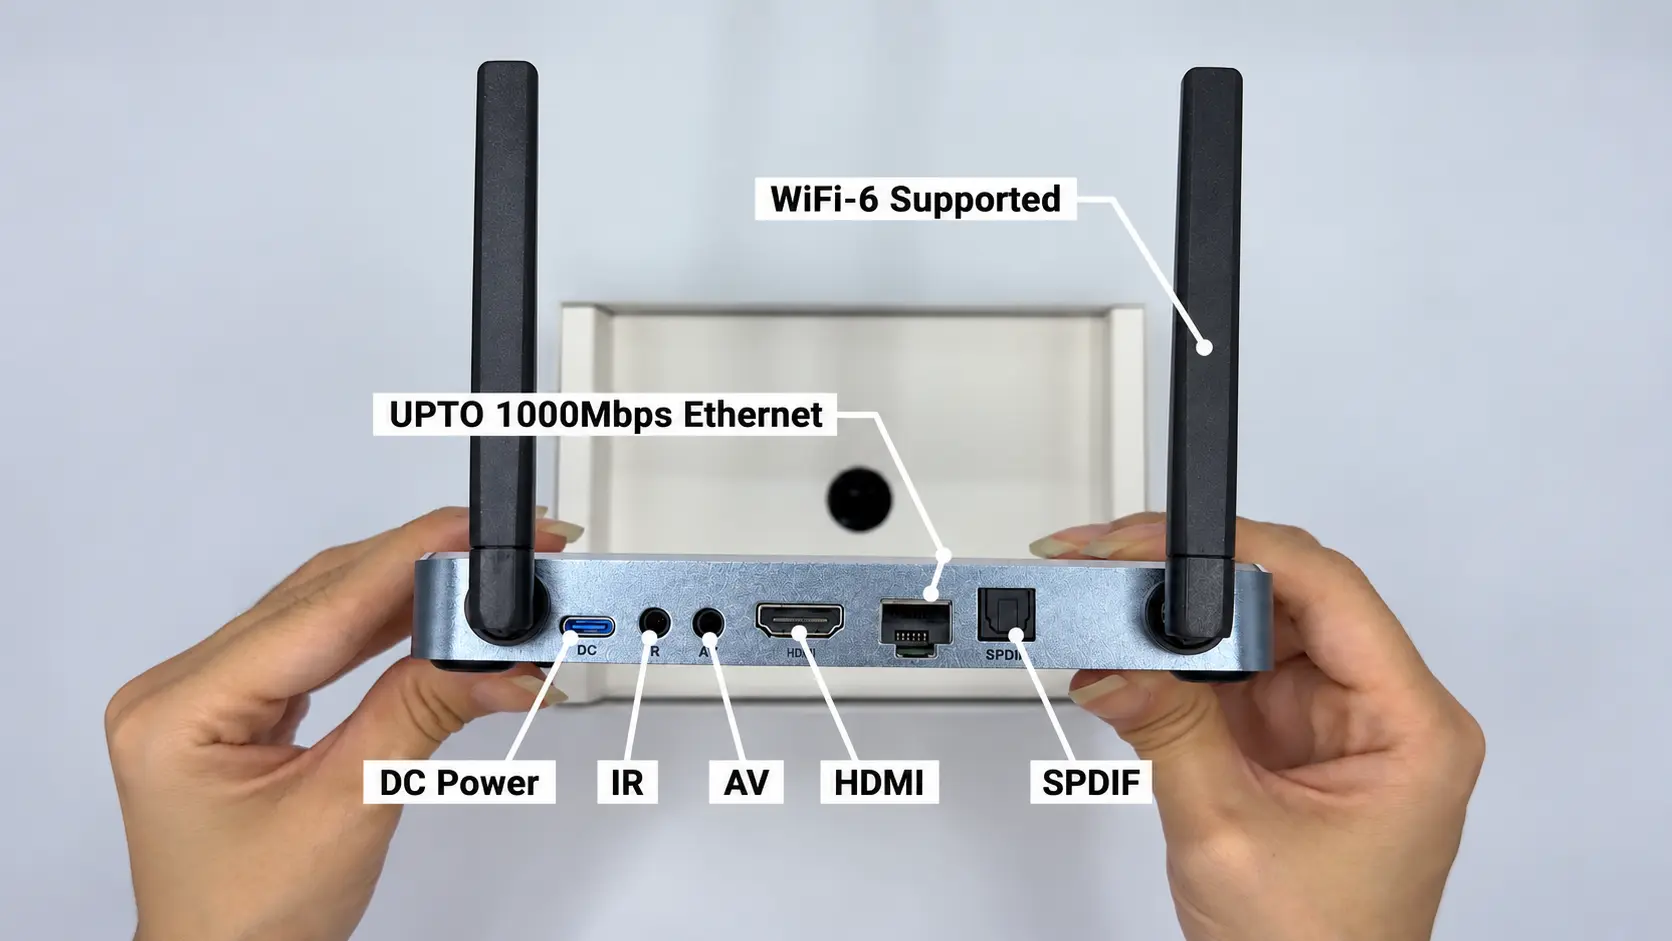
Look at the port labels on the actual device before plugging in accessories. The S8 Ultra specification lists HDMI, Ethernet, USB-C, USB 3.0, and a separate Type-C power connection. Connect HDMI to the TV, use the supplied power supply for the power input, and use Ethernet only if you want a wired network connection. USB ports are for compatible accessories; they are not a replacement for the dedicated power input.
The product specification and the physical production unit should take precedence over generic port labels from photos or packaging. If the ports on your unit appear different, stop and check the model label or ask the seller before inserting a cable. Never force a connector into a port.
Before You Set Up the S8 Ultra
Place the box on a stable, open surface close enough to reach the TV’s HDMI input and a power outlet. Leave the antennas in their normal upright position and do not cover the device. Have your Wi-Fi network name and password ready if you are using wireless internet. If you want to use Ethernet, place the box within reach of your router or network outlet.
You will need:
- A TV or display with an available HDMI input.
- The HDMI cable and Type-C power supply included with your S8 Ultra.
- A working internet connection for online apps and downloads.
- The remote and its batteries.
- Your Wi-Fi password, unless you plan to use Ethernet.
The S8 Series supports Wi-Fi 6 and Gigabit Ethernet according to the current product specifications. These are connection capabilities, not a guarantee of a particular streaming speed. Actual performance depends on the router, internet service, network conditions, app, and content source. For a dedicated network walkthrough, see How to Connect SuperBox S8 to Wi-Fi or Ethernet.
How to Connect the SuperBox S8 Ultra to Your TV
Connect the hardware before moving through the on-screen wizard. This makes it easier to see which cable or input needs attention if there is no picture.
Step 1: Connect HDMI
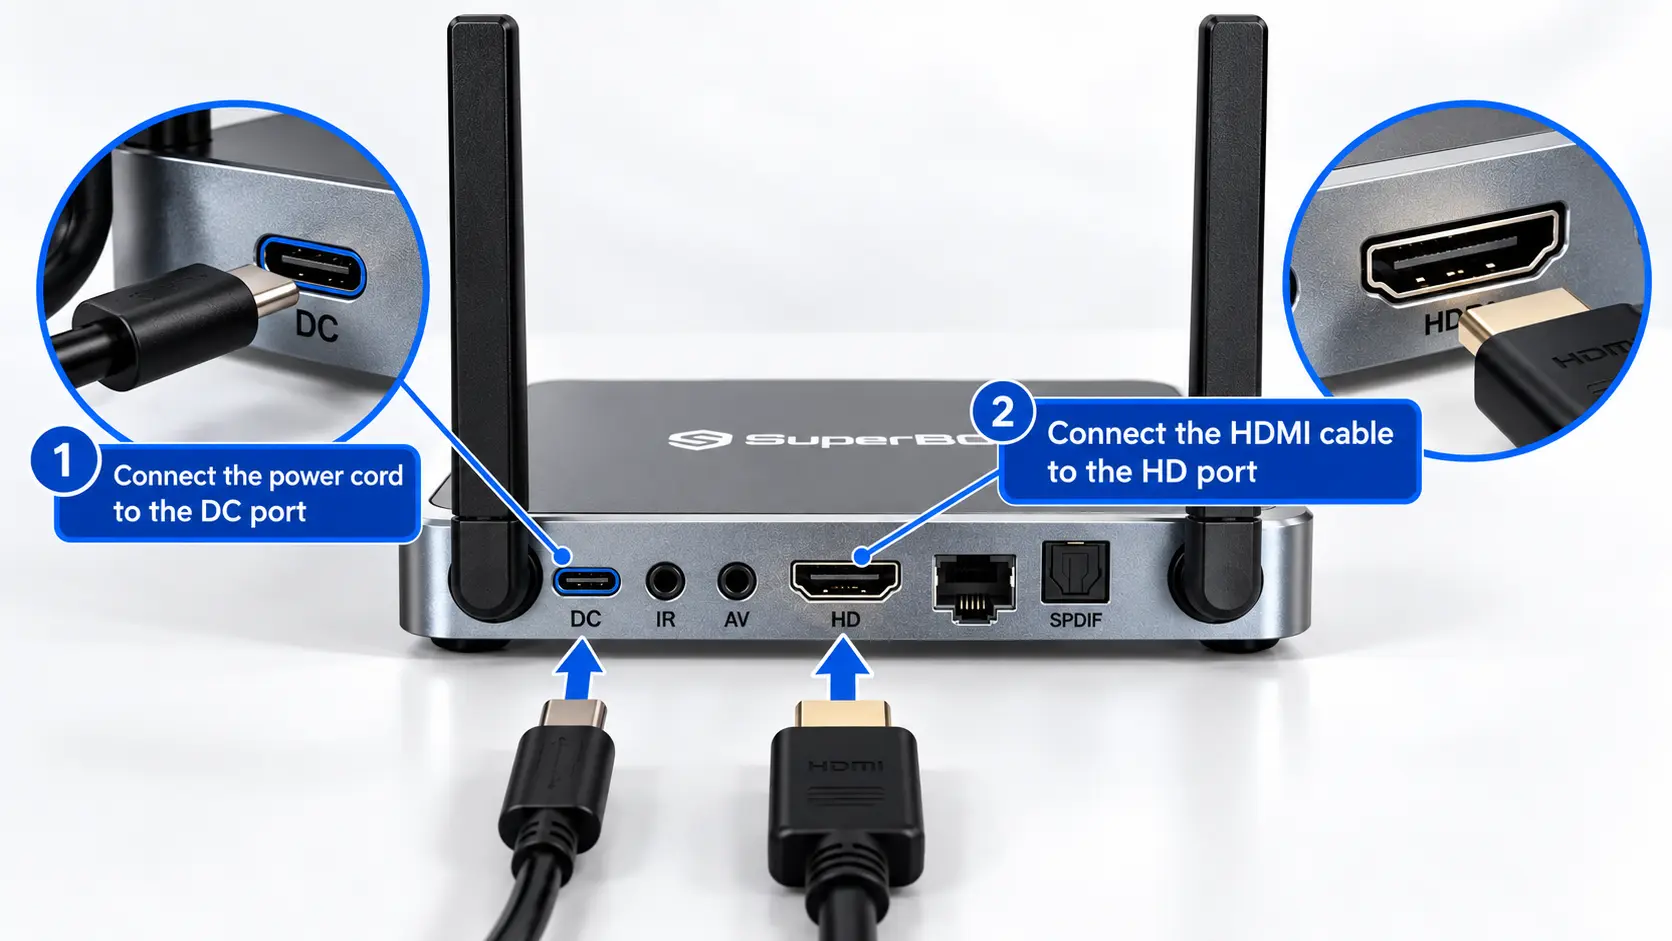
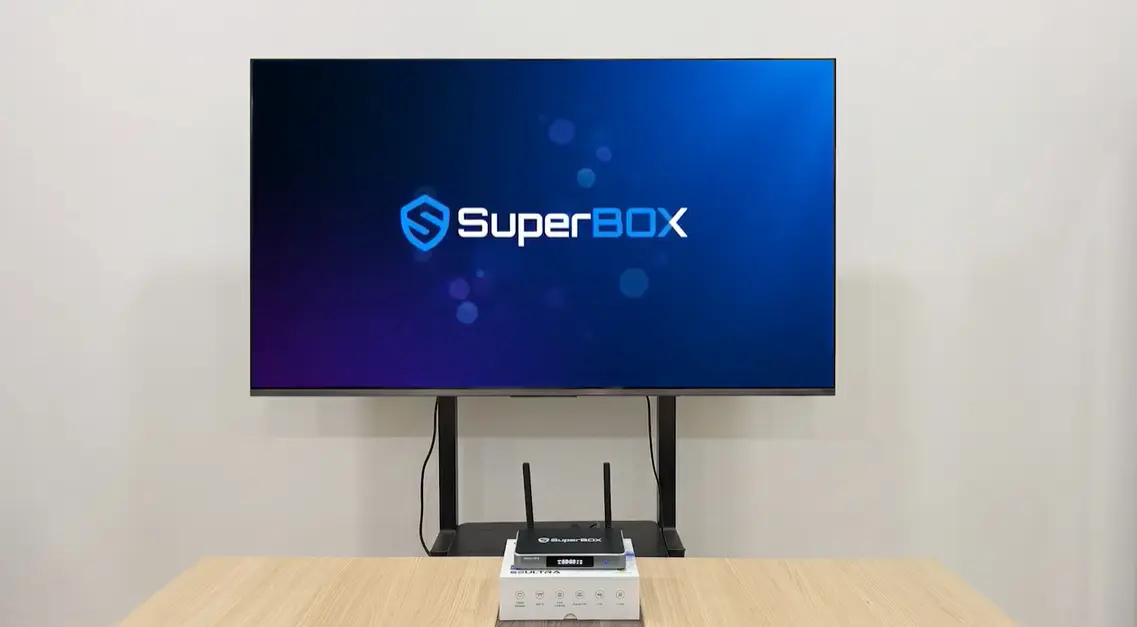
With the TV and S8 Ultra turned off, connect one end of the HDMI cable to the HDMI output on the box and the other end to an available HDMI input on your TV. Remember the input number, such as HDMI 1 or HDMI 2. Seat the plug gently without twisting or forcing it.
Step 2: Connect the Type-C power supply
Connect the supplied Type-C power cable to the S8 Ultra’s designated power input, then connect the power adapter to a suitable outlet. Use the power supply provided with your device. Two plugs can share a Type-C shape while having different electrical ratings, so do not assume that any Type-C adapter is suitable.
Keep the cable clear of walkways and avoid pulling it tight behind furniture. When power is connected, the device should begin its startup process. If it does not, check that both ends are seated and that the outlet is working.
Step 3: Select the TV’s HDMI input
Turn on the TV and use its Source or Input control to select the HDMI port used in Step 1. The SuperBox startup screen should appear after the box boots. If the TV shows “No Signal,” confirm the selected input, reseat the HDMI cable at both ends, and check that the S8 Ultra is receiving power.
Step 4: Complete the initial setup screens
Follow the first-run prompts on screen. Read each notice and choose the option shown on your device to continue. Use the remote’s directional controls to move between choices and press OK to confirm. The exact wording or layout can change with software updates, so use the current labels shown on your own S8 Ultra.
If the remote does not control the setup screen yet, move it closer to the box and check the batteries. Some setup screens may appear before the remote finishes pairing; follow the on-screen pairing prompt when it appears.
How to Connect SuperBox S8 Ultra to Wi-Fi or Ethernet
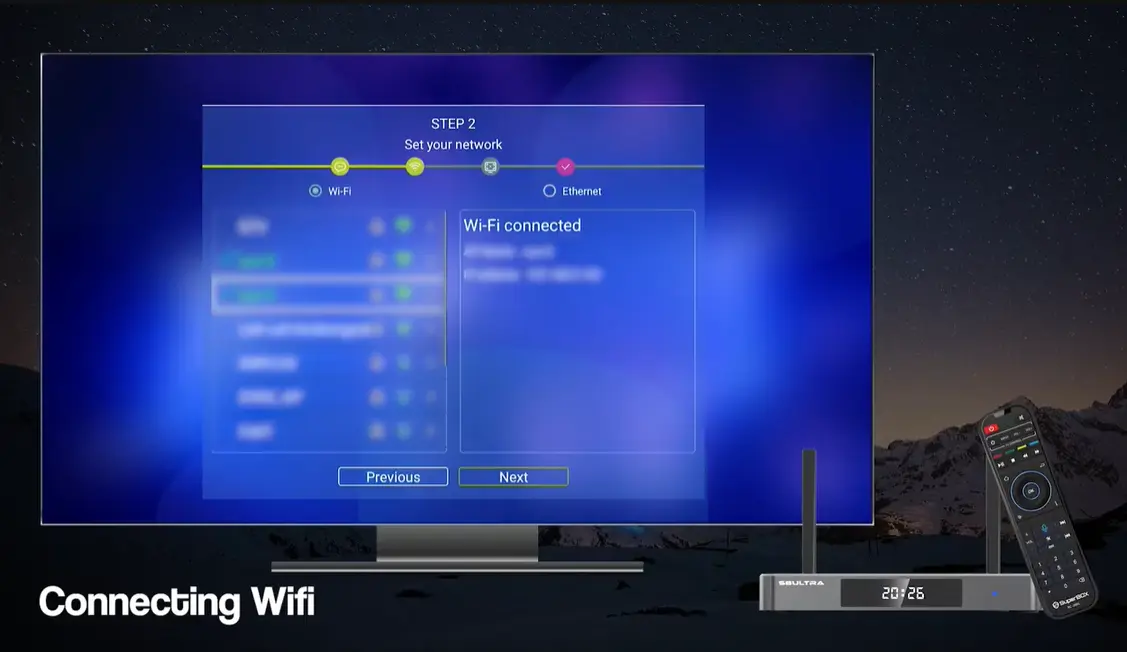
The setup wizard offers a network step so the box can go online. Choose Wi-Fi for a convenient installation without a long cable, or Ethernet if you prefer a wired connection and can run a cable from the router to the S8 Ultra.
Connect using Wi-Fi
- On the Set your network screen, select Wi-Fi.
- Wait for the available network list to appear. Refresh it if the list is empty.
- Highlight your home network and press OK.
- Enter the Wi-Fi password with the on-screen keyboard. Check capitalization, numbers, and symbols.
- Select Connect and wait for the connection result.
- When the network is connected, choose Next to continue setup.
Enter the password carefully. If the connection fails, select the network again and re-enter it rather than repeatedly pressing Connect with a possibly incorrect password. Keep your actual network name and password out of public screenshots or support posts.
Connect with Ethernet
Connect a network cable from the router to the S8 Ultra Ethernet port. Select Ethernet in the setup wizard if prompted, wait for the connection, and continue. Ethernet is useful when the box is near the router and you want a direct wired connection. For more network troubleshooting, use the S8 Wi-Fi and Ethernet guide.
How to Pair the SuperBox S8 Ultra Voice Remote
The included S8 Ultra voice remote supports voice commands, and the Ultra version has backlit buttons for easier navigation in a dim room. The first setup flow may prompt you to pair it. Keep the remote near the box while pairing and follow the instructions displayed on the screen.
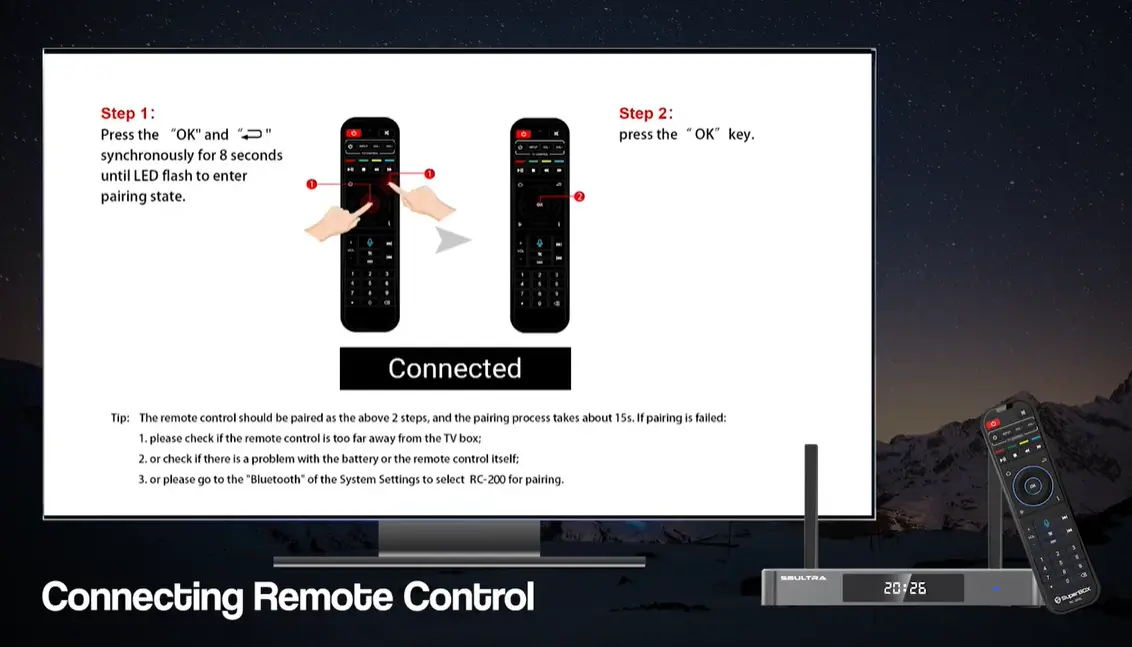
The pairing instructions shown for the S8 setup use this sequence:
- Press and hold OK + Back/Return together for about eight seconds.
- Release the buttons when the remote’s LED flashes and the S8 enters pairing mode.
- Press OK once to start or confirm the search, as prompted.
- Wait for the on-screen Connected message before testing navigation.
If pairing does not complete, make sure the batteries are installed in the correct direction, bring the remote closer to the box, and repeat the on-screen process. Avoid trying random button combinations. Follow the pairing prompt that appears on your device if a later software build changes the steps. For a separate troubleshooting walkthrough, see How to Pair a SuperBox S8 Remote.
Once connected, test the directional buttons, OK, Back, Home, and voice button. The backlight is a hardware feature of the Ultra remote; it does not mean the TV or every app supports every voice request. Use voice for compatible commands and the regular controls for precise menu navigation.
Install Blue TV, Blue VOD, Playback, and Other Apps
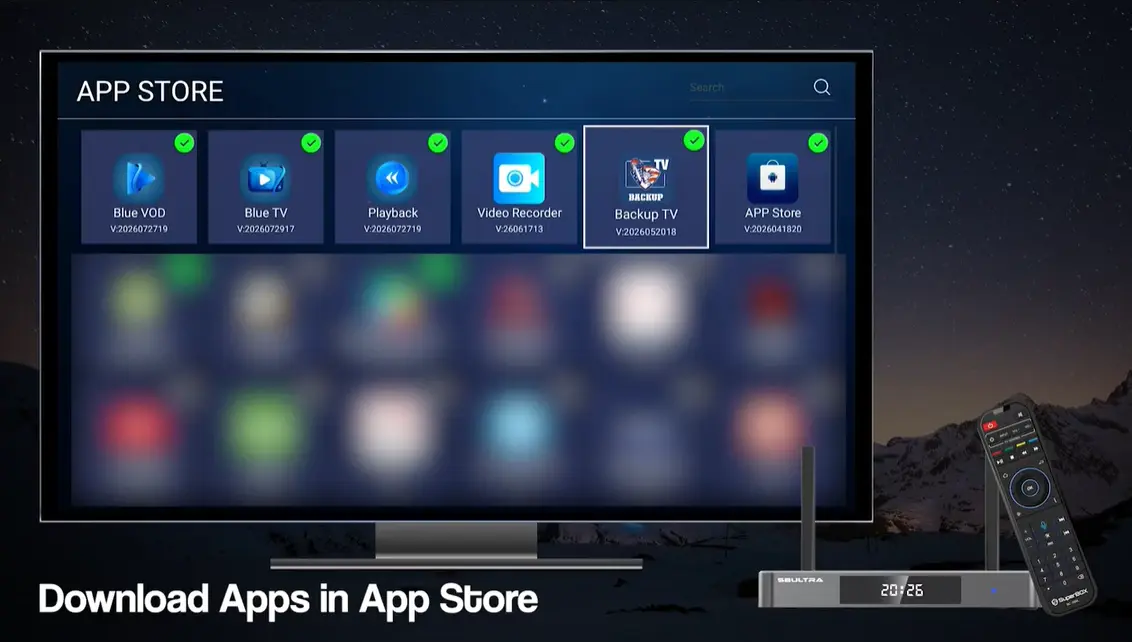
The redesigned S8 interface includes an App Store tile. A new device may need you to download the apps you want from this store. Keep the box connected to the internet during installation and wait for each app to finish before starting another download.
Step 1: Open App Store
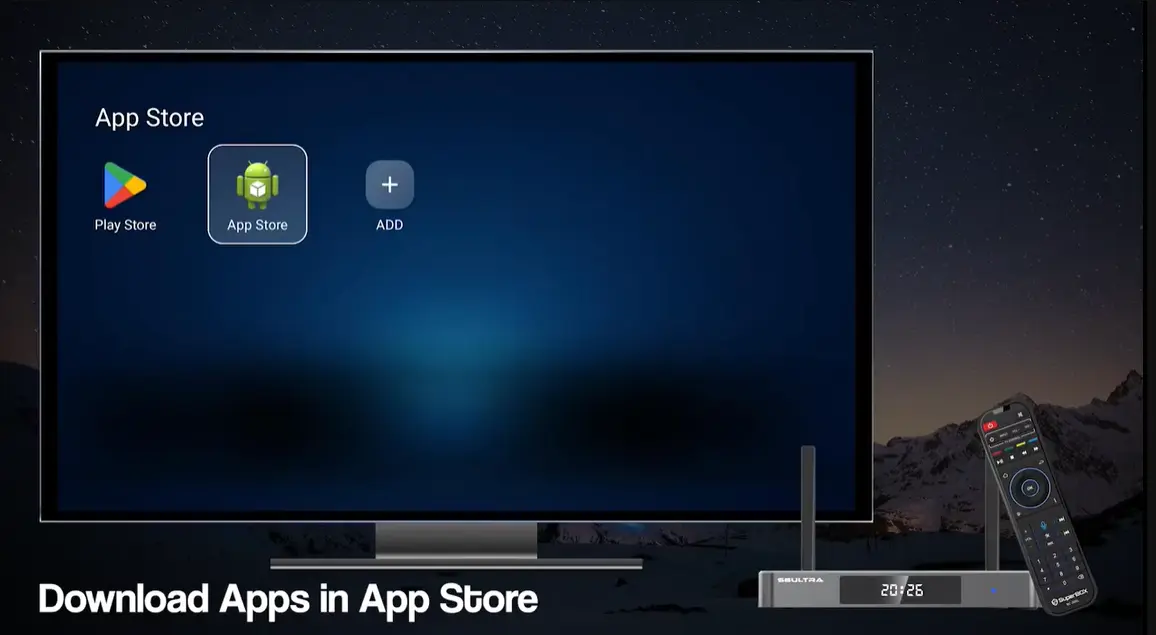
From the S8 home screen, move to App Store and press OK. If an information or service notice appears, read it and make the selection required to enter the app catalog.
Step 2: Review the available app tiles
The catalog interface shown for the S8 Series includes tiles such as Blue TV, Blue VOD, Playback, Video Recorder, Backup TV, and other apps. Names and availability may vary by region or software version. Read the individual app tile and install only the apps you intend to use.
| App or feature | Typical purpose on the S8 interface |
|---|---|
| Blue TV | Browse supported live programming categories |
| Blue VOD | Browse available on-demand content |
| Playback | Revisit eligible programs when the channel supports playback |
| Video Recorder | Access built-in recording for supported programming |
| Backup TV | An additional viewing option for supported live content |
| NFL app | Included in the S8 Max and S8 Ultra model feature comparison; check the current app catalog |
The availability of a channel, title, recording, or replay depends on the app, supported programming, region, and service status. An app tile does not mean every program is available on demand or can be recorded.
Step 3: Install the apps you need
Highlight an app tile and select its download or install option. Wait for the progress indicator to finish. Depending on the interface, a check mark or changed button state may indicate that the app is installed. Repeat for the remaining apps you want.
If an app does not appear on Home afterward, check the Apps area or the S8 home screen’s add-shortcut control. Installing an app and pinning it as a Home shortcut are separate steps. Our SuperBox S8 app installation guide explains how to install the apps and organize shortcuts on the redesigned interface.
What Makes S8 Ultra Different from Other S8 Models?
All four S8 models share the generation’s updated home interface and core setup flow. The Ultra is intended for people who want the largest built-in storage and the most complete set of listed S8 features. Its distinguishing points are more useful than a generic “premium” label: 128GB storage, full-channel Multi-Viewing support as listed in the comparison chart, the NFL app, and the series’ only backlit remote.
| Feature | S8 Pro | S8 Plus | S8 Max | S8 Ultra |
|---|---|---|---|---|
| RAM / internal storage | 4GB / 32GB | 4GB / 64GB | 4GB / 64GB | 4GB / 128GB |
| USB ports | USB-C + USB 3.0 | USB 2.0 + USB 3.0 | USB-C + USB 3.0 | USB-C + USB 3.0 |
| Power connection | Type-C | Round plug | Type-C | Type-C |
| Multi-Viewing | PPV + ESPN channels | PPV + ESPN channels | Full channels | Full channels |
| NFL app | No | No | Yes | Yes |
| Built-in recording | Yes | Yes | Yes | Yes |
| Backlit remote | No | No | No | Yes |
| Voice command | Yes | Yes | Yes | Yes |
All functions remain subject to app, channel, and software support. The S8 Ultra is not automatically the right choice for everyone. If you use only a few apps and do not need the Ultra-specific features, compare the lower models. If you want more storage for apps and locally saved media, a backlit remote, and the full feature tier shown for S8, Ultra may fit your priorities better. See the complete S8 Series model comparison or the SuperBox S8 Ultra product page for current details.
Troubleshooting SuperBox S8 Ultra Setup
The TV says “No Signal”
Confirm that the TV is set to the same HDMI input you used. Reseat the HDMI cable at the TV and box, then check that the Type-C power supply is connected. If possible, test another HDMI input on the TV.
The S8 Ultra does not power on
Check both ends of the supplied power cable and confirm the wall outlet works. Use the adapter provided with the device and verify that you are connected to the power input rather than a USB data port. If there is still no startup response, contact the seller before trying an unverified adapter.
The Wi-Fi list is empty
Refresh the list and confirm that your router is powered on and working. Move the S8 Ultra closer to the router during setup or use Ethernet if practical. If other devices also cannot get online, restore the home network connection first.
The Wi-Fi password is rejected
Re-enter the password slowly and check uppercase letters, numbers, and symbols. Make sure you selected the correct network name, especially if similar network names appear in the list.
The remote does not pair
Check the battery direction, keep the remote close to the box, and follow the current on-screen pairing instructions. Retry OK + Back/Return only as instructed by the pairing screen. A flashing LED alone does not confirm that pairing has finished; wait for the Connected status.
An app is installed but missing from Home
Open the Apps area or return to the home screen and use its add-shortcut option if available. Confirm first that installation completed in App Store. The S8 interface can distinguish an installed app from a pinned shortcut.
The app opens slowly or a stream buffers
Check that the S8 Ultra is still connected to the network and test another app. If one app is affected while others work, note the app name and any message shown. Network quality, app availability, and content source can each affect playback. Use our SuperBox buffering troubleshooting guide for a structured next step.
A feature or menu looks different
Software interfaces can change. Follow the labels on the device you have and check for model-specific guidance before applying instructions meant for another S8 version. Do not factory-reset the box simply because one menu has moved; first confirm the model, app, and current system screen.
Why Buy SuperBox S8 Ultra from SuperBox TV Box Store?
Choosing the right seller is just as important as choosing the right SuperBox model, especially when you want reliable service and product-specific support after your purchase. SuperBox TV Box Store is an authorized online retailer of SuperBox products, serving customers across the United States and Canada with a dedicated source for genuine SuperBox devices, order assistance, shipping support, and after-sales service.
Buying from an authorized retailer also gives customers greater confidence in where their device comes from and who to contact if assistance is needed after delivery. Instead of relying on an unknown third-party marketplace seller, customers have a dedicated retailer that can assist with order questions, shipping concerns, warranty-related issues, and product support throughout the purchasing experience.
For a purchase decision, compare the product listing with the exact model you want. The S8 Ultra has 128GB storage and a backlit remote; those are not features to assume are included with every S8 model. Keep your order confirmation and package details in case you need help. If setup remains blocked after following the steps above, use the store’s SuperBox support and contact guide and provide the model name, the screen you are seeing, and the steps already tried.
Shop the model: View SuperBox S8 Ultra at SuperBox TV Box Store. Check live availability and current terms at checkout.
Frequently Asked Questions
How do I set up a SuperBox S8 Ultra for the first time?
Connect it to the TV with HDMI, attach the supplied Type-C power supply, select the matching TV input, follow the initial prompts, connect to Wi-Fi or Ethernet, pair the remote, and install the apps you want from App Store.
Does the S8 Ultra use a Type-C power cable?
Yes. The current S8 Ultra specification lists a Type-C power connection and a 5V/2A power supply. Use the adapter supplied with the unit.
How much storage does the SuperBox S8 Ultra have?
The S8 Ultra has 128GB of internal storage and 4GB of RAM. Some storage is used by the system and apps, so usable space is lower than the total listed capacity.
Is the S8 Ultra remote backlit?
Yes. The S8 Ultra is the only model in the S8 lineup listed with a backlit remote. The S8 remotes also support voice commands according to the model comparison.
How do I connect the S8 Ultra to Wi-Fi?
On the setup network page, choose Wi-Fi, select your network, enter the password carefully, choose Connect, and wait for a connected status before continuing.
Can I use Ethernet instead of Wi-Fi?
Yes. The S8 Series specification lists Gigabit Ethernet. Connect a network cable to the LAN port and choose Ethernet in the network setup screen if prompted.
How do I pair the S8 Ultra remote?
Follow the pairing prompt on the S8 screen. The setup instructions shown for the S8 use OK + Back/Return held together, followed by the confirmation step on screen. Wait for the Connected status before testing the remote.
Are Blue TV and Blue VOD already installed?
No, SuperBox doesn’t come with preloaded app. The S8 App Store catalog provides apps for installation. Depending on the software and setup state, you may need to install apps and then add shortcuts to Home separately.
Is the S8 Ultra the right model for every buyer?
Not necessarily. Ultra is suited to buyers who value the largest S8 storage tier, backlit remote, NFL app, and full-channel Multi-Viewing support shown in the comparison. Buyers with simpler needs may prefer another S8 model at its current price.
Final Setup Checklist
Before you start watching, confirm that:
- The box is identified as S8 Ultra and the package contents are checked.
- HDMI connects the box to the TV.
- The supplied Type-C power supply is connected to the dedicated power input.
- The TV is on the HDMI input used for the S8 Ultra.
- Wi-Fi or Ethernet shows as connected.
- The remote reports a successful pairing status.
- Your selected apps are installed and visible in Apps or on the Home shortcuts.
- Your network password, serial number, and MAC address are not visible in public screenshots.
With those basics done, the S8 Ultra is ready for you to explore the redesigned interface and supported apps. Keep this guide handy if you add apps later or need to reconnect the network. For questions about model selection, setup, or your order, contact SuperBox TV Box Store through its current support page.
The article was updated on:
