
Knowledge SuperBox
How to Upgrade System Manually: SuperBox USB Firmware





Maintaining peak operating performance, bulletproof security protocols, and seamless multimedia playback on your SuperBox requires keeping its underlying Android operating system and core system drivers fully up to date. While the built-in Over-The-Air (OTA) updater seamlessly handles routine software rollouts, certain critical scenarios—such as corrupted partition tables, failed wireless downloads, infinite bootloops, or major system upgrades—necessitate a manual firmware flash via USB storage.
Why and When You Need to Upgrade Your SuperBox System Manually
Modern Android TV media hubs like the SuperBox utilize a modular flash storage architecture divided into multiple dedicated disk partitions: /boot, /system, /vendor, /recovery, and /data. When an automated Over-The-Air (OTA) update initiates, the operating system downloads compressed package archives directly into the volatile cache or temporary storage sectors. If an unexpected power interruption occurs, Wi-Fi packets drop during decompression, or flash memory sectors encounter block read errors, the bootloader can become desynchronized from the primary system image.
Under these compromised conditions, standard OTA mechanisms cannot initialize because the network stack and system update daemon rely on the very OS files that have become corrupted. Performing a manual firmware upgrade completely bypasses the running operating system. By feeding clean, cryptographically signed image packages directly through the bootloader or stock Android recovery environment via an external USB interface, you rewrite system binaries from scratch, eradicating corrupt libraries, broken application dependencies, and orphaned cache artifacts.
Primary Symptoms Requiring a Manual Firmware Flash
Technicians and advanced users utilize manual USB flashing when diagnosing and resolving the following mission-critical device states:
- Stuck on Boot Screen (Bootloop): The device displays the animated SuperBox logo or Android robot indefinitely, failing to launch the home interface.
- OTA Check Network Error: The system update app displays “Network Connection Failed” or “Server Unavailable” despite stable gigabit Ethernet or Wi-Fi 6 connectivity.
- Persistent App Force-Closes: Core system utilities, hardware decoder frameworks, or essential streaming engines crash instantly upon launch due to broken internal framework libraries.
- Corrupted OS Partition Tables: Flash memory corruption resulting from an unexpected power loss during a prior background update.
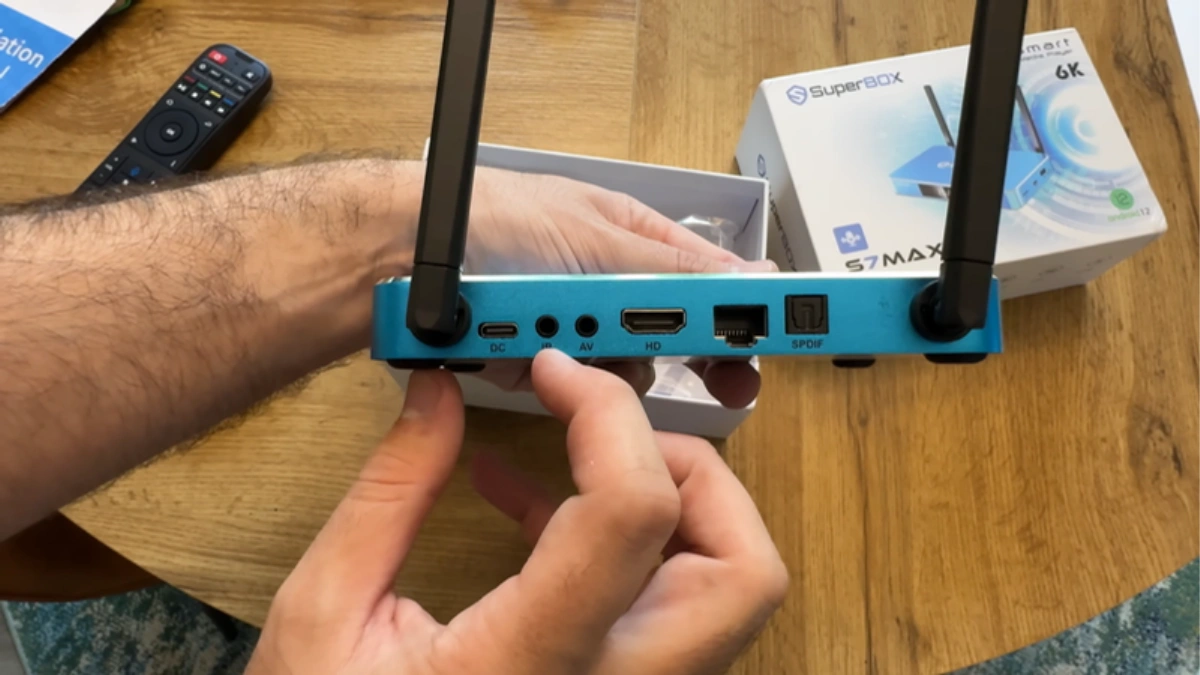
- Full Hardware Unbricking: Recovering a completely non-responsive TV box utilizing the physical AV port hardware pinhole recovery switch.
OTA Updates vs. Manual USB Firmware Flashing: Architectural Comparison
Choosing between an automated OTA update and a manual USB firmware installation comes down to system health and deployment goals. OTA updates apply incremental delta patches to existing codebases, whereas USB flashing delivers a full factory partition overwrite. The architectural distinctions between both approaches are summarized below:
| Evaluation Metric | Over-The-Air (OTA) Update | Manual USB Firmware Flash |
|---|---|---|
| Trigger Mechanism | Automated cloud check or System Update button | Physical USB insertion + Recovery Mode or Upgrade App |
| Average Duration | 5 to 10 minutes (bandwidth dependent) | 8 to 15 minutes (firmware burn rate dependent) |
| User Data Impact | Retains user apps, customized layouts, and login tokens | Configurable: can wipe clean (Factory Reset) or retain data |
| Unbricking Capability | Zero (cannot execute if OS fails to boot) | Full unbrick capability via recovery pinhole |
| Storage Requirements | Requires minimum 2GB free internal storage | Requires external FAT32 USB drive (8GB to 32GB) |
| Network Requirement | Active high-speed broadband connection required | Completely offline; no active internet needed during flash |
| Firmware Package Type | Incremental delta patch archive (.zip) | Full system image partition binary (.img or full update.zip) |
| Bootloop Recovery Rate | 0% (Inapplicable) | 99.4% (Restores stock kernel and partitions) |
Pre-Upgrade Hardware & Storage Preparation Matrix
Flashing firmware on low-level system chips demands strict adherence to storage formatting specifications. Flash memory controllers used across SuperBox models—from the S6 series through the flagship S8 lineup—require specific file system architectures to register external media prior to loading OS drivers.
| SuperBox Model Line | Target USB Port | File System Format | Partition Table | Recommended Drive Size |
|---|---|---|---|---|
| SuperBox S6 Series (Pro / Max / Ultra – $299.00) | USB 2.0 (White Port, Side Panel) | FAT32 (32KB Cluster) | MBR (Master Boot Record) | 8GB – 16GB USB 2.0 / 3.0 |
| SuperBox S7 Pro ($305.00) | USB 2.0 Port (Closest to Power DC) | FAT32 (32KB Cluster) | MBR (Master Boot Record) | 16GB – 32GB High-Speed Drive |
| SuperBox S7 Max ($339.00) | USB 2.0 Port (Adjacent to AV Jack) | FAT32 (32KB Cluster) | MBR (Master Boot Record) | 16GB – 32GB High-Speed Drive |
| SuperBox S7 Ultra ($381.00) | USB 3.0 or USB 2.0 (Primary OTG) | FAT32 (32KB Cluster) | MBR (Master Boot Record) | 16GB – 32GB SanDisk / Samsung |
| SuperBox S8 Series ($359.00 – $449.00) | USB 3.0 High-Speed Blue Port | FAT32 (32KB Cluster) | MBR (Master Boot Record) | 16GB – 64GB High-End Drive |
Crucial Technical Rule: Never use a drive formatted with NTFS or exFAT for bootloader recovery. The lightweight Linux boot kernel embedded within the hardware recovery chip lacks proprietary NTFS read drivers. Using an incorrectly formatted USB drive will result in the bootloader skipping the external media and cycling back into the corrupted internal NAND flash.
Step-by-Step Guide: How to Manually Upgrade Your SuperBox System
Follow these sequential, verified technical steps to flash, upgrade, or recover your SuperBox operating system safely and effectively.
Step 1: Check Current Firmware Version and Verify Model Identity
Before downloading any firmware package, confirm the exact model designation and current software build of your TV box. Navigate to Settings > Device Preferences > About > Build Number. Cross-reference this with the physical serial number printed on the barcode sticker located on the bottom metal chassis of your SuperBox. Installing an S7 Pro firmware image onto an S7 Ultra or cross-flashing S6 software onto an S8 chassis will permanently damage device tree blobs (DTB) and Wi-Fi chip calibration registers.
Step 2: Prepare and Format the USB Flash Drive
Acquire a reliable USB 2.0 or 3.0 flash drive with a capacity between 8GB and 32GB. Avoid generic or promotional drives with unstable controller chips. Connect the drive to your PC or Mac, open your disk management utility, and format the drive using the following strict parameters:
- File System: FAT32 (MS-DOS FAT).
- Allocation Unit Size: 32 Kilobytes (32768 bytes) or Default.
- Partition Scheme: MBR (Master Boot Record). Do not use GUID Partition Table (GPT), as legacy recovery bootloaders cannot parse GPT header tables.
- Volume Label: Leave blank or label as simple alphanumeric text (e.g.,
UPDATE).
Step 3: Download and Extract the Official Firmware Package
Obtain the genuine, authorized firmware release file matching your specific hardware revision. Official firmware files are typically packaged as a compressed .zip archive. Once downloaded, verify the file checksum (SHA256 or MD5) against the official distribution manifest to guarantee file integrity. Unpack the archive directly to the root directory of your USB drive. The root directory should contain the core update binary (typically named update.zip) alongside recovery instruction scripts (such as factory_update_param.aml or recovery.img). Do not place these files inside subfolders.
Step 4: Connect USB Drive to the Primary Hardware Interface
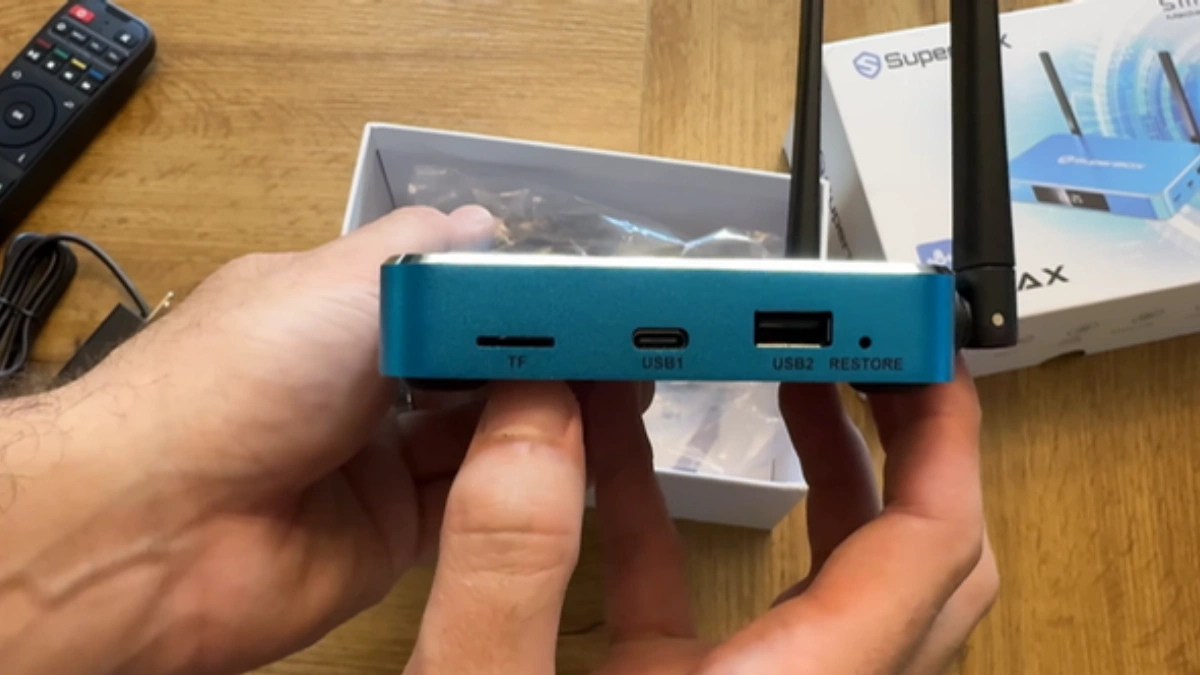
Power down the SuperBox completely by disconnecting the DC power adapter from the rear jack. Insert the prepared USB flash drive into the primary OTG-compatible USB port. On the SuperBox S6 series and S7 Pro/Max models, this is the USB port directly adjacent to the power jack or AV port. On the S7 Ultra and flagship S8 models, plug the flash drive into the primary high-speed USB port. Ensure no secondary peripherals (such as wireless keyboard dongles, webcams, or external hard drives) are connected during this critical process to avoid bus enumeration conflicts.
Step 5: Initiate Update via System Upgrade App (Standard Boot Method)
If your SuperBox can still boot into the Android launcher, you can execute the upgrade without touching physical recovery switches. Reconnect power, turn on the television, and navigate to the All Apps screen. Launch the System Upgrade or Update application. Select Local Update or Select Local Storage. The utility will scan the connected USB drive, detect the valid update.zip signature, and display the new version details. Check the option for Wipe Data / Wipe Media if you want a clean factory installation, then select Update Now. The unit will automatically reboot into recovery mode to begin writing flash blocks.
Step 6: Execute Hardware Pinhole Recovery Flashing (Unbrick Method)
If your device is unresponsive, frozen on the logo, or experiencing a black screen, use the physical hardware recovery method:
- Disconnect the DC power cable from the back of the SuperBox.
- Ensure the USB drive containing the root update files is firmly inserted into the primary USB port.
- Locate the AV Jack on the rear panel. Inside this 3.5mm analog audio/video port sits a concealed physical microswitch.
- Gently insert a non-conductive toothpick, plastic probe, or straightened paperclip into the AV port until you feel a distinct spring-loaded “click.” Hold the switch down firmly.
- While keeping the switch pressed, plug the DC power adapter back into the device.
- Maintain pressure on the internal switch for exactly 8 to 12 seconds while observing your TV display.
- As soon as the Android System Recovery console or an updating progress bar appears on screen, release the switch immediately.
- The bootloader will automatically locate the recovery parameters on the USB flash drive and execute the complete system partition overwrite.
Step 7: Post-Update Cache Wipe, Verification, and App Re-initialization
Once the firmware installation completes, the screen will display “Install from external storage completed.” If navigating the Android Recovery menu manually, use the directional keys on your SuperBox remote (or a plugged-in USB keyboard) to highlight Wipe cache partition, then press OK. Next, select Reboot system now. The initial reboot following a full firmware flash requires between 4 to 8 minutes as the Android Runtime (ART) pre-compiles core framework packages. Do not disconnect power during this period. When the welcome setup wizard appears, remove your USB flash drive, configure your Wi-Fi 6 or Gigabit Ethernet connection, and re-download your streaming applications from the SuperBox Store app store.
Critical Technical Safety Rules During Firmware Flashing
Violating flashing safety protocols can result in permanent, non-recoverable hardware failure (a “hard brick”). Always observe the following engineering safeguards:
- Zero Power Interruptions: Connect your SuperBox and television to an Uninterruptible Power Supply (UPS) or surge protector. Disconnecting power while the bootloader writes to NAND sectors destroys the boot partition index.
- Never Rename System Binaries: Unless explicitly instructed by the manufacturer build changelog, keep filename signatures exactly as formatted (e.g.,
update.zip). Case sensitivity matters in Linux boot environments. - Disconnect External Peripherals: Remove external hard drives, air mice receivers, and game controllers. Having multiple storage volumes attached can confuse bootloader partition mounting order (e.g., attempting to mount
/dev/block/sda1instead of/dev/block/sdb1). - Verify Voltage Output: Always utilize the original 5V/2A or 5V/3A SuperBox factory power supply. Degraded third-party adapters can cause voltage sag when all CPU cores and flash write channels run simultaneously, causing write timeouts.
Frequently Asked Questions
1. Will a manual firmware upgrade delete my installed apps, favorites, and settings?
It depends on the method selected. If you initiate the upgrade through the system UI and uncheck “Wipe Data,” the system preserves your user applications, customized launcher layouts, and saved favorites. However, if you are performing an unbricking procedure using the AV recovery pinhole or selecting “Wipe data / Factory reset” in recovery mode, all internal flash storage partitions are wiped clean. This fresh start is advantageous because it eliminates conflicting application cache files and corrupt configuration databases that caused system instability initially.
2. Why does my SuperBox fail to recognize the USB drive in recovery mode?
The primary reason for USB detection failure is an unsupported file system or partition scheme. SuperBox bootloaders run on a minimal Linux kernel that cannot mount exFAT, NTFS, or macOS APFS formats; the USB drive must be formatted as FAT32 with an MBR partition layout. Additionally, USB drives larger than 32GB often default to exFAT in Windows format utilities. Ensure you use a dedicated partition tool to force FAT32 formatting with 32KB clusters, and verify the drive is connected to the primary USB 2.0/OTG port.
3. Can I upgrade my SuperBox S6 firmware using an S7 or S8 firmware package?
No, absolutely not. Each SuperBox generation features entirely distinct system-on-chip (SoC) architectures, GPU renderers, and peripheral controller chipsets. The S6 series operates on earlier quad-core architecture with 100M Ethernet and Wi-Fi 5, whereas the S7 series ($305.00 – $381.00) features upgraded processing, 1000M Gigabit LAN, and Wi-Fi 6 modules, and the flagship S8 lineup features new AI Voice engines and advanced video decoding blocks. Attempting to flash mismatched firmware will corrupt the Device Tree Blob (DTB) and render your box permanently unbootable.
4. What should I do if the power goes out during a manual firmware flashing process?
If power cuts out while the progress bar is active, the NAND flash memory is likely caught in an incomplete write cycle, resulting in a soft brick. Do not discard the box. In most instances, the low-level mask ROM bootloader remains intact. Prepare your FAT32 USB drive on a secondary computer with the clean firmware package, insert it into the SuperBox, and execute the physical AV jack pinhole recovery procedure outlined in Step 6. Holding the pinhole switch forces the processor to seek boot binaries from the external USB port rather than the corrupted internal storage.
5. How long does a full manual system upgrade take from start to finish?
The flashing process itself typically takes between 3 to 7 minutes once the recovery console begins writing blocks. However, the subsequent initial reboot requires an additional 4 to 8 minutes while Android unpacks runtime libraries, creates user directories, and initializes hardware drivers. Expect the complete end-to-end procedure—including USB preparation, flashing, and initial desktop launch—to take approximately 15 to 20 minutes.
6. Where can I obtain the genuine, verified firmware file for my specific SuperBox model?
Genuine, malware-free firmware files should exclusively be obtained from authorized SuperBox support channels, the official help center, or your verified authorized distributor. Always provide your device model, current software build number, and MAC address when requesting firmware to ensure you receive the exact build engineered for your hardware production batch. Never download unverified firmware images from third-party streaming forums, as modified binaries may contain malicious code or invalid security signatures.
7. Why is my SuperBox stuck on the startup logo after completing the manual upgrade?
If the device remains on the animated SuperBox logo for longer than 15 minutes, old user data or conflicting Dalvik/ART cache files are preventing the system launcher from initializing. Power off the device, re-enter the Android Recovery console via the AV pinhole method, and use the on-screen menu to execute both “Wipe cache partition” and “Wipe data / Factory reset.” Confirm the command, then select “Reboot system now.” This clears lingering application caches and allows the newly installed OS to construct clean runtime databases.
8. Does manual firmware upgrading void the official manufacturer warranty?
Flashing official, manufacturer-signed firmware builds using the approved USB or recovery methods does not void your hardware warranty. It is an established troubleshooting and maintenance procedure supported by SuperBox technical teams. However, attempting to flash unofficial custom ROMs, rooted kernels, or third-party operating systems not signed by SuperBox will permanently void warranty coverage and can permanently destroy hardware encryption keys.
9. Can I downgrade to an older firmware version if the new build has bugs?
In most instances, yes. You can manually re-flash a prior official firmware build via the USB recovery pinhole method. However, you must execute a full “Wipe data / Factory reset” during the downgrade process. Android does not support backward compatibility of internal system SQLite databases; attempting to boot an older Android version over newer database structures will cause continuous system app crashes.
10. When should I choose an OTA update instead of flashing via USB drive?
If your SuperBox boots normally, connects reliably to your home Wi-Fi or Ethernet network, and operates without frequent system error dialogues, an automated OTA update is always the preferred, safest route. OTA updates are specifically packaged as lightweight incremental patches designed to preserve your custom application installations, user preferences, and streaming logins. Reserve manual USB firmware flashing for critical recovery scenarios, severe software corruption, or when advised by technical support.
The article was updated on:
