
Knowledge SuperBox
How to Add a USB Flash Drive to SuperBox for More Storage (2026 Guide)





SuperBox gives you a compact way to bring apps, streaming services, and local media together on one screen. But as you install more apps or keep more files on the device, the available internal storage can begin to feel limited.
The simplest solution is to add a USB flash drive.
In this guide, we will show you how to add USB storage to SuperBox, explain the difference between internal and removable storage, and help you choose the correct option for the way you use your device. You will also learn how to move supported apps, open local media, safely eject the drive, and fix the most common SuperBox USB problems.
Quick answer: Insert a compatible USB flash drive into your SuperBox, open Settings, go to Storage or Storage & reset, select the USB drive, and follow the on-screen setup. Choose device/internal storage if you want more room for supported apps, or removable/portable storage if you want to transfer media between SuperBox and other devices.
Why Add a USB Flash Drive to SuperBox?
A USB flash drive can make your SuperBox setup more flexible without replacing the device. Depending on the storage mode you select, it can give you more room for compatible apps or provide a convenient place to keep videos, music, photos, and other local files.
Adding a flash drive is especially useful when you want to:
- Free up space in the SuperBox internal storage.
- Store or play local media files.
- Keep personal media separate from system files.
- Move supported apps away from the built-in storage.
- Carry compatible media between a computer and your SuperBox.
Current SuperBox models include USB connectivity. For example, the SuperBox S7 Max product specifications list a USB 3.0 port, and SuperBox product information confirms that local media can be played through USB storage on supported models.
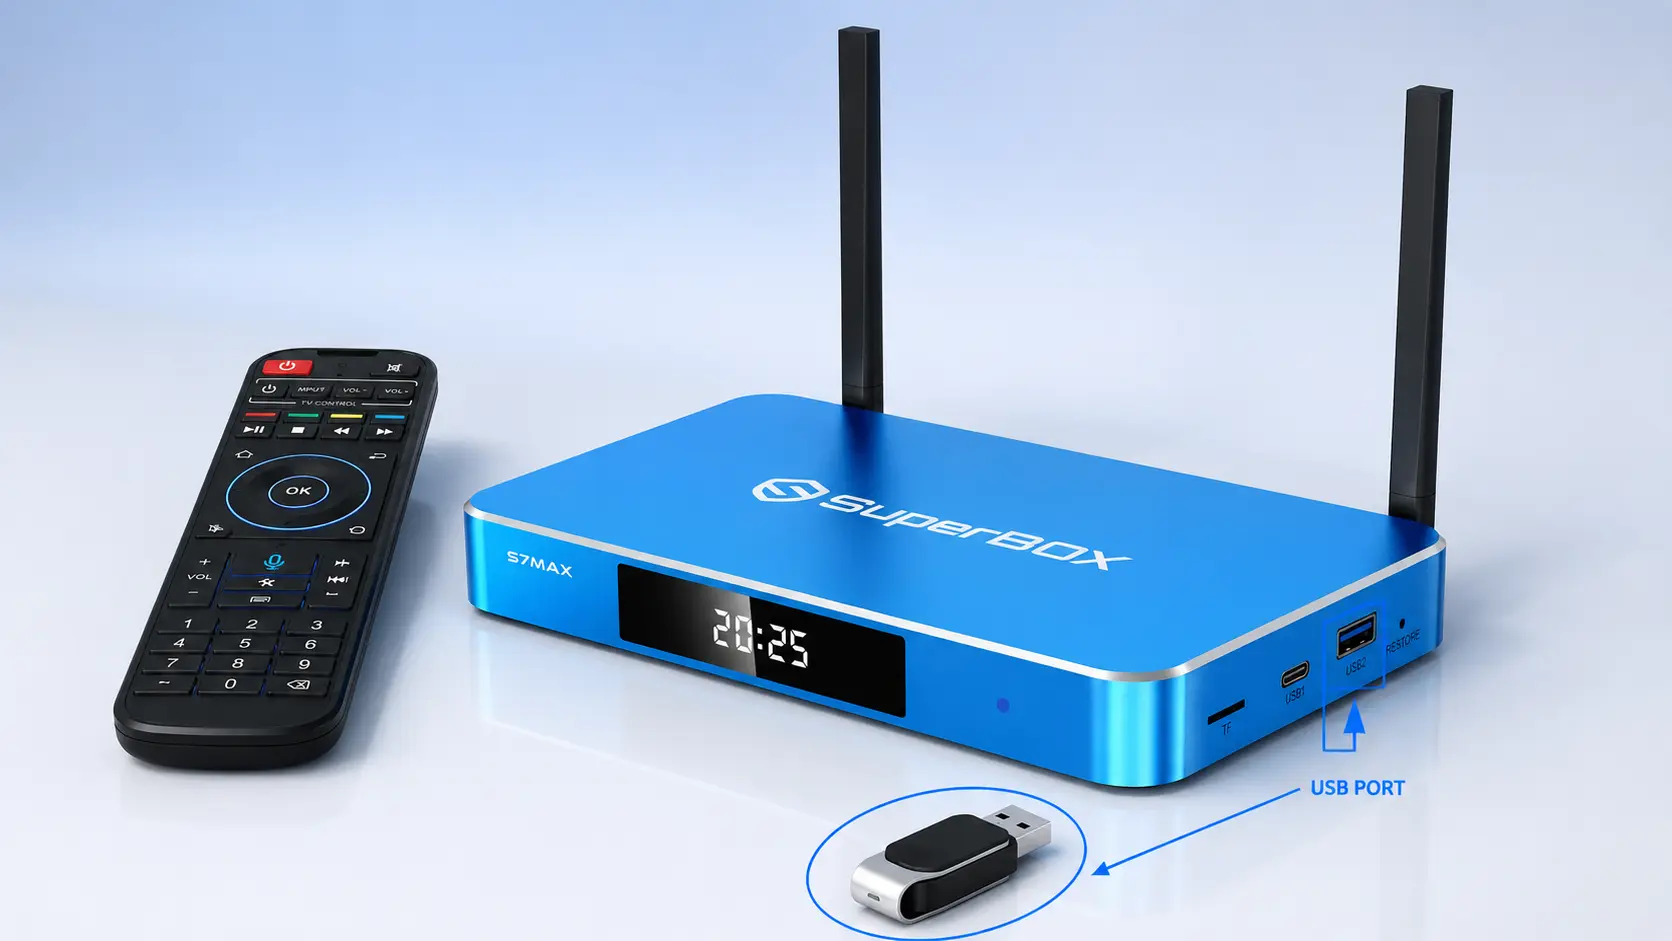
Before You Start: What You Need
Prepare the following items before setting up the drive:
- A SuperBox connected to your television and powered on.
- The SuperBox remote control.
- A USB flash drive.
- A few minutes to complete the on-screen setup.
Which USB Flash Drive Should You Choose?
For a smooth experience, use a dependable flash drive from a reputable manufacturer. If your SuperBox has a USB 3.0 port, a USB 3.0 drive is the practical choice because it can take advantage of the faster interface when the hardware and files support it.
The ideal capacity depends on what you plan to store:
| Typical use | Practical capacity | Why it works |
|---|---|---|
| A small media collection or occasional file transfer | 32–64GB | Compact and usually enough for basic use |
| More apps and a larger local media library | 128GB | A balanced option for many households |
| Large personal video collections | 256GB or more | More room, but compatibility should be verified with the specific drive and SuperBox model |
These capacity ranges are buying guidance rather than a universal compatibility limit. Drive design, file system, power requirements, and SuperBox software version can all affect recognition. When in doubt, test the drive before relying on it for important files.
Internal Storage vs Removable Storage: Which Option Should You Select?
This is the most important decision in the setup process. When SuperBox detects a new drive, it may offer two ways to use it. Android wording varies by software version, so you may see device storage, internal storage, removable storage, or portable storage.
| Feature | Device/Internal storage | Removable/Portable storage |
| Best for | Creating more room for supported apps and device data | Keeping videos, photos, music, and files you want to move between devices |
| Can supported apps be moved to it? | Yes, when the app allows external storage | No |
| Can it be read normally on another device? | No; it is tied to the SuperBox | Yes, when the other device supports the file system |
| Does setup erase the drive? | Yes | It may, especially if reformatting is required |
| Can you unplug it whenever you want? | It should remain connected and must be ejected safely | It can be removed after safe ejection |
| Best choice for most media transfers | No | Yes |
How to Add a USB Flash Drive to SuperBox
The exact menu labels can vary slightly by SuperBox model and software build, but the workflow remains similar.
Step 1: Back Up the USB Flash Drive
Connect the flash drive to a computer first and copy any files you want to keep. The SuperBox setup may need to format the drive, and formatting permanently removes its existing contents.
Do not continue until your backup is complete.
Step 2: Connect the Flash Drive to SuperBox
Turn on your SuperBox and wait for the home screen to load. Insert the flash drive firmly into an available USB port on the box. Avoid forcing the connector; it should slide into the port in the correct orientation.
If your model has more than one USB port, use the USB 3.0 port for a USB 3.0 flash drive when available.
Step 3: Wait for SuperBox to Detect the Drive
After connecting the flash drive, wait a few seconds. A USB notification or storage prompt may appear on the screen. If it does, select it with the remote to begin setup.
If no prompt appears, continue to Settings and open the storage menu manually.
Step 3: Verify the Connection
Turn on your TV and SuperBox. Look at the top right corner of the home screen. A small USB icon or notification banner should pop up, indicating that the system has successfully detected the external storage.
Step 4: Access Your Files
To view and play the content inside your USB drive, follow these navigation steps:
- Go to the SuperBox Home Screen.
- Open the App Store or your pre-installed apps.
- Select and launch the File Browser (or AppInstaller if you are installing
.apkfiles). - Choose your USB Storage from the device list to browse your folders.
Step 5: Safe Removal (Optional but Recommended)
To prevent data corruption, do not pull the drive out while it is reading data.
- Navigate to Settings > Storage & Reset.
- Select your USB Drive.
- Click Eject or Unmount.
- Safely unplug the drive from the box.
How to Play Media from a USB Flash Drive on SuperBox
When the flash drive is configured as removable storage, copy your personal media to it using a computer, safely eject it from the computer, and reconnect it to SuperBox.
Then:
- Open the file manager or media player available on your SuperBox.
- Select the connected USB drive.
- Browse to the folder containing your file.
- Select the video, music, or photo file you want to open.
- Choose a compatible media app if SuperBox asks which application to use.
The ability to play a specific file depends on whether the installed player supports that file’s container, video codec, audio codec, and resolution.
How to Safely Remove the USB Flash Drive
Never pull out an active flash drive without ejecting it first. Safe ejection allows SuperBox to finish pending file operations and reduces the chance of damaged files.
Open Settings > Storage or Storage & reset, select the USB drive, and choose Eject. Wait until SuperBox confirms that the drive can be removed, then disconnect it.
If the drive was configured as internal storage, it is designed to remain with that SuperBox. Apps and data stored on it may disappear or stop working while the drive is disconnected.
SuperBox USB Not Recognized? Try These Fixes
If your SuperBox does not detect the flash drive, work through the checks below in order. Start with the least disruptive option and only format the drive after backing up its contents.
| Problem | Likely cause | Recommended action |
| Nothing appears after connecting the drive | Loose connection, temporary detection issue, or faulty port | Remove the drive, reconnect it firmly, wait, and test another USB port if available |
| The drive appears but cannot be opened | Unsupported or damaged file system | Back up the drive on a computer, then format it to a supported FAT format |
| SuperBox asks to format the drive | The existing format is not recognized or a new storage mode is required | Back up all data, choose the intended storage mode, and follow the format prompt |
| Apps cannot be moved to the USB drive | The drive is portable storage or the app blocks external installation | Confirm the drive is configured as internal storage; if it is, the app may simply be ineligible |
| Apps disappear after unplugging the drive | The apps or data are stored on adopted USB storage | Reconnect the same drive and leave it attached during use |
| The interface becomes slow after adopting the drive | Flash drive performance is below the device’s internal storage | Use a faster, reputable USB 3.0 drive and keep essential apps on internal storage when possible |
| Files play on a computer but not on SuperBox | Media format or codec is unsupported by the selected player | Try another compatible player or convert your own file to a supported format |
| The drive disconnects randomly | Drive, connector, port, or power stability problem | Test another drive and USB port; avoid loose adapters and unnecessary USB hubs |
1. Reconnect the Drive
Unplug the flash drive, wait a moment, and reconnect it firmly. Give SuperBox several seconds to scan the device.
2. Try Another USB Port
If your SuperBox has another available port, test it. This helps determine whether the issue follows the flash drive or remains with one port.
3. Restart SuperBox
Restart the device through its system menu, then reconnect the flash drive after the home screen loads.
4. Check the Drive on a Computer
Connect the flash drive to a computer. If the computer also cannot recognize it, the flash drive may be damaged. If it works, back up the files before attempting any reformatting.
5. Use a Supported FAT Format
Google’s Android TV documentation specifies FAT-format support. If the drive uses an unrecognized file system, back it up and reformat it to a compatible FAT format before reconnecting it to SuperBox.
6. Test a Different Flash Drive
A second known-working drive is one of the fastest ways to isolate a compatibility or hardware problem. If the second drive works immediately, the original drive is the likely cause.
Best Practices for Reliable SuperBox USB Storage
Use these habits to protect your files and keep the storage connection dependable:
- Back up important files before formatting or changing storage modes.
- Use a reliable USB flash drive rather than an unknown or heavily worn device.
- Keep adopted internal storage connected to the same SuperBox.
- Eject removable storage through Settings before unplugging it.
- Leave some free space instead of filling the drive completely.
- Do not interrupt power while formatting or migrating data.
- Keep a separate backup of files that cannot be replaced.
- Remember that changing between internal and removable storage requires reformatting and erases the drive.
Frequently Asked Questions
Can I add more storage to SuperBox with a USB flash drive?
Yes. Connect a compatible flash drive to an available USB port and complete the storage setup in Settings. Depending on the mode you choose, the drive can be used for supported apps and device data or as removable storage for local media.
What format should a USB drive use for SuperBox?
Google’s Android TV guidance states that FAT-formatted USB drives are supported. If SuperBox does not recognize the existing file system, back up the drive before allowing the device to format it.
Will setting up a flash drive erase my files?
Formatting will erase the drive. Back up all important files before choosing a format or changing the drive’s storage mode.
Should I choose internal storage or removable storage?
Choose internal storage when you need more room for supported apps and will keep the drive attached to one SuperBox. Choose removable storage when you want to transfer photos, music, videos, or other files between compatible devices.
Can I move every SuperBox app to a USB drive?
No. Only apps that permit external storage can be moved. The USB drive must also be configured as device/internal storage rather than portable storage.
Can I remove a USB drive that is formatted as internal storage?
It is physically possible, but it is not recommended during normal use. Apps and data stored on the drive will become unavailable, and unexpected removal can risk corruption. Eject it through Settings first whenever removal is necessary.
Why is my SuperBox slower after adding USB storage?
The flash drive may be slower than the built-in storage. Android may warn when adopted media performs poorly. A quality USB 3.0 drive can help, but actual speed still depends on the drive, port, and workload.
Can I use the same flash drive on a computer after setting it up?
Yes, if it is configured as removable storage and the computer supports its file system. A drive configured as internal storage is formatted and encrypted for that SuperBox and is not intended to be read normally elsewhere.
Why does SuperBox ask me to format my USB drive?
The drive may use an unrecognized file system, or SuperBox may need to prepare it for the selected storage mode. Formatting erases the drive, so back up its contents first.
How do I remove the flash drive safely?
Open Settings > Storage or Storage & reset, select the USB drive, choose Eject, and wait for confirmation before unplugging it.
Final Thoughts
Adding a USB flash drive is one of the easiest ways to make a SuperBox more flexible. The key is choosing the correct setup mode from the beginning: use internal storage for supported apps that will stay with the device, or choose removable storage for local media and easy file transfer.
Take time to back up the drive, follow the format prompts carefully, and always eject it safely. Once setup is complete, your SuperBox will have more room for the content and apps that matter to you—without making everyday navigation more complicated.
If you are comparing current hardware, explore the SuperBox S7 collection or review the SuperBox S7 Pro vs. S8 Pro comparison. For customers who want to store recordings, our guide to recording shows on SuperBox S7 is a useful next read.
The article was updated on:
