
Knowledge SuperBox S8, Knowledge SuperBox
SuperBox S8 Max Unboxing and Setup: A Practical S8 Series Guide





A streaming box should be straightforward to set up, but a first-time installation can still raise practical questions: Which cable goes where? Should you connect with Wi-Fi or Ethernet? How do you pair the voice remote? And where do you install the apps shown on the SuperBox home screen?
This guide walks through those first steps for the SuperBox S8 Max, the model shown in this setup walkthrough. It is written for owners who want to get from opening the box to using the S8 interface without guessing. The S8 Max shown has 4GB of RAM and 64GB of internal storage. The S8 Series includes the S8 Pro, S8 Plus, S8 Max, and S8 Ultra. This guide focuses on the S8 Max; check the label on your own device and compare model-specific specifications, ports, remotes, and included accessories before following details that may differ.
The overall process is simple: check the package, position the device, connect HDMI and power, join the internet, pair the remote, and install the apps you need. Take the steps in order and you can catch most setup issues before they become frustrating.
Quick setup: Connect the S8 Max to your TV with HDMI, attach the included power supply, choose that HDMI input on your TV, connect by Wi-Fi or Ethernet, pair the voice remote when prompted, then open the App Store to install compatible SuperBox apps.
What Comes in the SuperBox S8 Max Box?
Before connecting anything, place the contents on a clear surface and check that you can identify each item. The unboxing shows the S8 Max unit, voice-command remote, power supply, HDMI cable, and user guide. The box also has two external antennas attached to the unit in the setup shown.
Keep the power supply and HDMI cable together with the box. If you are installing the device behind a television or inside a cabinet, make sure there is enough room for the cables and that the antennas are not pressed against the wall. A little space makes the connections easier to reach if you later need to change the network or move the box.
Package contents can change by model, seller, or production batch. If a listed item is missing, compare what you received with the current product listing and contact the seller before substituting an unverified adapter.
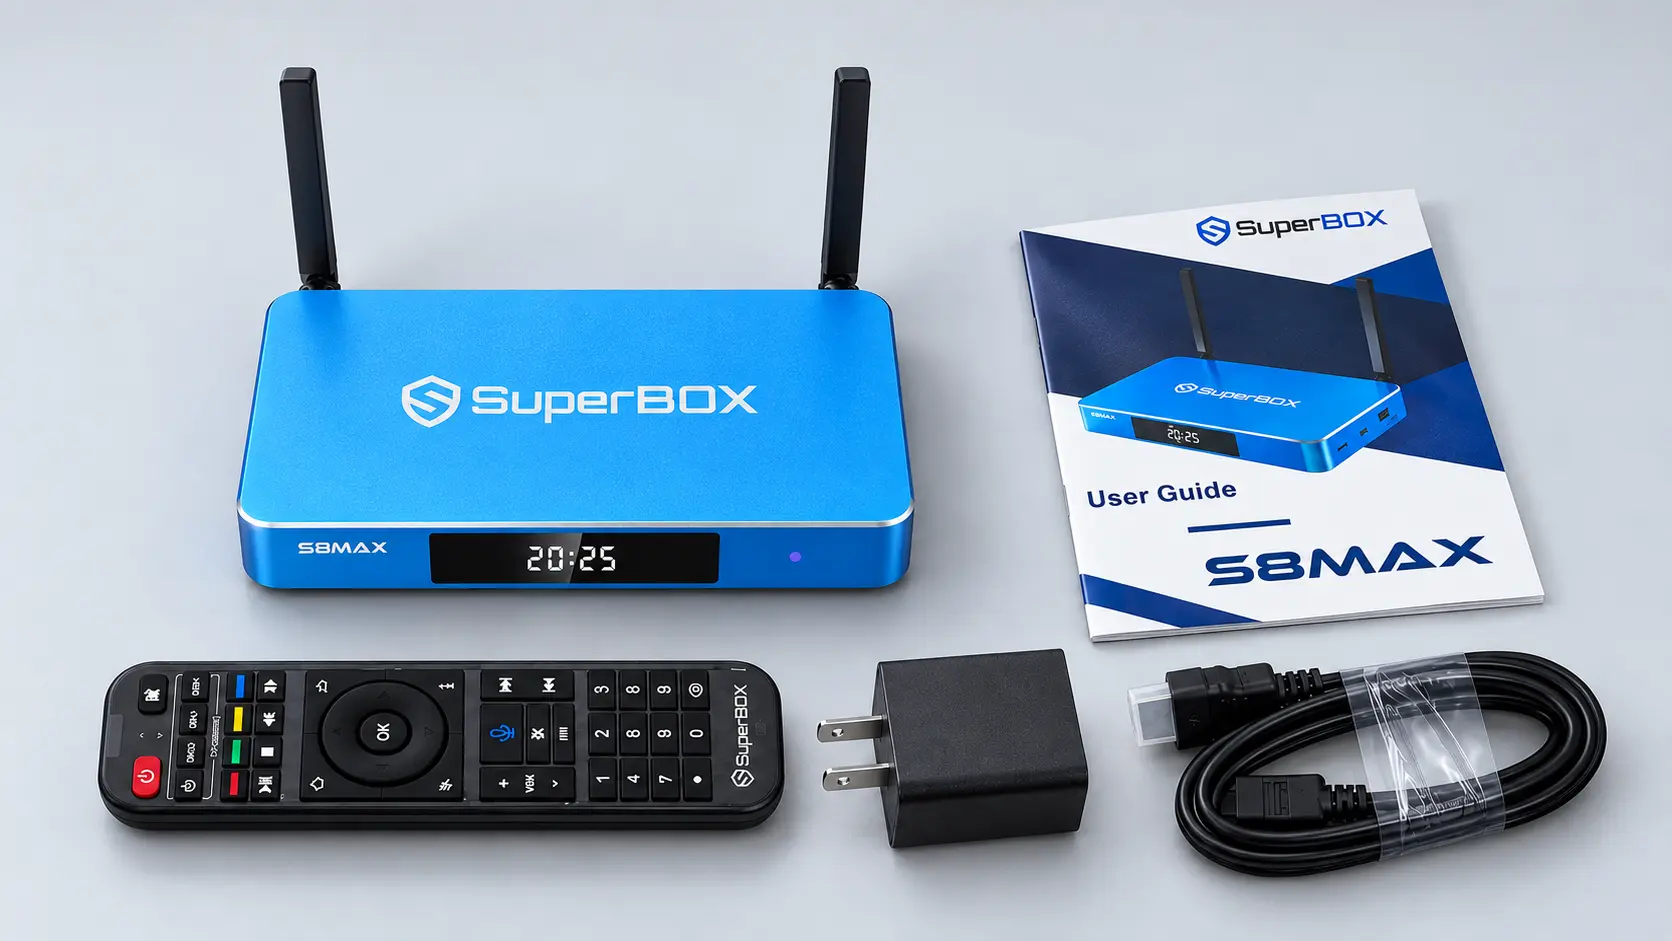
Identify the Ports Before You Plug In
Look at the back of the S8 Max before placing it beside or behind your TV. The device has the connections needed for display, power, wired networking, and compatible accessories. The S8 Max configuration uses USB-C and USB 3.0, with a Type-C power connection; its product information also lists Wi-Fi 6 and 1000 Mbps Gigabit Ethernet. Confirm the markings on your own device before plugging anything in. Port layouts differ across S8 models, and an animation or diagram may not match the physical port layout of every model.
For basic setup, you only need the HDMI connection, power input, and one network connection. Use either Wi-Fi or Ethernet; you do not need both to finish initial setup. Leave accessory ports free until the box is running and you know what you want to connect.
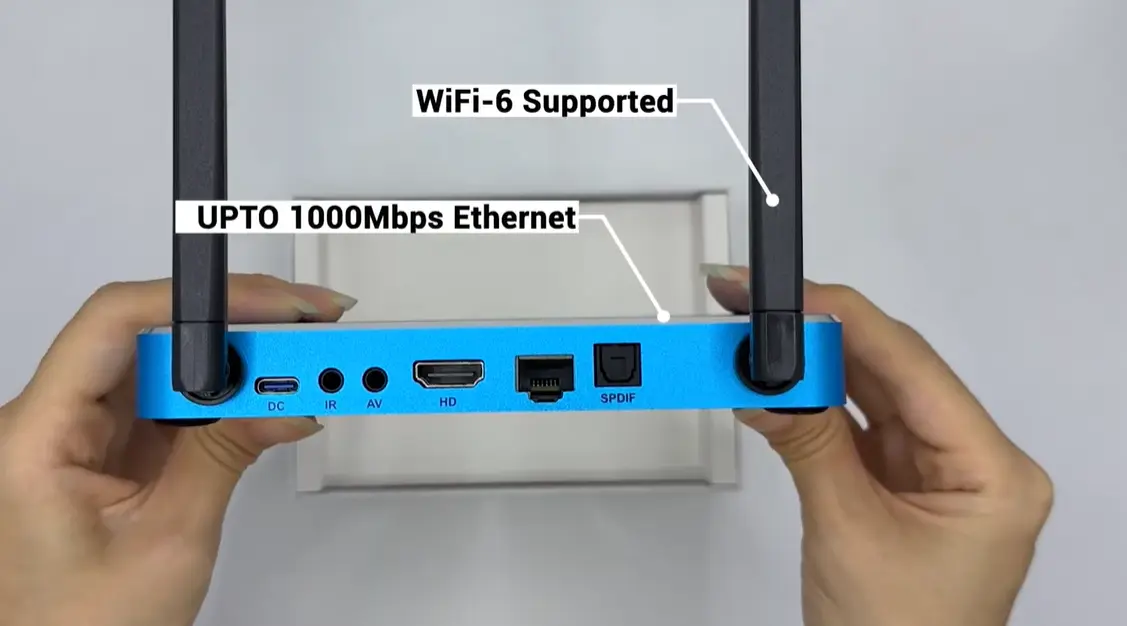
Check Which S8 Model You Have Before Connecting Power
The S8 Series has four configurations: S8 Pro, S8 Plus, S8 Max, and S8 Ultra. Several setup screens and core apps may look similar, but the hardware is not identical. Confirm your model on its label and use the power cable supplied for that model. This matters because the Plus use a round power connector, while the Pro, Max and Ultra use Type-C power. Do not force a plug into a port because it looks close.
| S8 model | Internal storage | USB and power layout | Performance Speed tier | Remote and viewing distinctions |
|---|---|---|---|---|
| S8 Pro | 32GB | USB-C + USB 3.0; Type-C power | Essential | Voice command; PPV/ESPN Multi-Viewing; no NFL app |
| S8 Plus | 64GB | USB 2.0 + USB 3.0; round power | Standard | Voice command; PPV/ESPN Multi-Viewing; no NFL app |
| S8 Max | 64GB | USB-C + USB 3.0; Type-C power | High | Voice command; full supported Multi-Viewing; NFL app |
| S8 Ultra | 128GB | USB-C + USB 3.0; Type-C power | Premium | Backlit voice remote; full supported Multi-Viewing; NFL app |
The blog demonstrates the Max. If you have a Plus, the software flow may look similar, but confirm its round power connector and USB labels before connecting equipment. For a model-by-model feature breakdown, see the S8 Series comparison guide.
What the S8 Max Specifications Mean in Everyday Use
The S8 Max is shown with 4GB of RAM and 64GB of internal storage. RAM supports system and app tasks; storage holds the operating system, apps, and supported local recordings. The full advertised capacity is not available for recordings alone, so leave room for installed apps and check remaining space if you use Video Recorder.
The box lists Wi-Fi 6 and 1000 Mbps Ethernet for wireless or wired networking. These standards do not guarantee a particular internet speed or buffer-free viewing; results depend on your router, internet plan, connection path, and app. Ethernet is convenient when the router is nearby, while Wi-Fi avoids running a cable.
The product information lists H.265 decoding up to 6K and 4K playback on compatible sources and displays. That does not make every program or television 6K: source, app, HDMI path, and screen capability affect the output. For setup, confirm the home screen looks clear, then test supported content on your TV.
Step 1: Connect the S8 Max to Your TV
- Place the SuperBox near the TV, with the back panel accessible and the antennas upright.
- Connect one end of the included HDMI cable to the S8 Max and the other end to an available HDMI input on your television.
- Connect the supplied power cable to the box and then to a suitable power outlet.
- Turn on the TV and use its Input or Source control to select the HDMI port connected to the SuperBox.
You should now see the SuperBox setup screen. If the TV shows “No Signal,” first confirm the selected HDMI input matches the port you used. Then check that both ends of the HDMI cable are seated and that the power connection is secure. If your television has multiple HDMI ports, try the one you connected and verify the TV is not still set to another source.
Do not pull the box by its cables when adjusting its position. If you need to move it, hold the device and disconnect the cable gently.
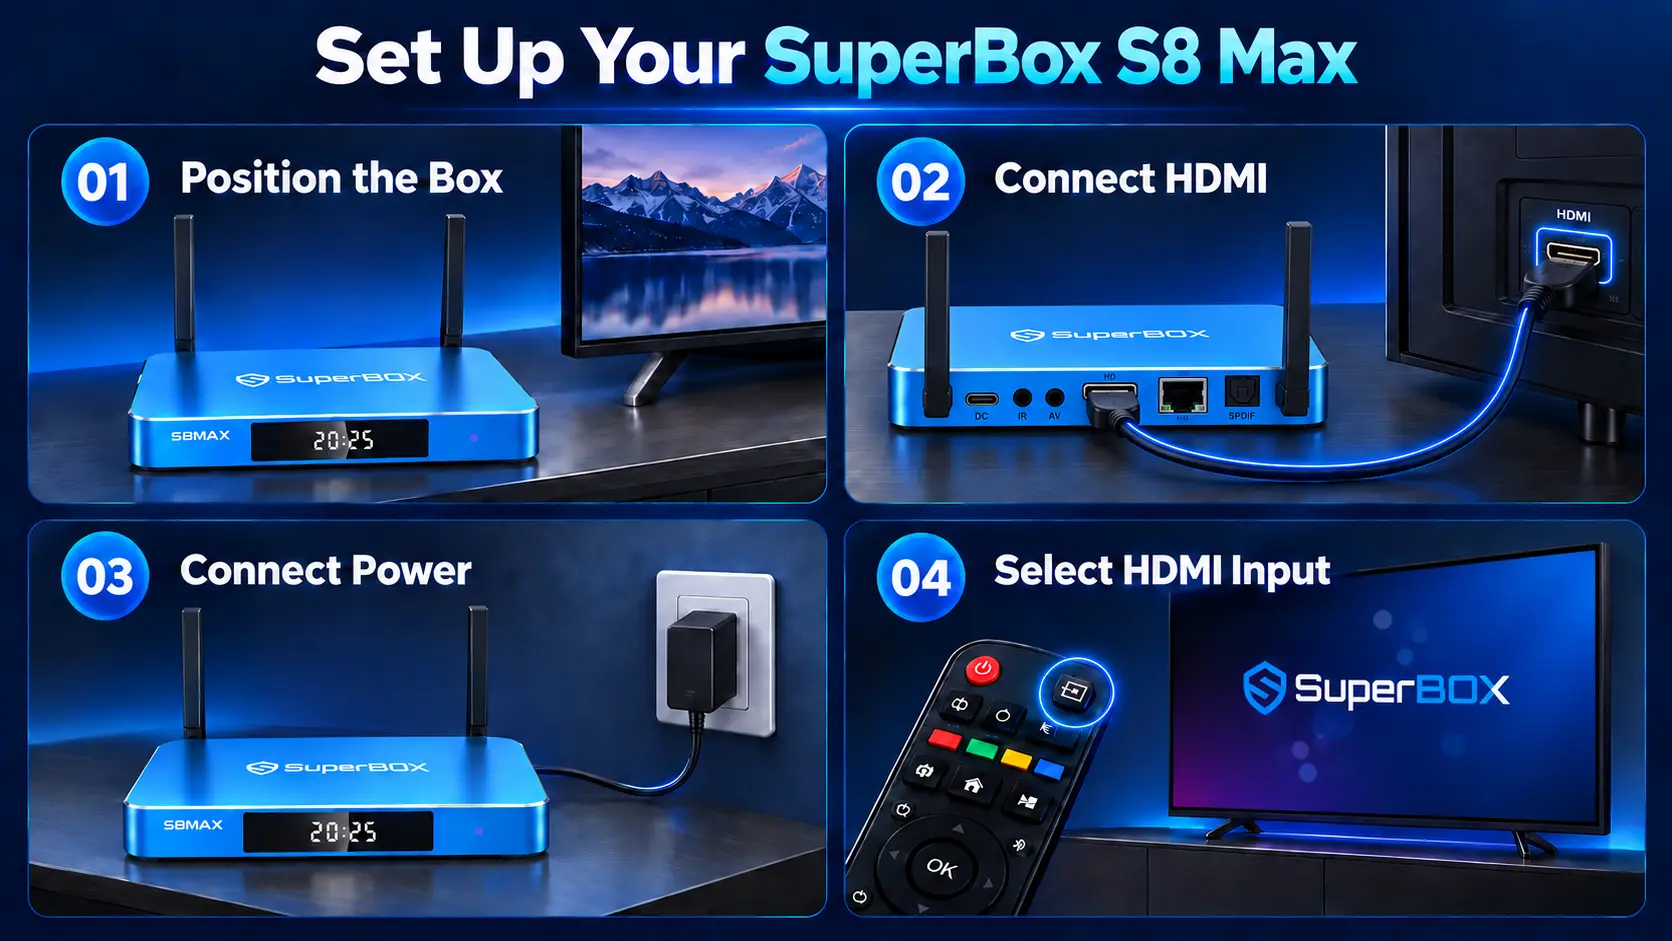
Step 2: Connect to Wi-Fi or Ethernet
The setup wizard offers a network step. Choose Wi-Fi if you want a wireless installation, or Ethernet if your router is close enough for a cable connection. The S8 Max packaging identifies Wi-Fi 6 support and Gigabit Ethernet; your actual connection still depends on your router, internet service, network conditions, and the route to the device.
Connect with Wi-Fi
- On the network screen, select Wi-Fi.
- Choose your home network from the list.
- Enter the Wi-Fi password carefully, paying attention to capital letters and symbols.
- Select Connect and wait for the screen to confirm the connection.
- Continue to the next setup step once the network is connected.
If the network name does not appear, check that the router is on and that the box is within a useful range. Recheck the selected network and password if the connection fails. A password typo is easy to make with an on-screen keyboard, especially when it contains similar-looking characters.
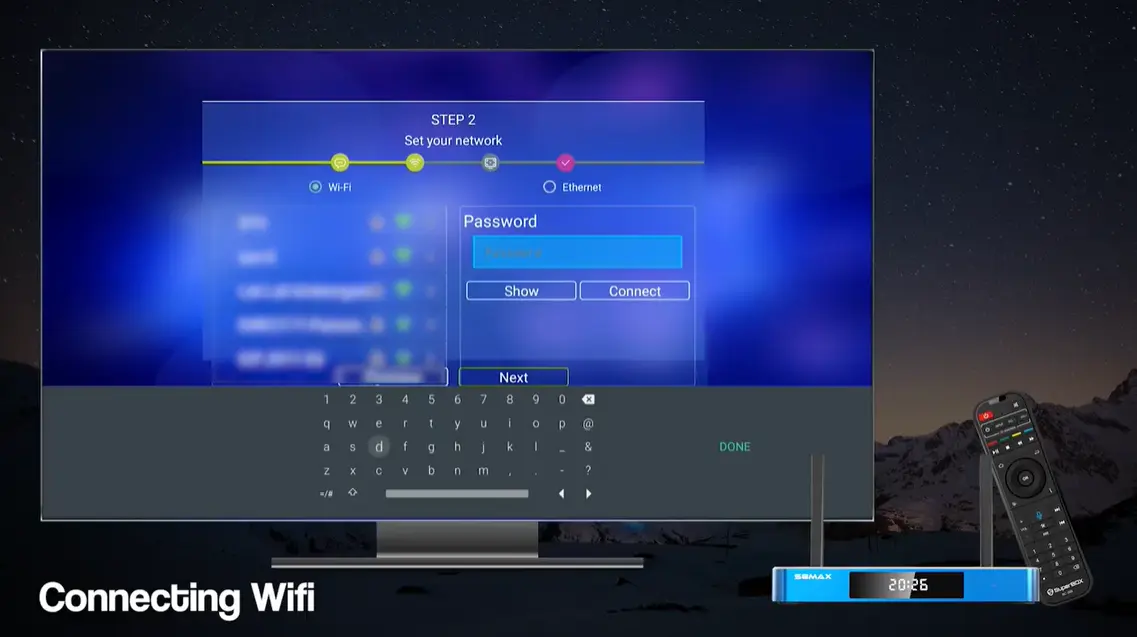
Connect with Ethernet
If you prefer a wired connection, connect an Ethernet cable from your router to the Ethernet port on the SuperBox. Return to the network setup screen and choose the wired connection option if it is presented. The on-screen wizard should show whether the box has connected before you proceed.
Choose one method to start. If you change from Wi-Fi to Ethernet, give the box a moment to update its connection status before testing an app.
If Wi-Fi or Ethernet Does Not Connect
Check the simple points before repeating the entire setup:
- Make sure the router is powered on and the network is available to another device in the same room.
- For Wi-Fi, select the intended network again and re-enter its password rather than assuming the first attempt saved correctly.
- For Ethernet, check that the cable is fully seated at both ends and connected to the S8 Max Ethernet port, not an adjacent USB or optical port.
- If the setup screen confirms a connection, continue to the next step and test an app. If it does not, switch to the other connection method if practical.
Do not post your Wi-Fi password in a support message or screenshot. If you ask for help, share the wording of the error and whether you selected Wi-Fi or Ethernet; keep network credentials private.
Step 3: Pair the SuperBox Voice Remote
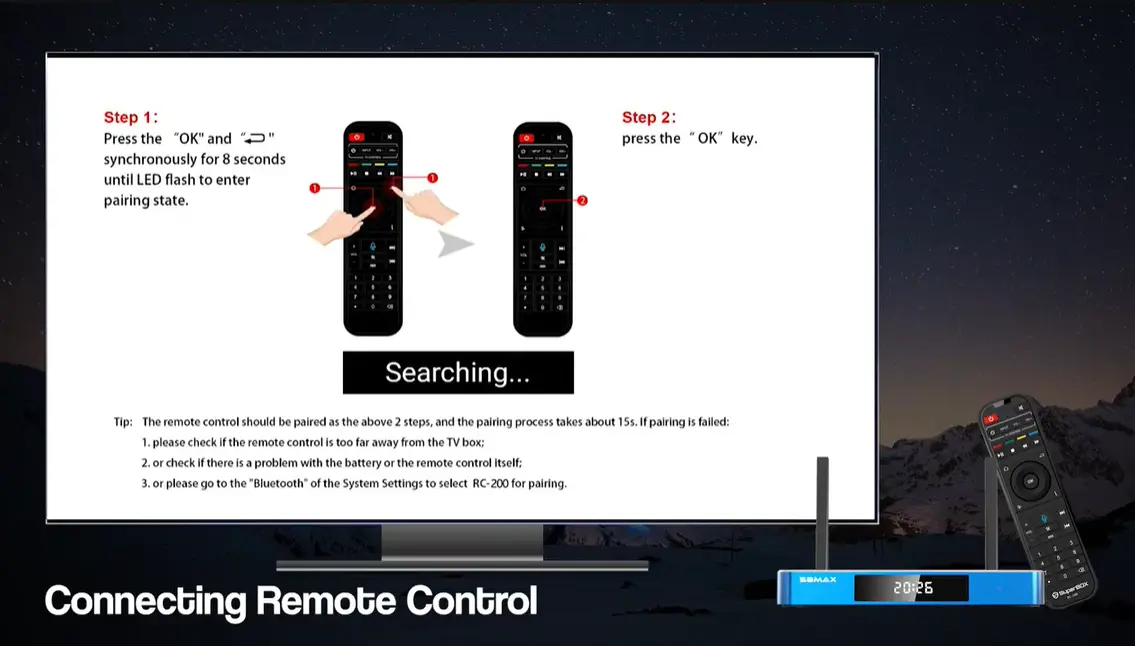
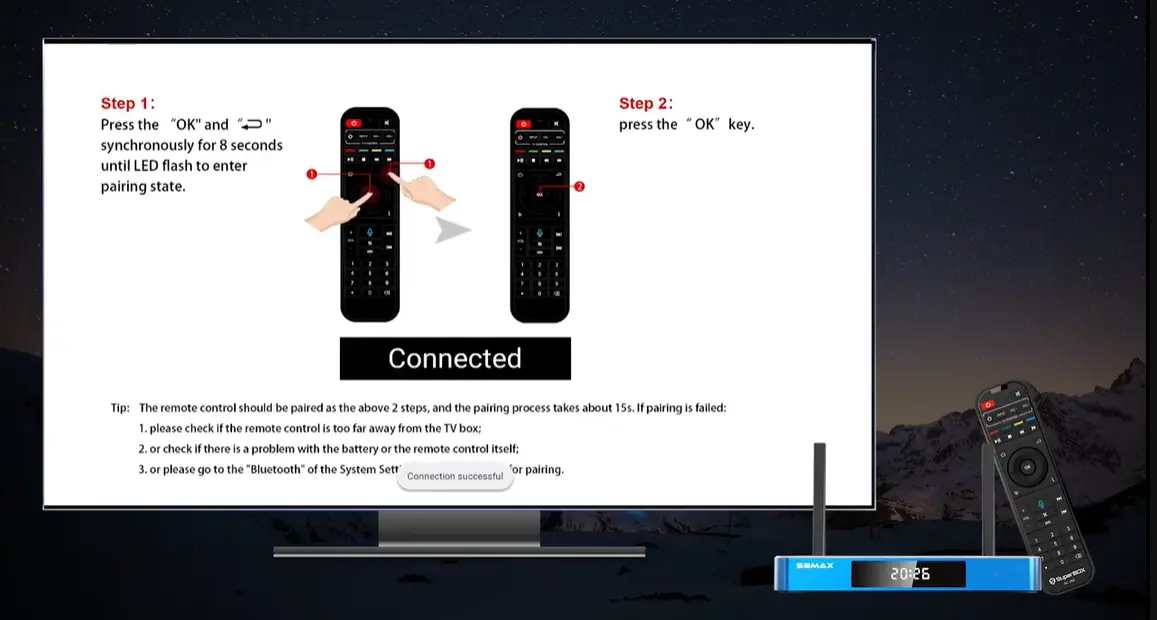
During first-time setup, the interface displays a remote-pairing prompt. Keep the remote near the S8 Max and follow the pairing instruction shown on screen. In the S8 Max setup sequence, the pairing graphic says to hold OK and Return/Back together for about eight seconds, until the remote’s LED flashes, and then press OK once. The screen changes from Searching… to Pairing… while the connection is made.
Wait for the pairing process to finish before pressing several buttons. The setup instructions indicate that pairing can take about 15 seconds. Once the remote is connected, test the directional pad and OK button by moving the highlight on the screen and selecting an item.
If the remote does not pair, keep it close to the box and repeat the on-screen sequence. Check that the batteries are installed and have charge. If the first-time prompt does not work, the setup slide also points to System Settings → Bluetooth, where you can select RC-200 to pair. Menu names can vary slightly by software version, so use the closest matching Bluetooth option shown on your S8 interface.
How to Tell Whether Pairing Worked
A flashing LED means the remote has entered the process; it does not by itself confirm that the box has completed pairing. Wait for the interface to move past its Searching or Pairing state, then use the directional pad to move between options. Press OK once to open a highlighted item. If navigation works but voice search does not, first finish ordinary setup and test voice commands in a compatible search field; do not repeat pairing if the basic controls already respond.
If the box is already at its home screen and there is no pairing prompt, use the Bluetooth route described above rather than repeatedly holding buttons at random. When contacting support, say whether the screen showed Searching, Pairing, or a completed connection, and whether the remote LED flashed. That symptom detail helps distinguish a pairing step from a battery or remote problem.
Step 4: Open the App Store and Install the Apps You Want
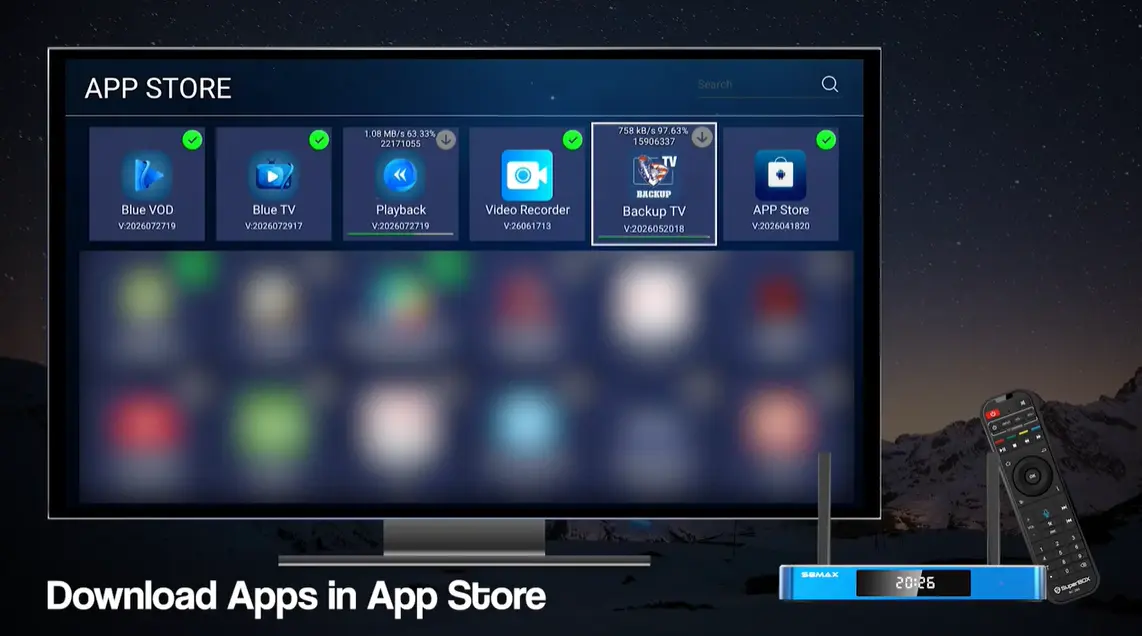
After internet and remote setup are complete, go to the App Store tile on the S8 home interface. When opening the store, read the displayed disclaimer and choose the on-screen confirmation button to continue. The store view in the setup shows dedicated tiles for apps such as Blue TV, Blue VOD, Playback, Video Recorder, and Backup TV.
Select an app tile to view its available action. If it is not already installed, choose the install or download option and wait for the progress indicator to finish. Avoid interrupting the installation by unplugging the box or switching off the TV before the download completes. When installation is done, open the app from its tile or return to the home screen and select it there.
Install only the apps you plan to use first. This makes it easier to confirm each one opens properly and avoids downloading several apps at once while you are still checking the internet connection. The S8 Max shown has 64GB of internal storage, but installed apps, system data, and recordings all use available space. Keep storage in mind if you plan to record or save content locally.
App catalogs and availability can change. Use the App Store supplied on the device and read any terms displayed by the app or service.
If an App Is Missing or the Download Seems Stuck
Start by checking the status shown on the app card. A tile with an install/download action is different from a tile with an installed check mark. Select the intended app and wait for its progress indicator to finish before leaving the store. If the screen appears unchanged, confirm that the S8 Max is still online, wait briefly, and open the App Store again to check the status before starting another installation.
If an app has installed but is not on the home screen, look through the available apps or shortcuts rather than downloading it repeatedly. The S8 App Store and the home-screen app row serve related but different purposes: the store is where you obtain compatible apps; the home screen is where you launch or organize the apps available on your box. For a fuller walkthrough of installing and arranging apps, see How to Install Blue TV, Blue VOD, Playback, and More Apps on SuperBox S8.
If the App Store displays an error, record the exact message and check the network first. Avoid installing random files from unfamiliar websites to replace an app that is missing from the store. Use the device’s supplied App Store or ask the seller’s technical support team which next step applies to your model and software version.
Make the New S8 Interface Easier to Use
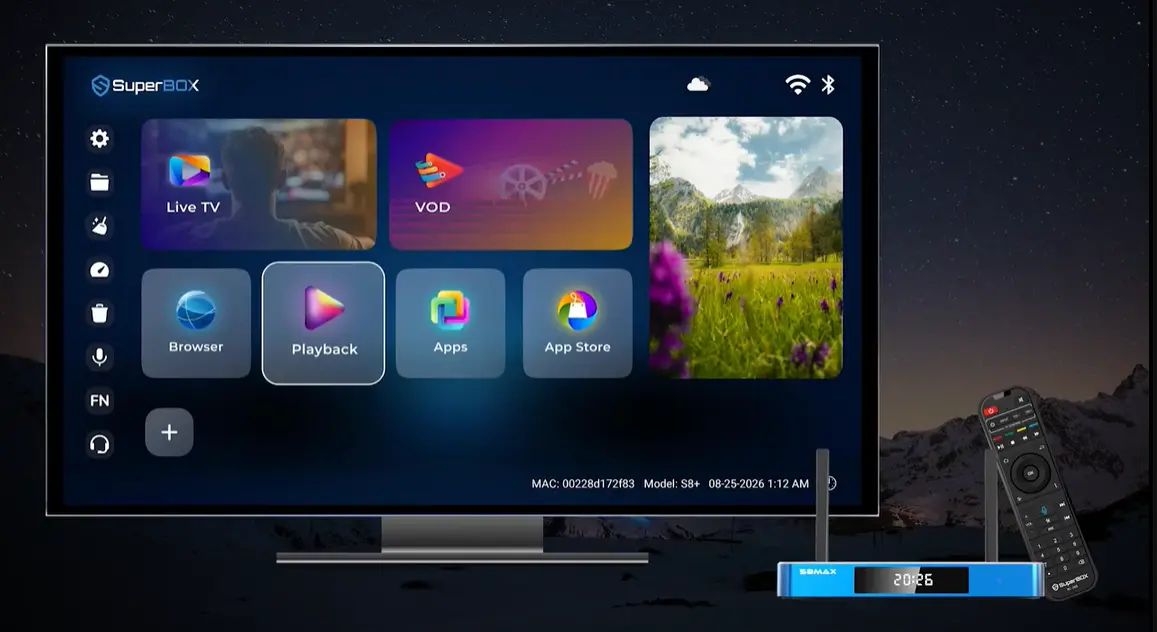
Once the apps you want are installed, learn the home screen. Use the directional pad to move between sections and press OK to open the highlighted item. Test one app at a time so you can tell an app problem from a remote or network issue.
A helpful first-use routine is:
- Open each installed app once to confirm it loads.
- Keep the remote pointed toward the screen while navigating and check that button presses register.
- Note which app is used for each kind of viewing so household members can return to it easily.
- If an app requests an update or additional setup, follow its displayed instructions and terms.
- Keep the S8 Max where its connections and antennas are accessible rather than sealing it behind other equipment.
The redesigned S8 interface groups setup and app access on one device. Tile order and options can change with software updates; another S8 model or build may show slightly different screens.
A Short First-Run Test
Before settling in, test remote navigation, open one installed app, and confirm the App Store responds. If the box is on Wi-Fi, confirm it remains connected after leaving the setup wizard; if using Ethernet, check the cable is seated. Keep the remote, supplied power adapter, and guide somewhere accessible. This quick check tells you whether a later issue is with the network, one app, or the remote itself.
Quick Troubleshooting During First Setup
| What you see | What to check first |
|---|---|
| TV says “No Signal” | Confirm the TV is on the HDMI input connected to the box; reseat HDMI and check power. |
| Wi-Fi is not connecting | Re-select the network and carefully re-enter the password. Try the Ethernet option if available. |
| Remote stays on “Searching…” | Keep it near the box, repeat the shown OK + Return/Back sequence, and check the batteries. |
| App Store download does not finish | Confirm the device has internet, wait for the progress indicator, then retry from the store if needed. |
| An app opens but does not load content | Confirm the network is connected and check whether the app displays a service-specific message. |
Work through one check at a time. If a problem persists, take a photo of the message on the TV and note which step you were completing. That gives the retailer’s technical support team useful context without having to repeat the whole setup from memory.
Frequently Asked Questions
How do I set up a SuperBox S8 Max for the first time?
Connect the S8 Max to your TV with HDMI and connect the supplied Type-C power cable. Select the matching HDMI input on your TV, follow the on-screen setup prompts, connect to Wi-Fi or Ethernet, pair the voice remote, and install the apps you want from the on-device App Store.
Does the SuperBox S8 Max use a Type-C power cable?
Yes. The S8 Max uses a Type-C power connection. Use the power supply included with your device, and check the model label before connecting an adapter. The S8 Plus uses a different, round power connector.
How do I connect the S8 Max to Wi-Fi?
On the network setup screen, select Wi-Fi, choose your home network, enter the password, and select Connect. Wait for the screen to confirm the connection before moving to the next setup step.
Can I connect the S8 Max to the internet with Ethernet?
Yes. Connect an Ethernet cable from your router to the S8 Max’s Ethernet port. Choose the wired connection option if the setup screen prompts you to select a network method, then wait for the connected status.
How do I pair the SuperBox S8 Max remote?
Keep the remote close to the box. When the pairing prompt appears, press and hold OK + Return/Back for about eight seconds, until the remote’s LED flashes. Then press OK once and wait for the pairing process to finish. Confirm that the screen shows a connected status before testing the buttons.
What should I do if the remote stays on “Searching”?
Keep the remote close to the S8 Max and follow the pairing instructions on screen again. Check that the batteries are installed correctly and have charge. If pairing still does not complete, the setup guide points to System Settings → Bluetooth, where you can select RC-200.
Where can I install Blue TV, Blue VOD, and Playback?
Open App Store from the S8 home interface. Select the app you want, choose its install or download option, and wait for the progress indicator to finish. The available app catalog may vary by software version or region.
Why is an installed app not showing on the S8 Max home screen?
First, confirm that the download completed in App Store. Then check the available apps or shortcuts on the home interface. An app’s installation status and its Home-screen shortcut are separate, so an installed app may need to be found or added through the interface.
How much storage does the SuperBox S8 Max have?
The S8 Max has 64GB of internal storage and 4GB of RAM. The system and installed apps use some storage, so the full 64GB is not available for recordings or other files. Check the remaining space if you use supported recording features.
Does the S8 Max support built-in recording?
The S8 Max feature list includes built-in recording. Recording depends on the program and app supporting the feature, and saved recordings use internal storage. Check available space and the on-screen options before recording.
What is the difference between the S8 Max and S8 Ultra?
Both models have 4GB of RAM, USB-C plus USB 3.0, Type-C power, the NFL app, and full supported Multi-Viewing. The S8 Max has 64GB of storage and a voice remote without backlit buttons; the S8 Ultra has 128GB and a backlit voice remote.
What should I check if my TV says “No Signal”?
Make sure the TV is set to the HDMI input connected to the S8 Max. Reseat the HDMI cable at both ends and check that the power cable is securely connected. If the TV has more than one HDMI port, confirm that you selected the correct one.
Buying the SuperBox S8 Series from SuperBox TV Box Store
If you are choosing a device, SuperBox TV Box Store lists the S8 Series, including the S8 Max. Check the live product listing for current configuration, price, stock, package details, and terms; availability can change.
SuperBox TV Box Store identifies itself as an authorized online SuperBox retailer and publishes contacts for order questions and technical support. Review its current warranty, return, and shipping terms, and keep your order confirmation. That gives you a clear store contact for model-selection questions before purchase and setup help after delivery.
Choose the model that fits your setup. Compare storage, remote, ports, and live price; ask the shop if you are unsure whether a feature or accessory applies to your model.
For a more confident order, verify three details on the live listing: the exact model name, the included power connection and remote, and the current fulfillment/return terms. SuperBox TV Box Store presents itself as an authorized SuperBox retailer and provides order and technical-support contact information. That gives buyers a direct place to ask about a model or setup question before checkout and a support route to use after delivery.
The article was updated on:
